 Shortcuts allow you to insert text; open web pages, files, folders, and applications; automate key presses; and run automations using scripting. This guide is an overview of the different types of shortcuts available on the nVoq platform, and offers examples of each for you to view.
Insert Text
Shortcuts that insert text are for you if you:
- Type the same things over and over again each day-from a single sentence to your signature block.
- Type or copy paragraphs from other documents.
- Want to include variable text in your transcript. (See Environment Variables)
Open Web Pages
This type of shortcut does not run on any current nVoq client.
Shortcuts that open web pages are for you if you:
- Visit the same web pages over and over again
- Have to click, click, and click again to navigate to the information you need
- Access local or network files with your web browser.
Open Files, Folders and Applications
This type of shortcut does not run on any current nVoq client.
Shortcuts that open files, folders, and applications are for you if you:
- Open the same documents and folders over and over again
- Have to click multiple times to navigate to information you need
- Open the same applications every day
Provide a fully qualified path. Spaces in paths are allowed.
- WINDOWS:
C:\Windows\System32\notepad.exe - WINDOWS:
C:\Program Files\Microsoft Office 15\root\office15\EXCEL.EXE
Provide a network path.
- WINDOWS:
\\mynetworkhost\Training\MyCompanyUniversity - WINDOWS:
\\user_apps\Programs\Setup.exe
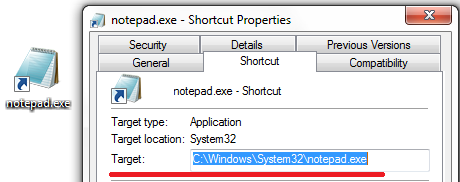
Tips for Finding a Path
Use Windows Explorer to browse to an item, then copy the path and name.- Example:
C:\Windows\System32 - Example:
C:\Windows\System32\notepad.exe
Application Parameters (Optional)
Many applications include support for "parameters" (also known as application arguments, command-line switches, or command-line arguments) that provide additional information to an application when it starts.
Examples with Parameters
Parameters are application-specific. To find information on parameters for your application, try a web search using the name of your application along with following terms: application parameters, application arguments, command-line switches, or command-line arguments.
Parameters with spaces must be quoted (either single or double quotes are OK).
In the following examples, the parameters are shown in red:
Open a file and interpret with ANSI encoding:
- Example:
C:\Windows\System32\notepad.exe /A myFile.txt
Open a file in read-only mode:
- Example:
C:\Program Files\Microsoft Office 15\root\office15\EXCEL.EXE /r "C:\my File.xlsx"
Open a file with a specific program:
- Example:
C:\Windows\System32\notepad++.exe myFile.txt
Open a web page with a specific browser:
TIP: Put the path to the browser as the Written Form, and put the URL to the web page as the application parameter.
- Example:
C:\ProgramData\Microsoft\Windows\Start Menu\Programs\Firefox https://support.nvoq.com/nvoq-dictation
Keyboard Automations
This type of shortcut does not run on any current nVoq client.
Shortcuts that simulate keyboard input are for you if you:
- Use the Tab key, directional arrows, or click multiple times to navigate through forms, menus, and dialogs
- Don't use keyboard shortcuts and hotkeys because they are too hard to remember.
For example, in some spreadsheet applications, the following key sequence fills the current cell with yellow: ALT, H, H, DOWN, DOWN, DOWN, DOWN, DOWN, DOWN, DOWN, DOWN, RIGHT, RIGHT, RIGHT. But that's a lot of keys to remember and type in.
In a Firefox browser, open a new tab:
Alt F, T
In Windows 10, open onscreen keyboard:
WINDOWS Ctrl O
In a text field or document, highlight the previous word and delete it.
shift ctrl LEFT, DELETE
Send("+^{LEFT}")
Send("{DELETE}")
In Microsoft Outlook, open a new message, type into the subject line (My Subject) and type some text in the body of the message (This is an example.)
ALT, H, N, TAB, TAB, SHIFT M, y, SPACE, SHIFT S, u, b, j, e, c, t, TAB, SHIFT T, h, i, s, SPACE, i, s, SPACE, a, n, SPACE, e, x, a, m, p, l, e, PERIOD
How Do I Enter Keys?
Generally, enter a key (e) or a key combination (Shift S) separated by a comma (,) as shown in the examples above.
All characters on US English keyboard are allowed in a keyboard automation. Characters that are not on a US English keyboard (like ø, Æ, or þ) are automatically removed when you save the shortcut.
nVoq Administrator includes a key recorder to make creating keyboard automations easier.
Be sure to test your shortcut as you're working to quickly find problems or where you might need to add delays.
SHIFT key may not be recognized while running automations if the Num Lock key is enabled. As a work-around, run your keyboard automation with Num Lock disabled. UP, DOWN, RIGHT, and LEFT arrow keys may be recognized as NUMPAD8, NUMPAD2, NUMPAD 6, and NUMPAD4 (respectively) when Num Lock is enabled. As a work-around you can run keyboard automations with Num Lock disabled, or you can use a Workflow Automation shortcut that includes the command Send("+^{LEFT}") in place of LEFT. Why Do I Need a Delay?
A delay adds a brief pause before sending the next key(s). In some cases a shortcut client can send simulated keystrokes faster than your application, computer, or network can respond.
If your shortcut doesn't work as expected, you may need to add a delay to pause your shortcut while your application or computer catches up.
Each single "delay" = 200 milliseconds (5 delays = 1000 milliseconds or 1 second).
- You can add multiple "delays" or you can put an equal sign after a delay (
delay=) with a specific time parameter after it to specify the length of a delay.For example: delay=1000is a 1 second delay.You may specify a delay up to 120000milliseconds (2 minutes).
Delay Examples
- Default Delay:
WINDOWS, UP, delay, RIGHT - Multiple Delays:
WINDOWS, UP, delay, delay, delay, delay, delay, RIGHT - Time-specified delay:
WINDOWS, UP, delay=1000,RIGHT
Known Limitations of Keyboard Automations
- Keyboard automations have a 900,000 character limit. (A character is a typed symbol, not a keystroke. For example, "SHIFT" is 5 characters, even though it is 1 keystroke.)
- You cannot use your dictation or shortcut hotkeys in keyboard automations. (By default these are F2 and F3, but yours may be different.)
- Certain commands may be prohibited by your operating system. For example,
WINDOWS LorCtrl + Alt + DELETE. - Toggling the Num Lock key On or Off changes the behavior of other keys.
- The Insert a Key button only enters capital letters. To type lowercase, enter the key manually.
- The
SHIFTkey may not be recognized in automations if the Num Lock key is enabled. As a work-around, run your keyboard automation with Num Lock disabled. - Due to a defect in Java, the
UP,DOWN,RIGHT, andLEFTarrow keys may be recognized asNUMPAD8,NUMPAD2,NUMPAD 6, andNUMPAD4(respectively) when Num Lock is enabled. As a work-around you can run keyboard automations with Num Lock disabled, or you can use a Workflow Automation shortcut that includes the commandSend("+^{LEFT}")in place ofLEFT.
Workflow Automations
This type of shortcut does not run on any current nVoq client.
Workflow automations combine the ability to insert text and simulate keyboard input with scripting capabilities to automate repetitive tasks.
Shortcuts that automate workflow are for you if:
- Your work includes repetitive tasks
- You want to save time typing, opening web pages, launching applications and files, filling in repetitive information
- You want to be able to complete multiple tasks with a single command
Getting Started with Workflow Automations
Below is information to help you learn to write workflow automations.
- Workflow automations are built on AutoIt software. Scripts can be written in any text editor, and there are several tools available to help. See www.autoitscript.com for examples, tutorials, function lists, documentation, and tools for writing scripts.
- See also Known Limitations of Workflow Automations
Syntax at a Glance
Workflow automations are written using a BASIC-like scripting language. This table provides a few examples of workflow automation syntax.
I want to...
Add a comment to a script
Example Code Fragment: ; a semicolon indicates a comment
Note: Use a semicolon at the start of each line in a comment.
Start a program
Example Code Fragment: run ("notepad.exe")
Note: The run function can open programs such as Notepad.
Open a web page
Example Code Fragment: shellexecute ("www.nvoq.com")
Note: The shellexecute function can open a web page in your default web browser.
Open a file
Example Code Fragment: shellexecute ("C:\tmp\my_example.docx")
Note: The shellexecute function can open a file.
Simulate keyboard input
Example Code Fragment: send ("Hello {ENTER}")
Note: The send function can simulate typing, including keys such as ENTER or TAB.
Simulate repeated keyboard input
Example Code Fragment: send ("{TAB 4}")
Note: The send function can simulate typing the same key multiple times.
Simulate keyboard input of reserved characters
Example Code Fragment: send ("Use reserved characters like #, and !" , 1 )
Note: Function parameters configure the behavior of functions. In this example, reserved characters are sent as literals using the send function 1 parameter.
Simulate keyboard input and dynamic data
Example Code Fragment: send ("Thank you, " & $myName)
Note: Variables are supported and can be combined with stock text. See also Environment Variables.
Quickly simulate keyboard input
Example Code Fragment:
AutoItSetOption ("SendKeyDownDelay", 0)
AutoItSetOption ("SendKeyDelay", 0)
send("Here is a block of plain text")
Note: Options such as AutoItSetOption configure the behavior of your script.
Pause for a certain amount of time before doing the next action in a script
Example Code Fragment: sleep (3000)
Note: This sleep function hard codes a 3 second pause.
Paste Text from Clipboard
Example Code Fragment: send ("^v")
Note: If text is not already on the clipboard, you may have to add a sleep command like sleep ("100") before this command in the code.
Wait for a particular window to open before doing the next action in a script
Example Code Fragment: WinWaitActive ("Gmail: Email from Google")
Note: The WinWaitActive function dynamically pauses the script until a named window is open and active.
About Timeouts
- In most cases, AutoIt functions provide timeout parameters that are appropriate for the function. For example, the MsgBox function includes a timeout parameter that causes it to exit after a specified time without user intervention.
- You can configure a script timeout by adding a single line comment with this keyword:
;nvoq-timeout-seconds: <seconds>
(For example:;nvoq-timeout-seconds: 30causes a script to exit after 30 seconds)- The comment can be added anywhere in the script.
- It must be on a line by itself.
- To disable the timeout entirely:
;nvoq-timeout-seconds: 0