Only administrators with an administrator role at the system level and tenant level administrators with access to Note Assist can see this page in nVoq Administrator.
Note Assist is offered as a premium feature and therefore is only visible to customers who have purchased it.
Use Note Assist in nVoq Administrator to design your own custom categories and reviews that give clinicians tailored, time-saving documentation support. Administrators with system- or tenant-level access can create, edit, or delete Note Assist categories and reviews for Voice users on Windows, Android, or iOS.
Note Assist in nVoq Voice is a premium feature that streamlines the documentation process by ensuring patient notes are complete and compliant. Clinicians can use Note Assist reviews to review notes for required categories, helping them meet documentation standards with ease.
Note Assist reviews are created here, but they're assigned on the Accounts page.
For information on assigning Note Assist reviews to multiple users at once on the Accounts page see Actions and then Update Note Assist. Reviews can also be assigned to individual users on the Edit Account page.
Note Assist Page Toolbar
Whether you are on the Reviews tab or the Categories tab of the Note Assist page, you have the same options in the toolbar.

Delete
When one or more reviews (on the Reviews tab) or categories (on the Categories tab) is selected using the checkmark to the left of the list item, the trash can icon will appear in the toolbar. Click the trash can icon to delete the selected reviews or categories.
New
Click on the plus symbol to create a new review (on the Reviews tab) or new category (on the Categories tab).
You must have at least one Category in order to save a new review.
Upload
Click on the upload symbol to create or upload a new review (on the Reviews tab) or new categories (on the Categories tab). Categories must exist before uploading a review that includes them.
On the Note Assist list view page, open the Reviews tab or Categories tab and click the Upload icon.
On the Upload Reviews or Upload Categories page, either:
Click Download template csv file to download a template and create your own file, or
Use a file downloaded from another tenant or system.
Note: Upload categories before uploading reviews.
Upload your CSV file by either:
Clicking Choose a file and browsing to the saved file, or
Dragging and dropping the file into the dotted upload box.
Enable the Overwrite existing toggle if you want to update an existing category or review with information from the upload file.
The system validates the file and checks for issues.
Click Save.
Upload Categories
Required columns for Category upload:
Category name - The name of the category to which the corresponding word or phrase belongs. Category names appear in Note Assist to indicate what information may be missing from a note.
Repeat the category name for each individual word or phrase included in the file, including each conditional word type entry.
Maximum length: 255 characters
Word - A word or short phrase that must appear in a note for the corresponding category to pass. Each word or phrase must be entered on its own line in the file.
All words and phrases must be entered in lowercase.
Word Type - The type of word or phrase:
simple = standard word or phrase
conditional = +AND/+OR words or phrases
If you are using conditional word types, we recommend creating the category on the Add Note Assist Category page and then downloading the file, rather than building the conditional structure manually in the CSV file.
Coaching tips (optional) - Optional coaching tips can be included for a category. When a review is run in nVoq Voice, these tips appear beneath any failing category name to help users understand what information is missing.
Maximum length: 100 characters
Upload Notes:
A category name without an associated word is ignored.
Duplicate words within the same category are skipped.
If the category name already exists, enable the Overwrite existing toggle to update the words and/or word types for that category with the information from the upload file.
A Category Name line without a word is ignored.
Upload Reviews
Required columns for review upload:
Review name - The name of the review to which the corresponding category belongs. This name should clearly identify the type of note or intended users, since end-users will see this name when selecting a review in Note Assist.
Repeat the review name for each category included in the file.
Maximum length: 255 characters
Description - Optional description for the review. Descriptions appear only in nVoq Administrator and can be used to store internal notes or reminders.
The Description column is required on the file, even if descriptions are left blank.
Maximum length: 255 characters
Category - The name of the category to include in the review. Categories must already exist in the system before the review file is uploaded.
Enabled - Controls whether the review is available for assignment to users. Reviews set to No do not appear on the Add/Edit Account or Update Accounts pages (so cannot be assigned to users).
Yes = Enabled
No = Disabled
Note: Files created or downloaded before Administrator version 20.2.0 do not include this column and will need to be updated before upload.
Upload Notes:
Categories must exist in the system before uploading a review that references them.
If a category listed in the file is not found, it is not added.
A review name without an associated category is ignored.
If a review name already exists, enable the Overwrite existing toggle to update the review description and/or categories with the information from the upload file.
If you receive the message “Nothing in the file survived validation,” verify that all category names in the file already exist in the system.
Download
Click the Download icon on the Reviews or Categories tab to download reviews or categories. Downloaded files can be used to upload reviews or categories to another tenant or system.
To download all reviews or categories, leave all items unselected and click the Download icon.
To download specific reviews or categories, select one or more items, click the Download icon, and choose Selected reviews or Selected categories.
To download a single review or category, open the item and click the Download icon on the Edit Review or Edit Category page.
Support Center
Click on the question mark icon in the blue bar to go directly to the online documentation for the Note Assist page (this page).
The black question mark icon at the top right of nVoq Administrator goes to the nVoq Administrator main help page.
Search
Use the Search field near the top-right (in the gray area) to search for a review (on the Reviews tab) or a category (on the Categories tab) by information in any of the columns. Enter all or part of a word or name. The search is case insensitive.
Note Assist Page Columns
The Note Assist page will list existing reviews (if any) on the Reviews tab, and existing categories (if any) on the Categories tab.
Click on any column header on the page to sort information in ascending or descending order. The sort order is retained after selecting a different organization in the organization menu. Additionally, sorting and scrolling location are remembered when leaving and returning to a page, even if you log out and back in.
Reviews Tab Columns

Review Icon / Checkbox - Hover your mouse over the review icon
 and click to put a checkmark in the box to select the review in order to perform an action on it from the blue toolbar. Once selected, the row turns green and has a checkmark on the left.
You can select multiple reviews by clicking on each icon and then perform actions available from the icons in the blue toolbar on all selected reviews.
You can select all reviews in the list by putting a checkmark in the box on the left side of the column headers (above the review icons).
Review Name - This is the name that was given to the review and it should clearly define what type of note or who should use the review, as it will be used by end-users to determine which review they select when running Note Assist. The name will appear in a drop-down menu at the top of Note Assist.
Description - This is optional information about this review. This information only appears in nVoq Administrator.
Categories - These are the categories assigned to this review in the order that they appear in Note Assist. A category is list of words or phrases that Note Assist looks for in a note to see if the note meets criteria.
Enabled - This column displays a "Yes" if the review active. A "No" means the review is disabled. A disabled review cannot be used in any nVoq product.
Actions -This is a menu of things that you can do with this review. Click the actions icon to open the menu and select an option:
Edit Review - Select this option to make changes to the review. See Edit Note Assist Review
Run Note Assist QA - Run a Note Assist review against clinical documentation downloaded from your system to see if those notes include review categories. See Run Note Assist QA
Delete - Select this option to permanently remove this review. See Delete a Review
Categories Tab Columns

Category Icon / Checkbox - Hover your mouse over the category icon
 and click to put a checkmark in the box to select the category in order to perform an action on it from the blue toolbar. Once selected, the row turns green and has a checkmark on the left.
You can select multiple categories by clicking on each icon and then perform actions available from the icons in the blue toolbar on all selected categories.
You can select all categories in the list by putting a checkmark in the box on the left side of the column headers (above the category icons).
Category Name - This is the name given to the category. It should clearly define the information that is needed so that end users understand what to add to the note when they see it. This name appears in Note Assist with either a checkmark or an X to indicate whether it is included in the note.
Coaching Tip - This is an optional statement that will appear in nVoq Voice after the category name when the category fails in the review. It should give clinicians an idea of what is missing from the note so they know what needs to be added in order for the category to pass.
Words - These are the words or phrases that Note Assist looks for to indicate that this category has been included in a note. A word (or short phrase) in an end user's note must be an exact, case-insensitive match with the word or phrase entered here in order to be counted as being included in the note. If the clinical note includes any of those words or phrases, Note Assist assigns a green checkmark for the entire category.
Actions -This is a menu of things that you can do with this category. Click the actions icon to open the menu and select an option:
Edit Category - Select this option to make changes to the category (except for the name).
Delete - Select this option to permanently remove this category.
Add or Edit a Review
Add a New Review
Before you can add a new review you must have at least one category.
Go to the Reviews tab on the Note Assist page.
Click the plus symbol
in the blue toolbar.

Edit an Existing Review
Go to the Reviews tab on the Note Assist page.
Click the Actions menu next to the review you want to change.
Select Edit Review.

Add/Edit Categories
Add a New Category
Go to the Categories tab on the Note Assist page.
Click the plus symbol
in the blue toolbar.

Edit Existing Categories
Go to the Categories tab on the Note Assist page.
Click the Actions menu next to the category you want to change.
Select Edit Category.
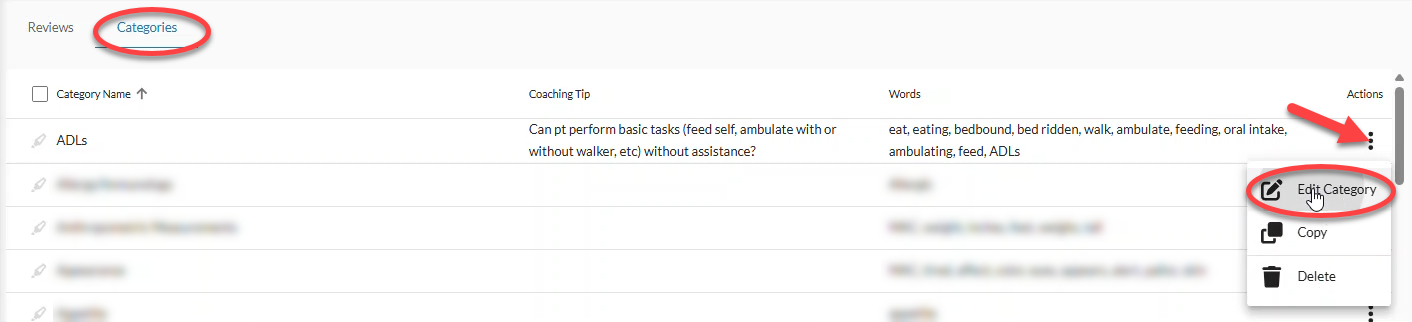
You cannot change the NAME of an existing category. If you need to change a name, you will need to create a new category and delete the original one.
Delete a Review
Go to the Reviews tab on the Note Assist page.

Click the Actions menu next to one review you want to delete and select Delete from the menu,
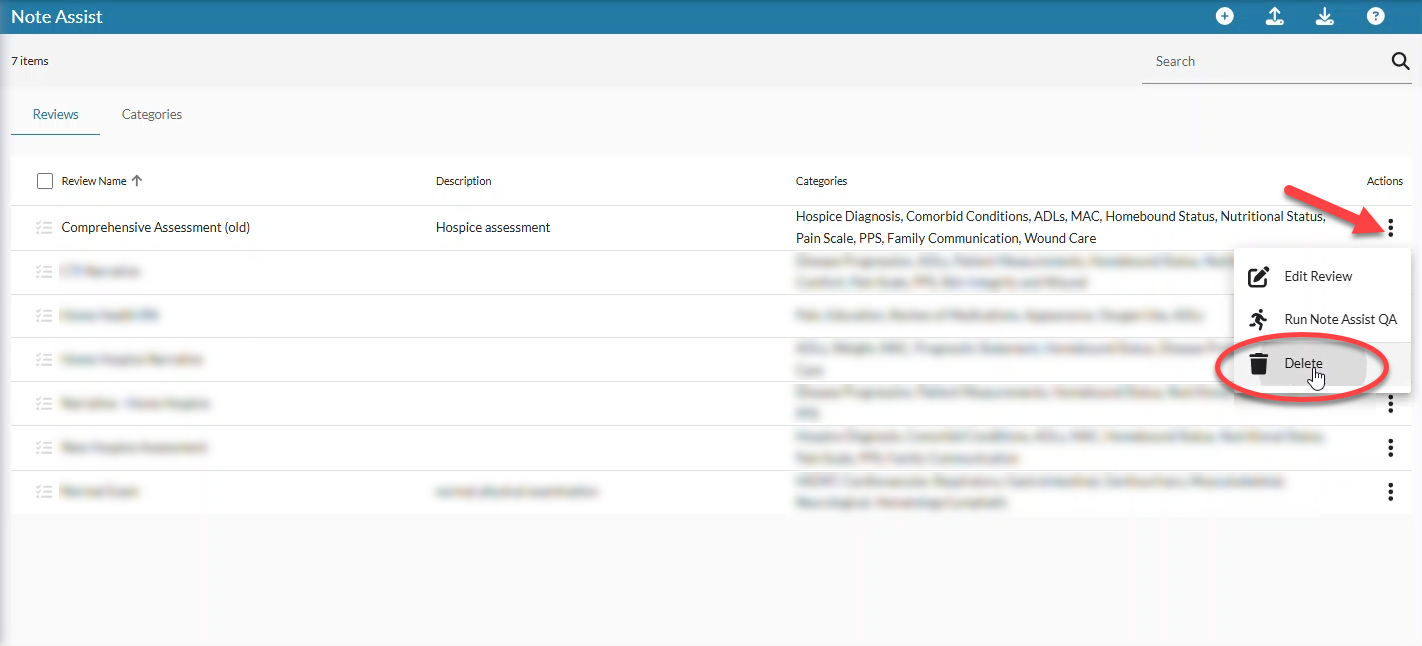
or select one or more reviews and then click the trash can icon in the blue toolbar.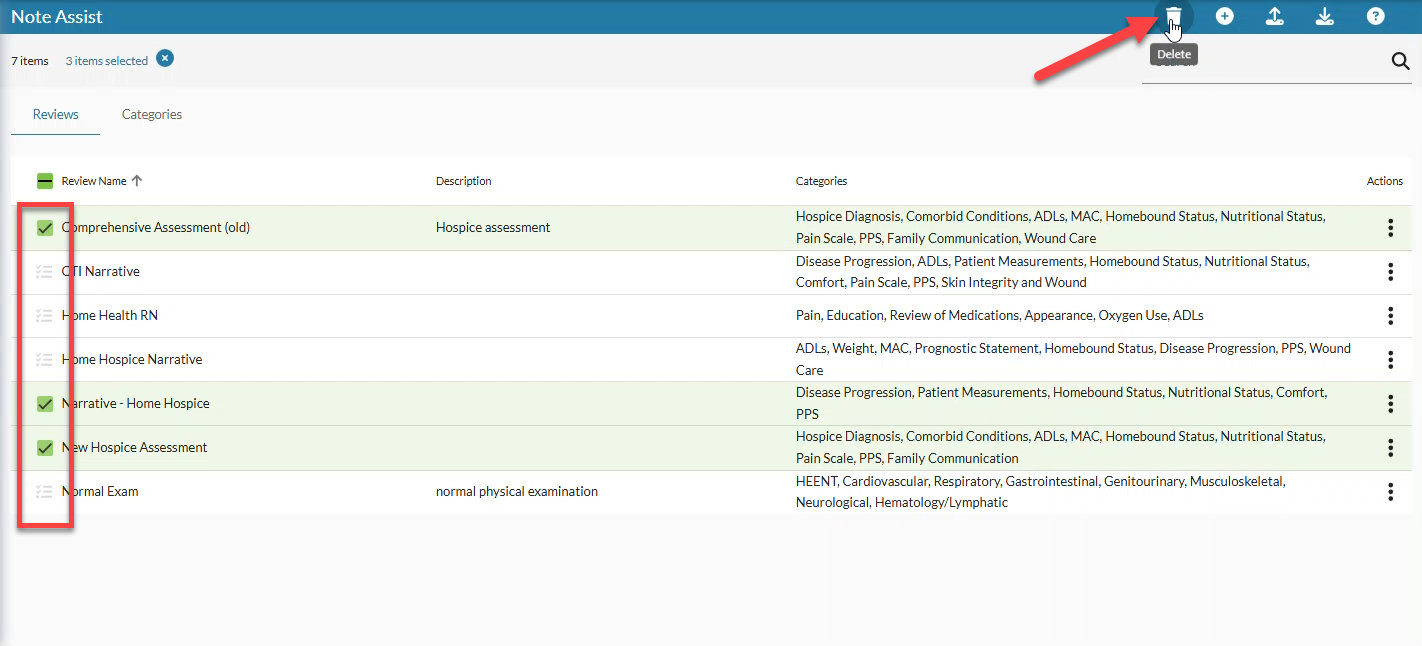
A confirmation message will appear to let you know how many reviews will be deleted, and that deleting reviews will permanently remove them. The ones that will be deleted are highlighted in green.
To delete them, click the Yes, delete reviews button.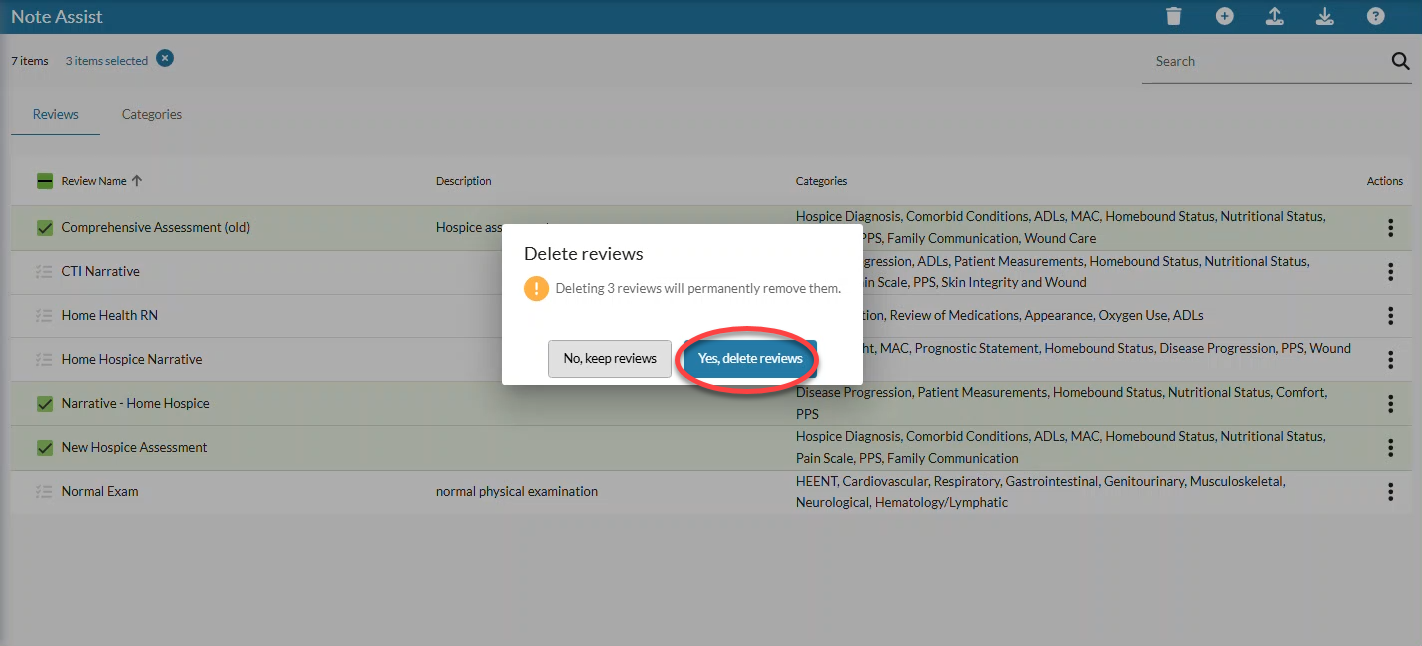
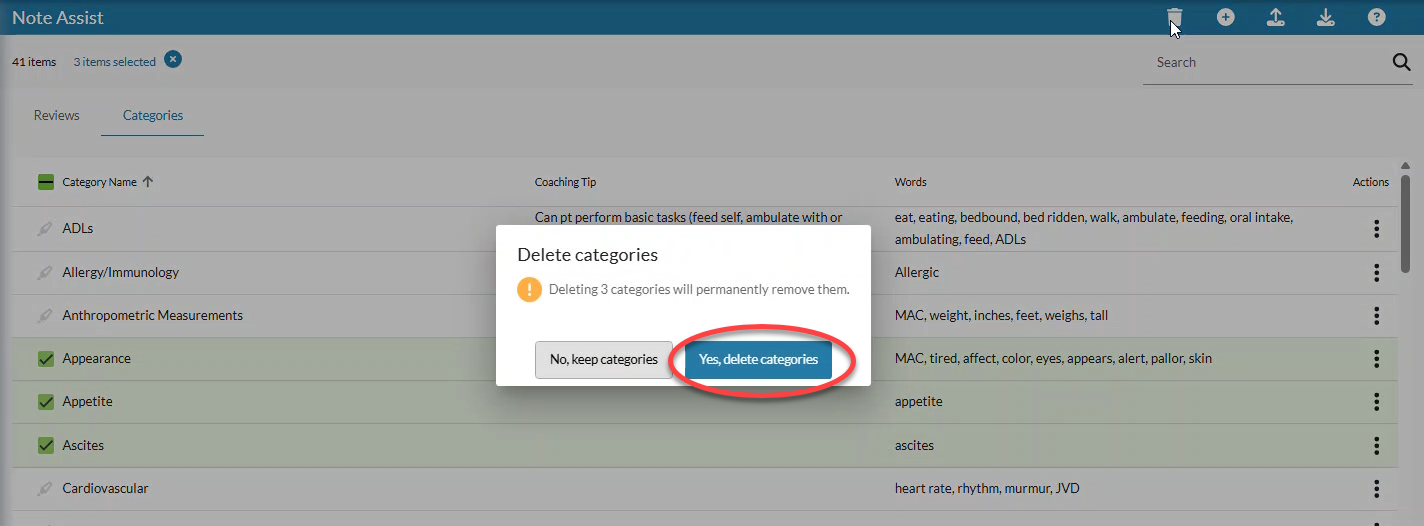
Delete a Category
Go to the Categories tab on the Note Assist page.

Click the Actions menu next to the category you want to delete and select Delete,
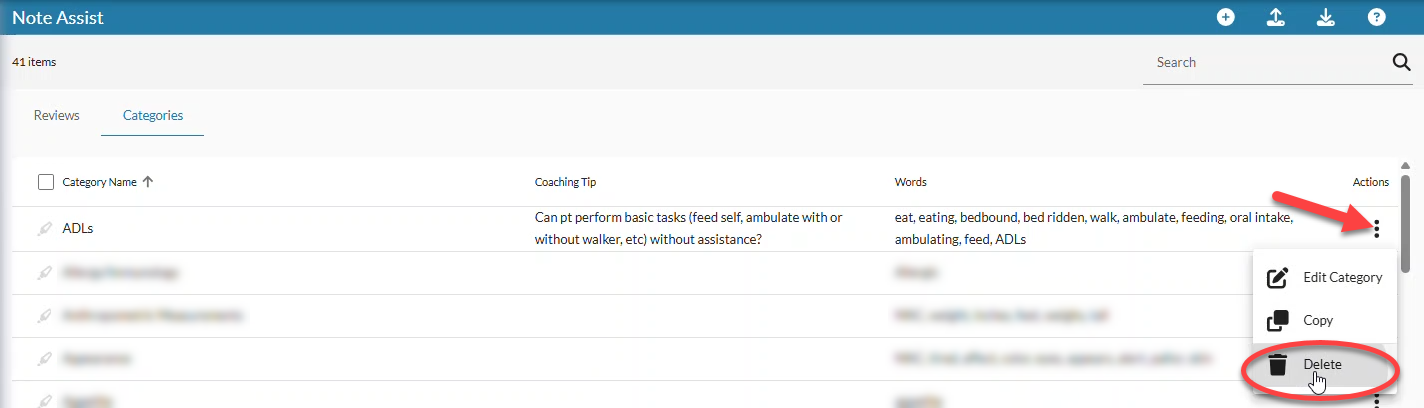
or select one or more categories and click the trash can icon in the blue toolbar.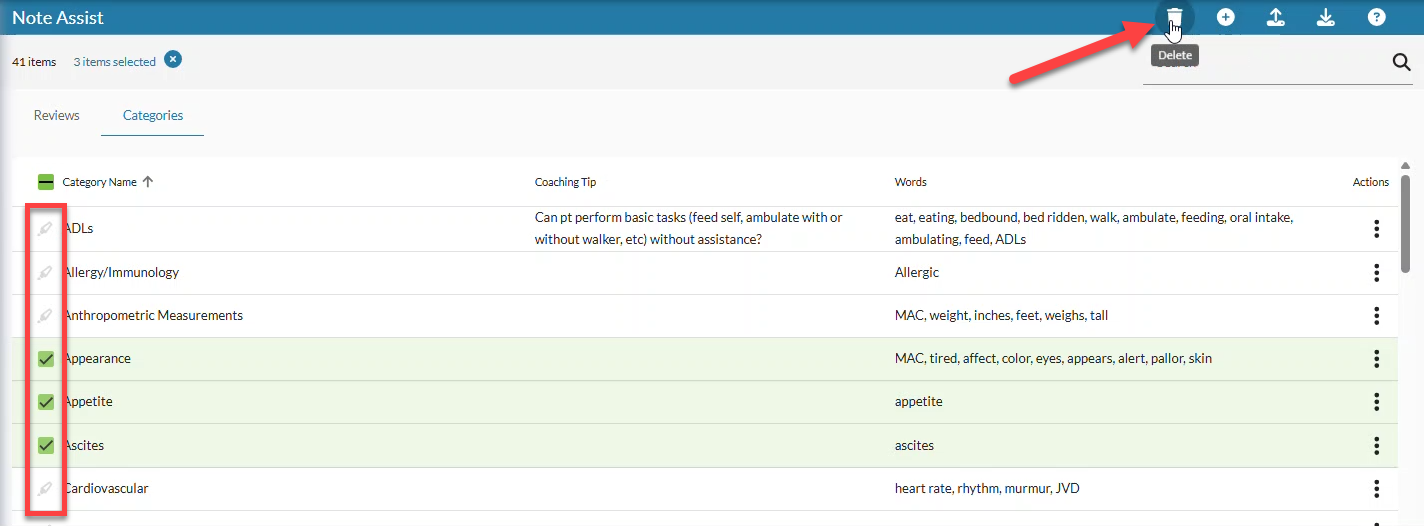
A confirmation message will appear to let you know how many categories will be deleted, and that deleting categories will permanently remove them. The ones that will be deleted are highlighted in green.
To delete them, click the Yes, delete categories button.