Create New System Account
- In nVoq Administrator, click on the System icon
 at the bottom of sidebar on the left side of the screen.
 - Select System Accounts.
- On the System Accounts page, click the New icon
 in the blue toolbar.
 - On the Add System Account page, complete the Account Information.
- Grant the appropriate Administrative Access.
- Click the Save button at the bottom of the page.
Edit an Existing System Account
- In nVoq Administrator, click on the System icon at the bottom of sidebar on the left side of the screen.
- Select System Accounts.
- On the System Accounts page, find the account you need to edit. Use the Search field if needed.
- Open the Actions menu
 for the account you need to edit and select Edit Account.
 - On the Edit System Account page, change the necessary information under Account Information and/or Administrative Access.
- Click the Save button at the bottom of the page.
Add / Edit System Account Page Details
Account Information
Username
Enter the username account holder will use to log in to nVoq Administrator on the system.
- Field length is 45 characters maximum. The following characters are NOT allowed: " * / : < > ? \ | ' & ; # +
- Usernames must be unique across the entire system.
- Usernames are case insensitive and cannot contain spaces.
First Name
Enter the first name of the account holder.
Last Name
Enter the last name of the account holder.
Email Address
Enter the email address of the account holder that is used for username retrieval and password reset.
Enabled
This toggle, on (blue) by default, should be turned off (white/gray) if you do not want the user to be able to log in to this system.
When this toggle is on the Enabled column on the System Accounts page shows "Yes". If unchecked, the column shows "No".
Require Administrator two-factor authorization
This toggle, off by default, should be turned on if you want this system user to use two-factor authentication when signing in to nVoq Administrator.
- This setting works with Cisco's Duo Two-Factor Authentication. Users will be prompted to set up Duo authentication the next time they sign in to nVoq Administrator.
Password / Confirm Password
Enter the initial password for the user. You don't have to tell this password to the user because they can use the Forgot Password or Username link on the sign in screen to change their password.
- Passwords are case sensitive.
- A checkmark appears beside the Password field when the required password strength (see below) is met, and beside the Confirm Password field when the password entered matches the one entered in the Password field.
- System account passwords adhere to the settings in place for accounts with an Administrator Role:
- Passwords must meet "Strong" password strength (must be at least 8 characters and must contain a lowercase letter, an uppercase letter, a number, and a symbol).
- Password will automatically have the Password History parameter enabled, with History Count set at 5.
- Password will automatically have Password Lockout parameter enabled, with Maximum Failure set at 5.
- Password will automatically have Password Expiration parameter enabled, with Maximum Age set at 90 days and Warning Time set at 14 days.
- See Password Security Settings for more information about these parameters.
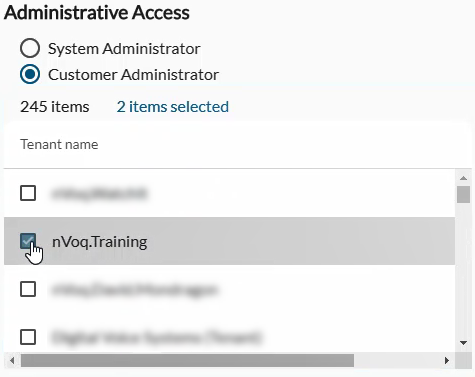
Administrative Access
Select the radio button to grant either System Administrator or Customer Administrator access to the account holder.
System Administrator
Select the System Administrator radio button to grant has full access to all tenants on the system. By default, there is one System Administrator user account with system level access. This role can:
- edit properties every tenant on the system
- find user accounts in any tenant in the system
- create new tenants on the system
- configure additional System Administrator and Customer Administrator accounts
Customer Administrator
Select the Customer Administrator radio button to grant access to one or more tenants on a system. This role can:
- edit tenant properties of tenants to which they have access
- find user accounts in tenants to which they have access
- create new tenants on the system
Customer Administrator Tenant Menu
This menu appears when the Customer Administrator radio button is selected and it lists all tenants on the system..
Put a checkmark next to the tenant(s) to which this Customer Administrator role should have access.