Upload organizations so you don't have to create each one individually.
This feature can only be used to add new organizations, not modify existing ones.
Step 1. Create or Download the Organization File
Create a new organization hierarchy using a template OR download an existing organization hierarchy that you want to copy.
- Create a New Organization Hierarchy Using a Template
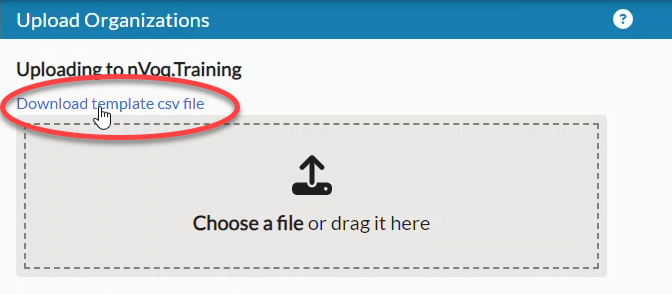
- Go to the Organizations page in nVoq Administrator.
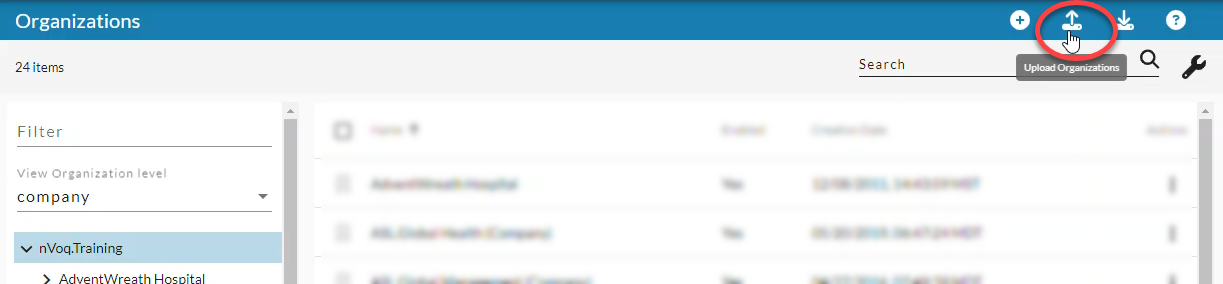
- Click on the upload icon in the blue toolbar.
- Click the Download template csv file link to download the template file (organizationTemplate.csv).
- The template includes three sample rows that show you how to use the template. For more help using the template, see How to Use the Organization Template.
- The maximum number of organizations that can be uploaded per file is 10,000.
- Download an Existing Organization Hierarchy
- Follow the instructions at Admin: Download Organizations
- Make any changes you want to the hierarchy in the downloaded file.
- The maximum number of organizations that can be uploaded per file is 10,000.
- Follow the instructions at Admin: Download Organizations
Step 2. Upload the Organization File
- Go to the Organizations page in nVoq Administrator.
- On the organization list select the organization level that is the parent of the highest-level organization in your spreadsheet. (For example, if your file includes a company, you need to select the tenant. If the highest level org in your file is a group, you need to select the division under which the groups should be added.)
 In the example above the spreadsheet includes company-level organizations, so the tenant is being selected.
 - Select the level of the highest-level organization in your spreadsheet from the View Organization Level menu.
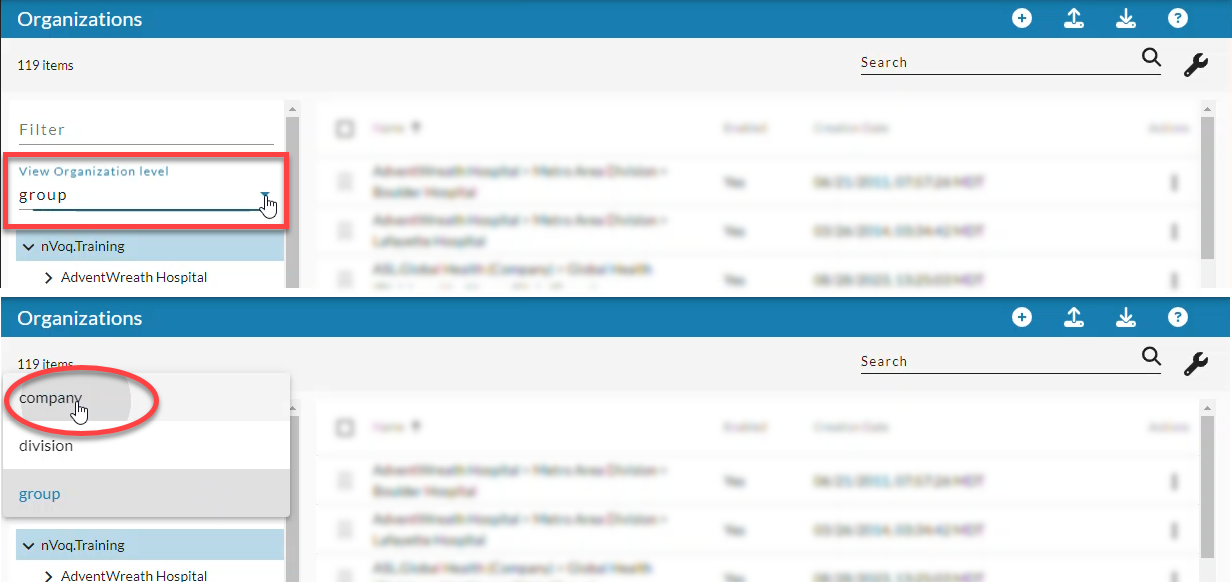 In the example above the spreadsheet includes company-level organizations, so the company level is being selected.
 - Click the Upload Organizations icon in the blue toolbar
- On the Upload Organizations page, click the Choose a file link, or drag your file to the upload box.
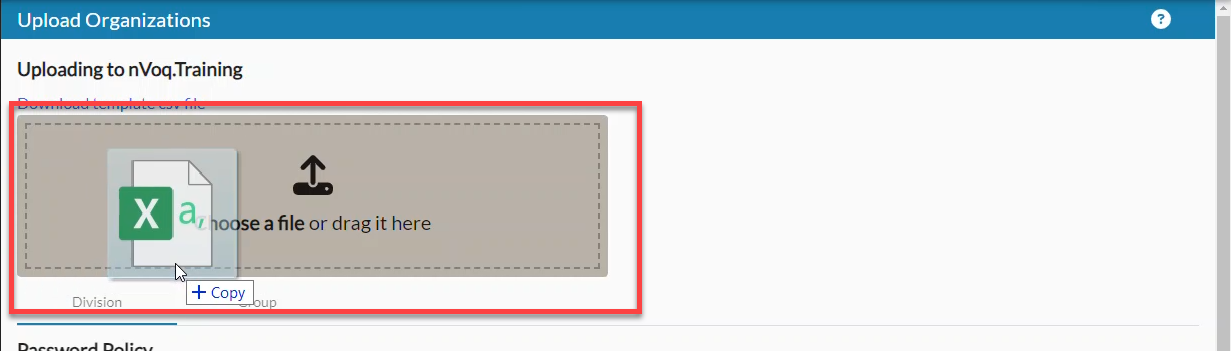
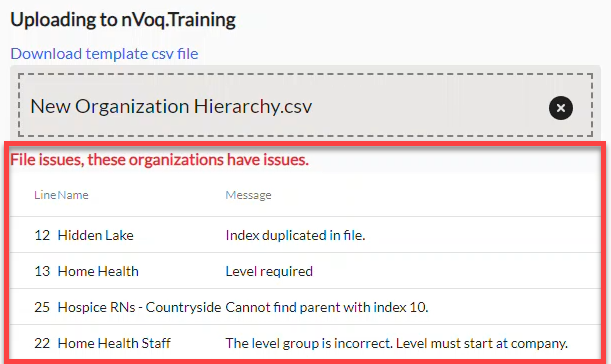
- If your file has issues they will be explained below the file along with the spreadsheet line number and the organization name (if available). Click the X icon in the upload box to clear the file and make the necessary corrections.
 Some examples include:
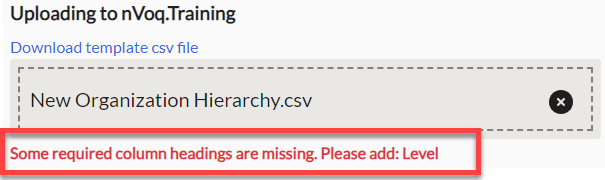
- Some required column headings are missing. Please add: Properties (optional) - The Properties heading is missing from the spreadsheet.
- Organization name required. - The organization name is missing.
- Level required. - The organization level is missing.
- Incorrect organization level group, cannot be saved under parent with level company. - A group organization was given the Parent Index of a company. A group must have a division for the parent, a division must have a company as a parent.
- Index is duplicated in file. - Two organizations have the same Unique Index.A Unique Index left blank for an organization is automatically assigned a Unique Index of 10000 + the organization's row number on the spreadsheet.For example, an organization on row 5 that is missing a Unique Index will be automatically given a Unique Index of 10005 on upload.
- The level specified is not legal. - Something other than "company" "division" or "group" was entered in the Level column.
- The level group is incorrect. Level must start at company. - No parent index number was listed for an organization that was given the level of "group."
- The level division is incorrect. Level must start at company. - No parent index number was listed for an organization that was given the level of "division."
- Cannot find parent with index #. - There is a problem with at least one of the parent organizations. If you see "Cannot find parent with index 10," look at the organization that should have the Unique Index of 10 and see if there is a problem. If that organization looks ok, review that organization's parent organization.
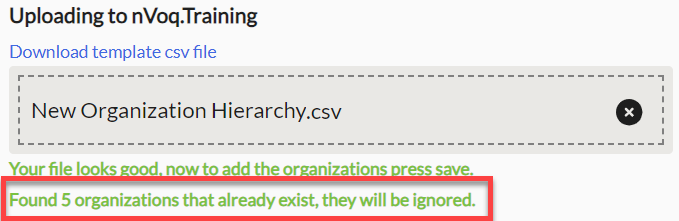
- If organizations already exist with the same name at the same level as appear on the spreadsheet a message will let you know that those organizations will be ignored during upload.
- If you deleted or changed any of the required headers a red message will display the header that is missing. Click the X icon in the upload box to clear the file and make the necessary corrections.
- If your file has issues they will be explained below the file along with the spreadsheet line number and the organization name (if available). Click the X icon in the upload box to clear the file and make the necessary corrections.
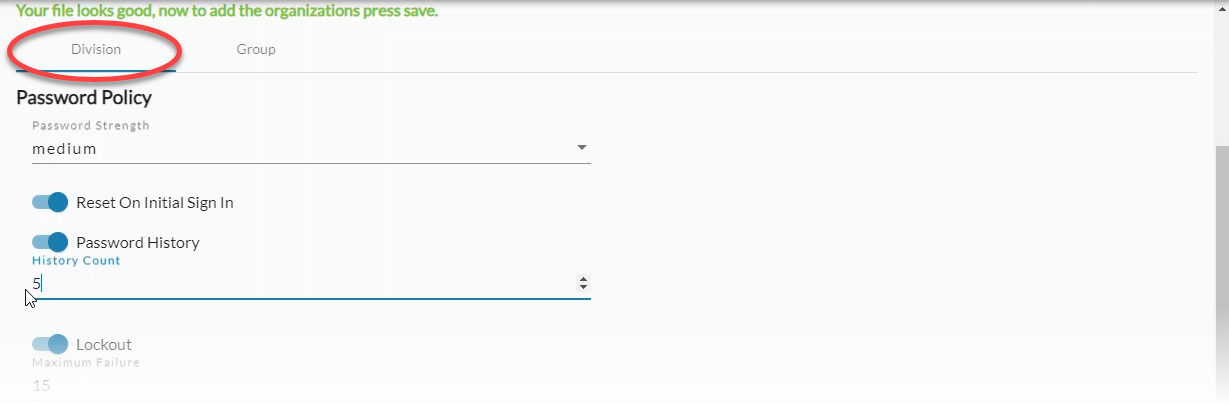
- If your file looks good, configure the password properties for the organizations on your spreadsheet on the Division tab, or just leave the default settings. Any properties that you added for your divisions on the spreadsheet will overwrite selections on this tab. The settings on this page will be used for any properties that were not included on the spreadsheet.
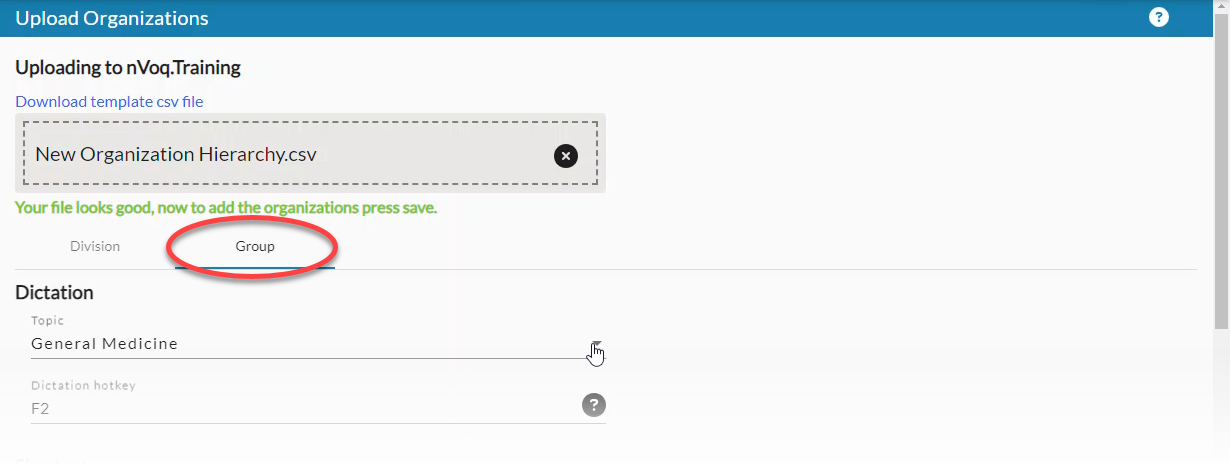
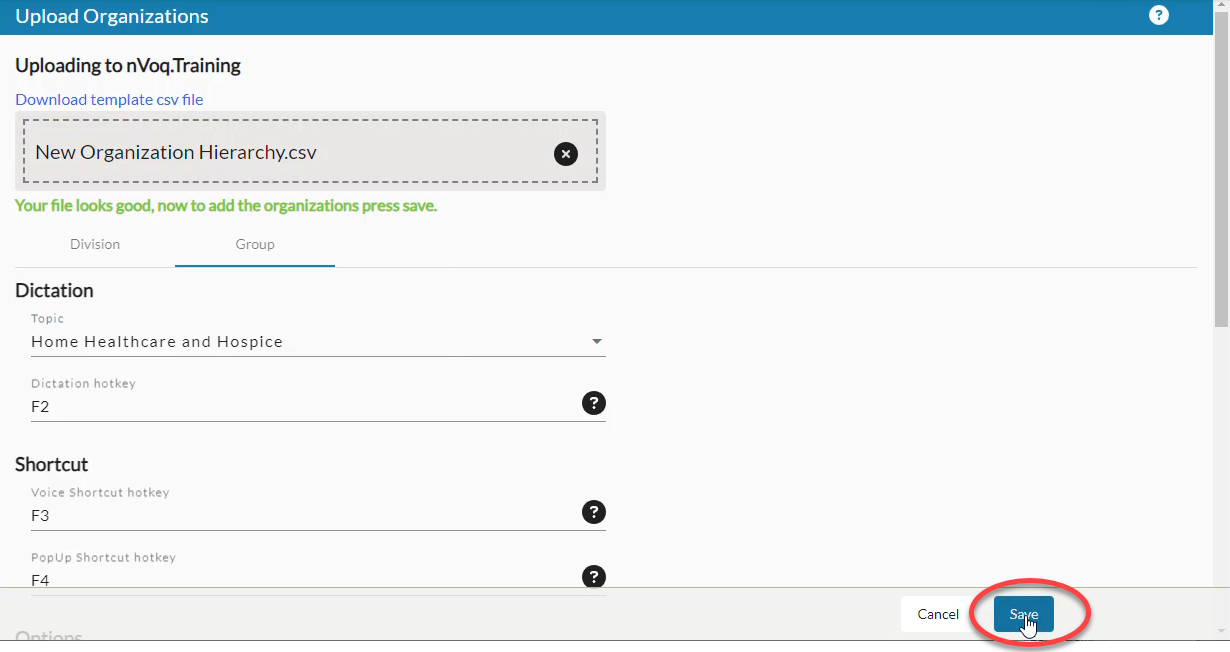
- Next, configure the client properties for the groups on your spreadsheet on the Group tab, or leave the default settings. Any properties that you added for your groups on the spreadsheet will overwrite selections on this tab. The settings on this page will be used for any properties that were not included on the spreadsheet.
- Click the Save button to upload your organizations.
- The order that organizations are uploaded are all companies, all divisions, then all groups.
- A green notification message will pop up in the top-right corner letting you know the number of organizations that were added.
- If any of the organizations could not be added, you'll see a red or yellow message letting you know that too. Click on the Notifications icon
 for more details on which organizations could not be added and why.
How to Use the Organization Template
To get the template...
- Go to the Organizations page in nVoq Administrator.
- Click on the Upload Organizations icon in the blue toolbar.

- Download the template (organizationTemplate.csv) on the Upload Organizations page by clicking the Download template csv file link.
The template includes seven columns:
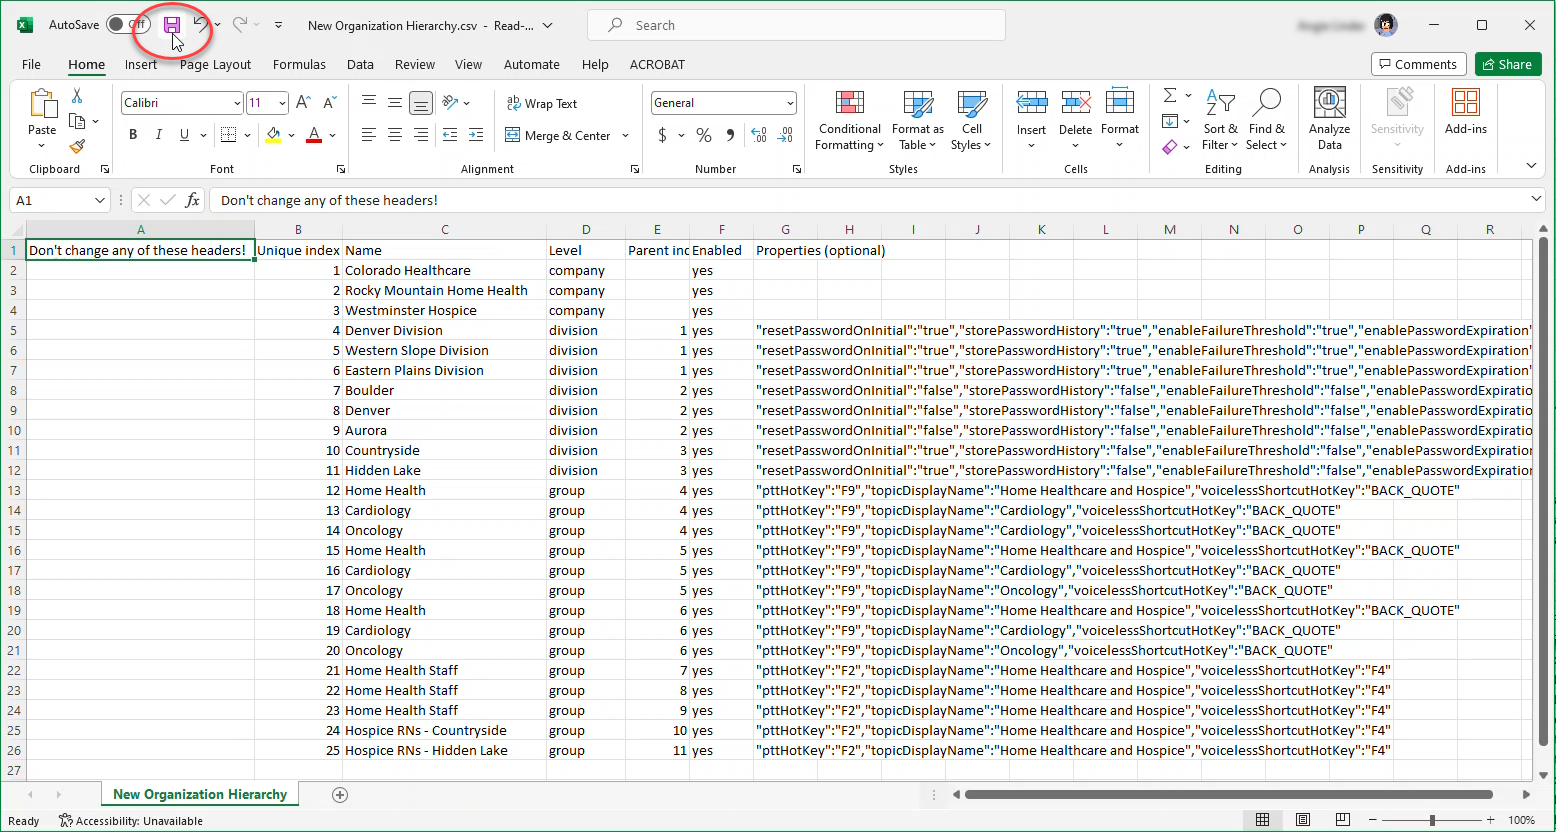
- Don't change any of these headers! - This is just information letting you know not to remove or change any of the column names in the top row.
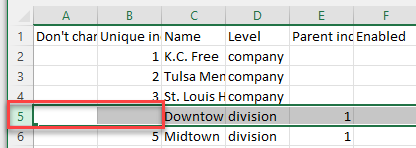
- Unique index (use any number) - Numbers assigned to each organization listed in the file that is the parent of another organization in the file
- Name - The name of the organization
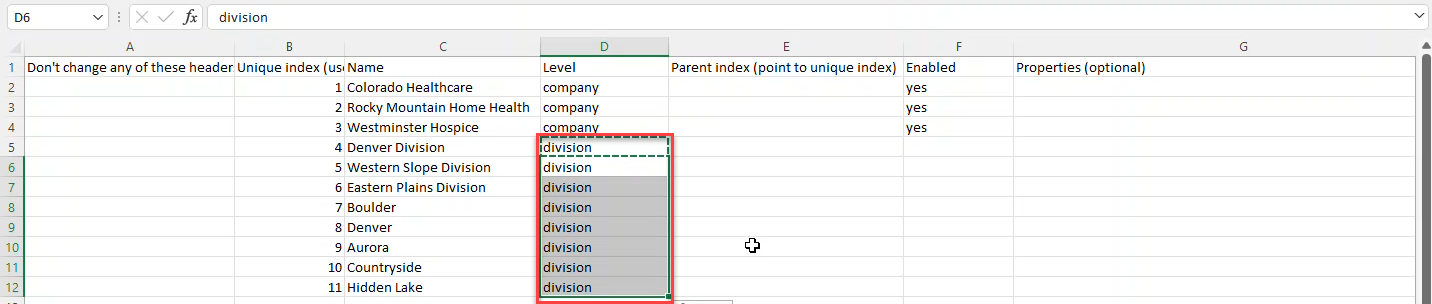
- Level - The level of the organization (company, division, or group)
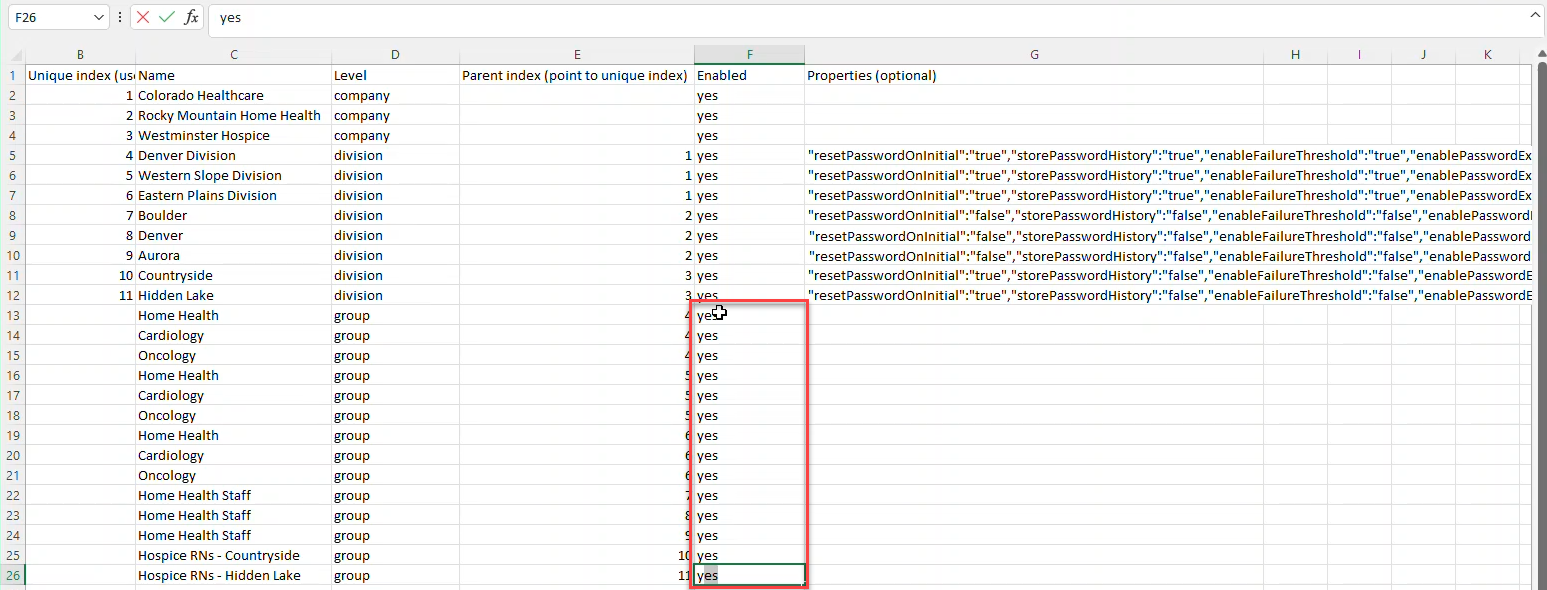
- Parent index (point to unique index) - This is the number (from the Unique Index column) assigned to the organization that should be the parent of the organization on this row. If organizations need the same Name, Level, Enabled status, and Properties you can assign to multiple parents using commas to separate multiple parent index numbers.
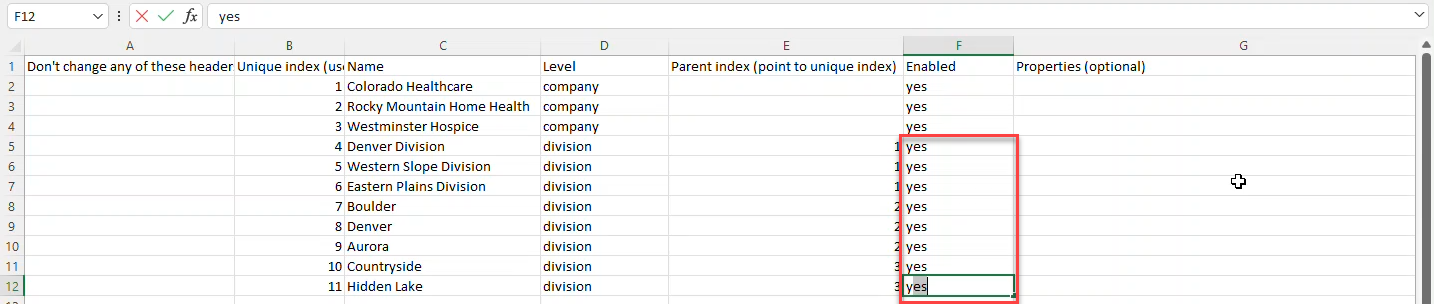
- Enabled - Whether or not the organization should be enabled (yes or no). When filling out the template (or changing a spreadsheet that you downloaded) keep in mind that when an organization is disabled all organizations below that it are also disabled. For example, if you attempt to add a disabled division with an enabled group under it, that won't work; the group will be disabled regardless of what is listed on the spreadsheet. When an organization is enabled all accounts added to the organization will have an active billing subscription unless the accounts are disabled. If nothing is added in this column the setting defaults to enabled (yes).
- Properties (optional) - Whether you download the template or download an organization hierarchy that includes children you will automatically get one property for groups: the dictation topic. When filling out the template you don't need to put anything here if all of the organizations on your spreadsheet will use the same settings for all divisions and groups, as these can be configured on the Upload Organizations page. However, if you want different divisions or groups to have different properties you can include those here. You only need to add the properties that you want to be different than the ones on the Upload Organization page; any properties not included on the spreadsheet will be pulled from the Upload Organization page. Properties listed in the spreadsheet will overwrite any that are configured on the Upload Organizations page. See Properties for a list of properties available for each organization level.
The template includes three sample rows:
- These rows (sample company, sample division, and sample group) just give you an idea about how to use the template. If you would like more information about how to use the template, keep reading.
Here's how to use the template...
- Name the file and save it somewhere you can easily find it.

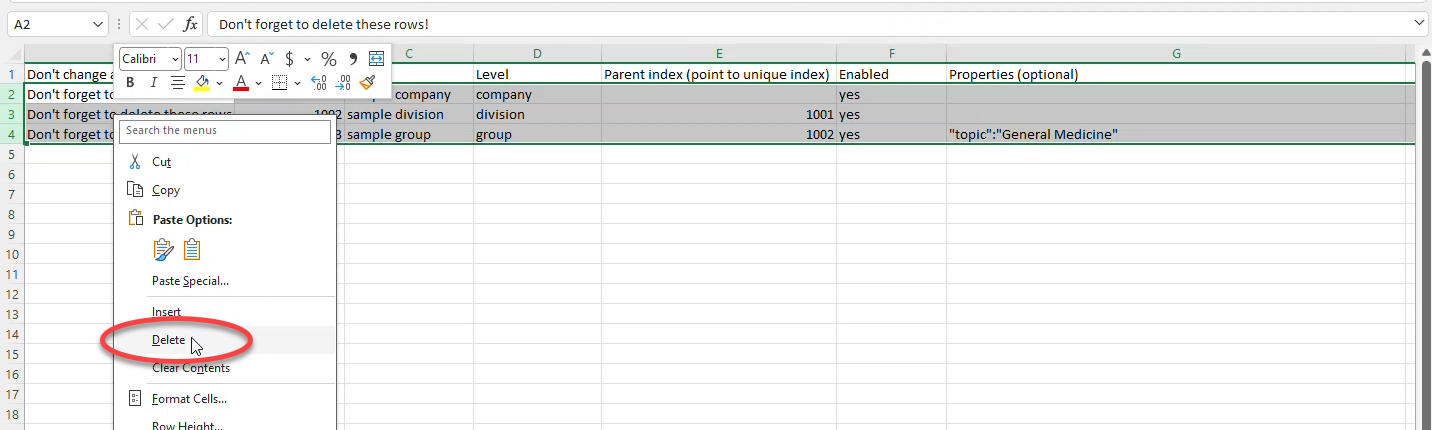
- Delete the sample organizations from the spreadsheet. DO NOT DELETE THE TOP ROW (HEADERS).
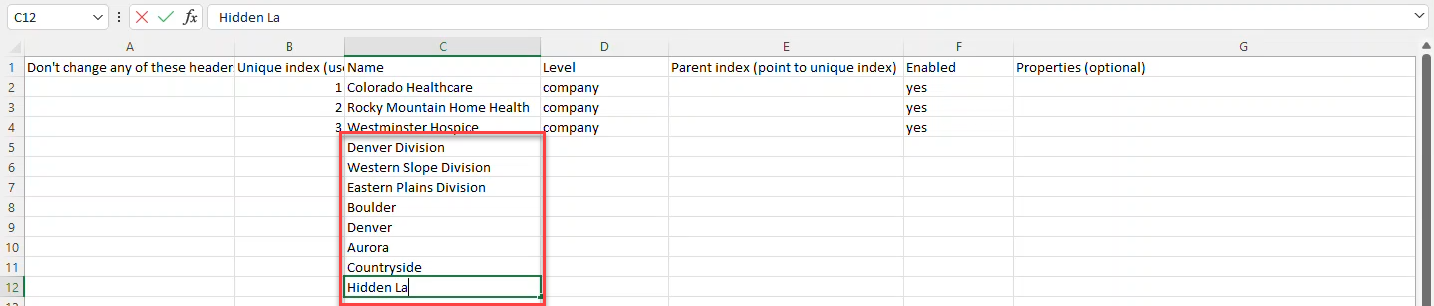
- Add the names of any company level organizations that you want to upload to the Name column.

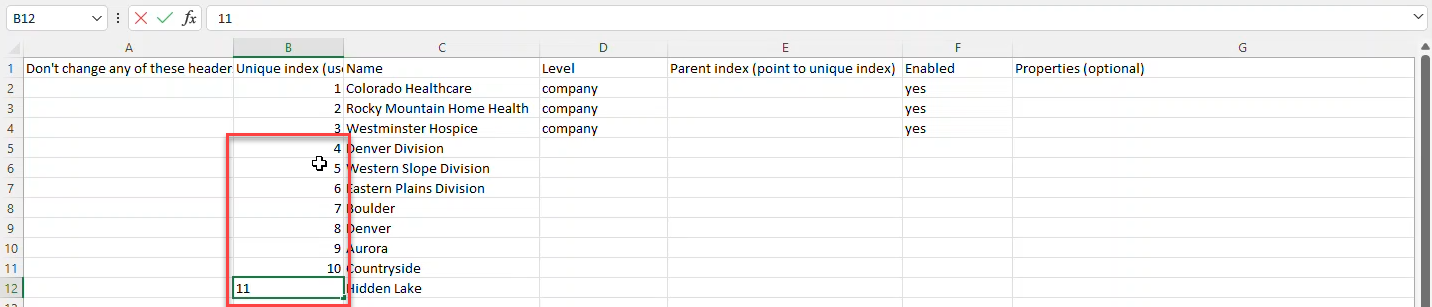
- In the Unique Index column assign a unique number to the company organizations.

- Assign the Level of "company" to the company organizations.

- Add a yes or no to the Enabled column for the company organizations. If nothing is added, this defaults to "yes."

- Add the names of any division-level organizations you want to upload to the Name column.
 If you have divisions under multiple companies that need the same Name, Enabled status, and Properties you can just add the information on one row and assign to multiple companies (see Step 10).
- In the Unique Index column assign a unique number to the division organizations.
- Assign the Level of "division" to the division organizations.
- Add the Parent Index number that corresponds to the company's Unique Index that is the parent organization of each of the divisions.
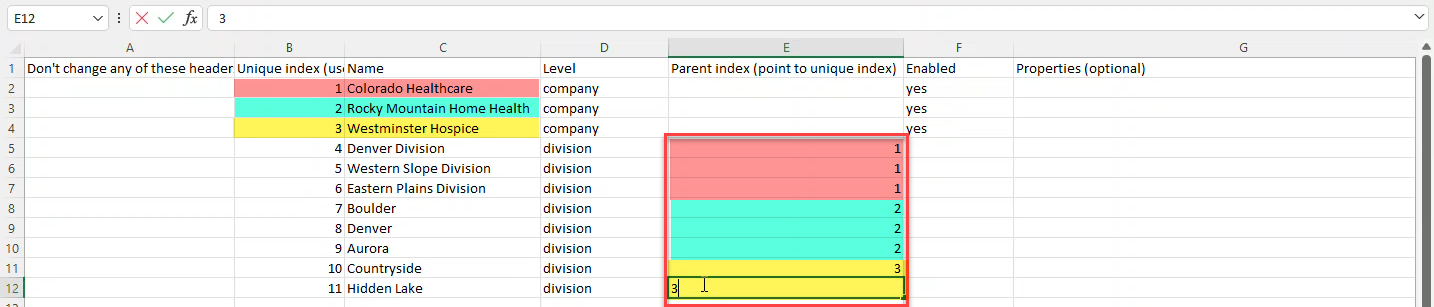 Create the same division name under multiple companies using Parent Index numbers separated by a comma.
- Add a yes or a no to the Enabled column for the division organizations. If nothing is added, this defaults to "yes."
- Add Properties for the divisions IF you do not plan to have all divisions share the same password properties. See Division Level Properties for optional properties for divisions. You can make changes to properties in the formula bar.
Make sure all properties are listed in the following format: "PropertyName":"value","NextProperty":"value"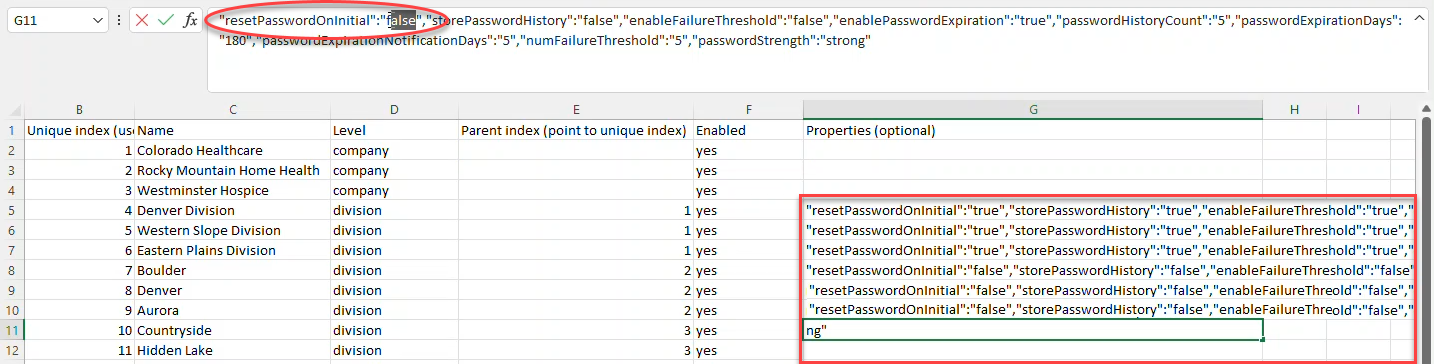
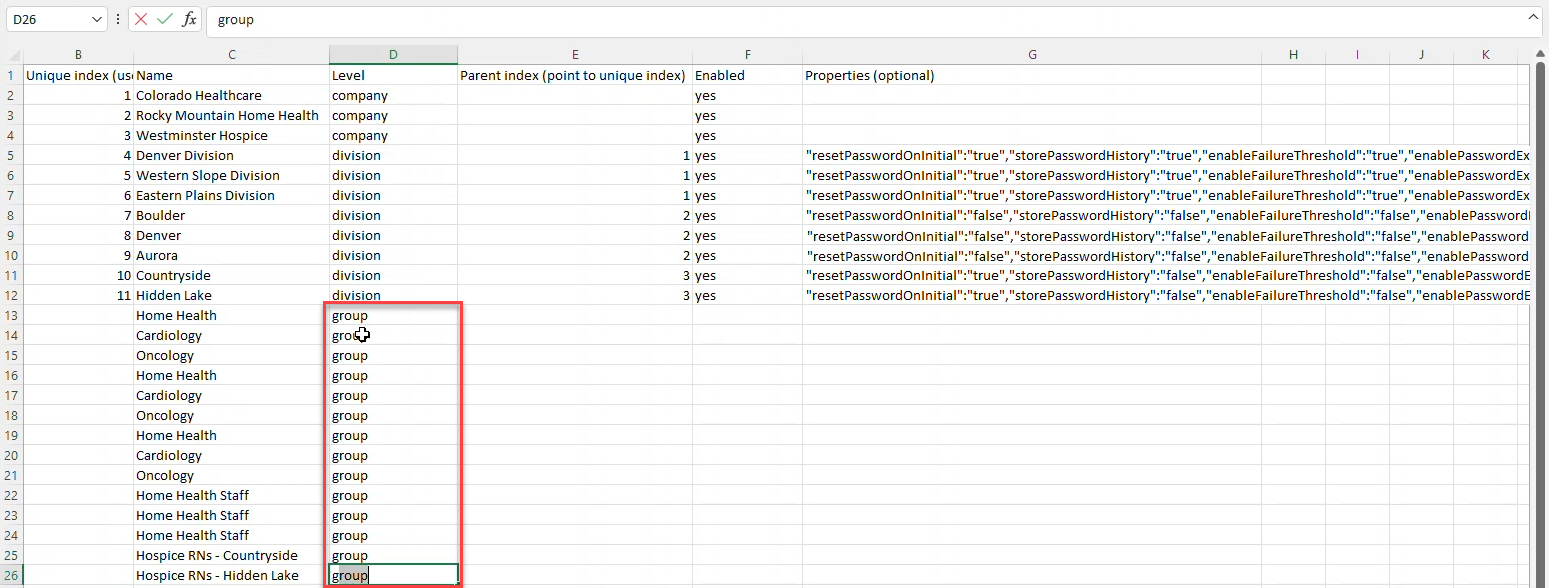
- Add the names of group-level organizations you want to upload to the Name column.
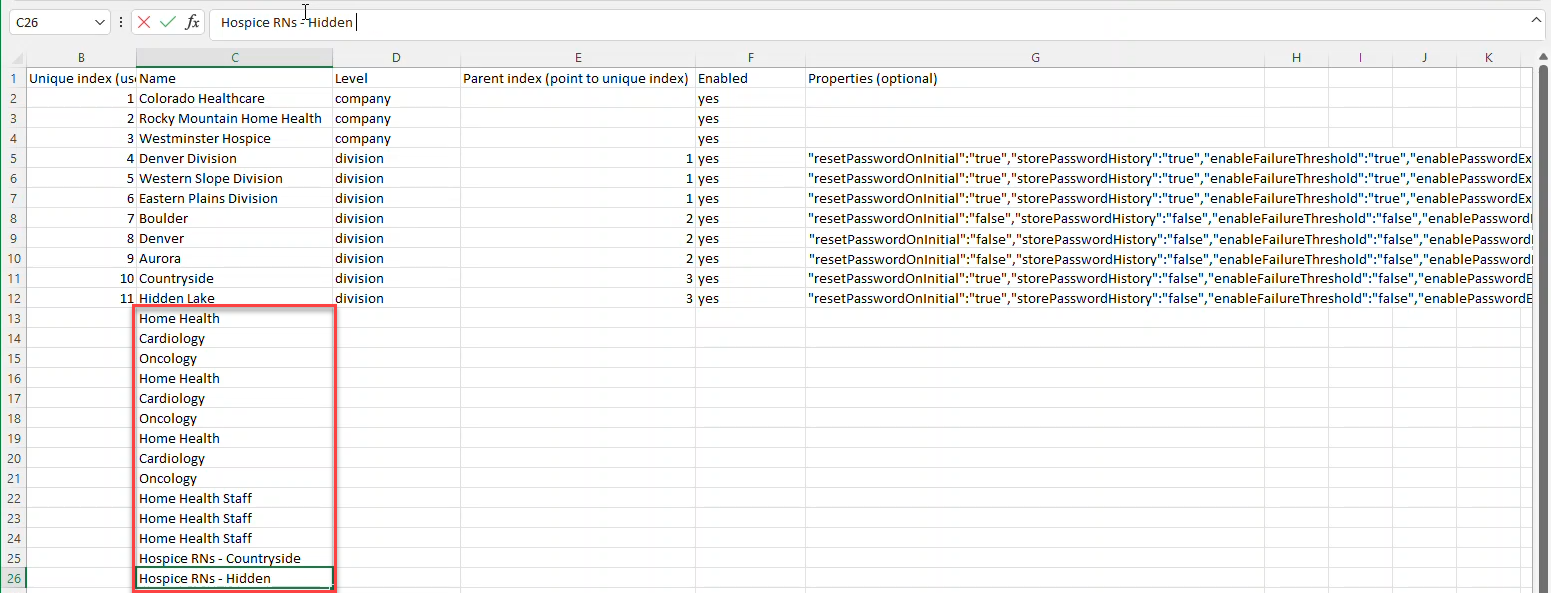 If you have groups under multiple divisions that need the same Name, Enabled status, and Properties you can just add the information on one row and assign to multiple divisions (see Step 15).
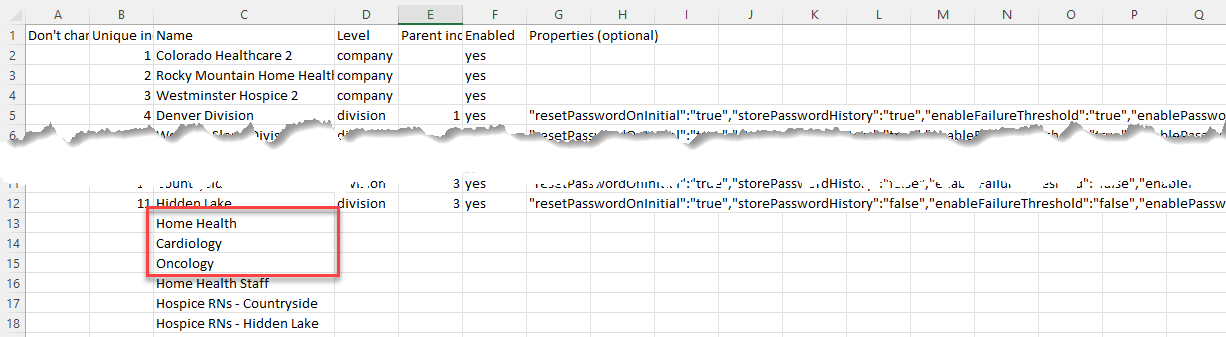
- Assign the Level of "group" to the group organizations.
- Add the Parent Index number that corresponds to the division's Unique Index that is the parent organization of each of the groups.
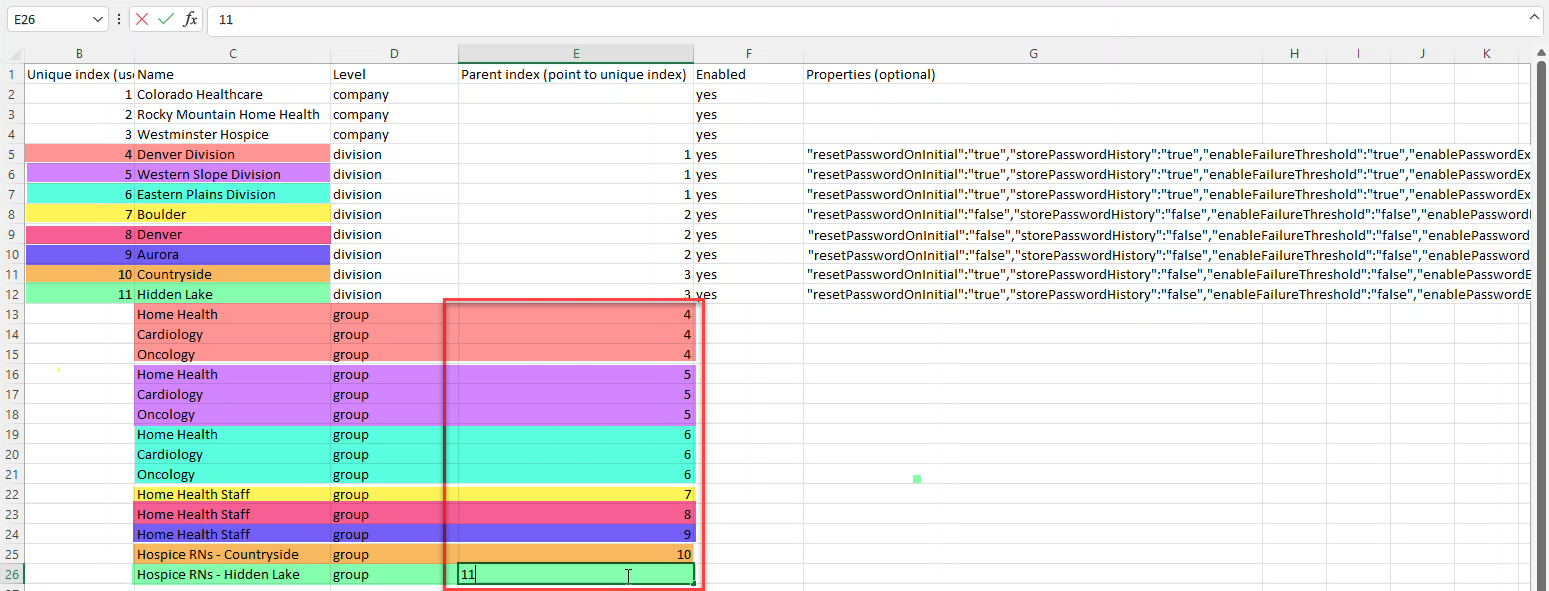 Create the same group name under multiple divisions using Parent Index numbers separated by a comma.
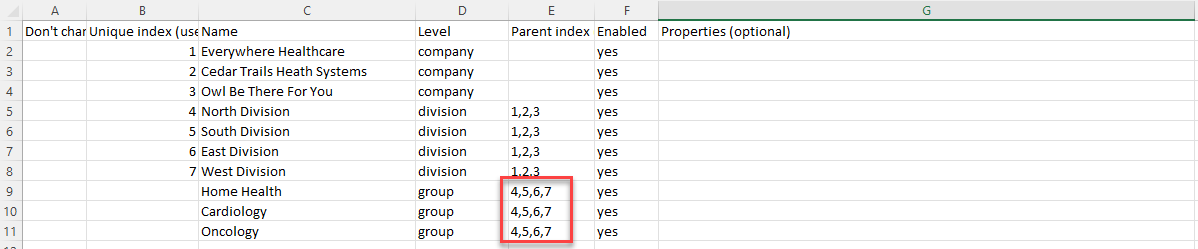
- Add a yes or a no to the Enabled column for the group organizations. If nothing is added, this defaults to "yes."
- Add Properties for the groups IF you do not plan to have all groups share the same client properties. See Group Level Properties for optional properties for groups. You can make changes to properties in the formula bar.
Make sure all properties are listed in the following format: "PropertyName":"value","NextProperty":"value"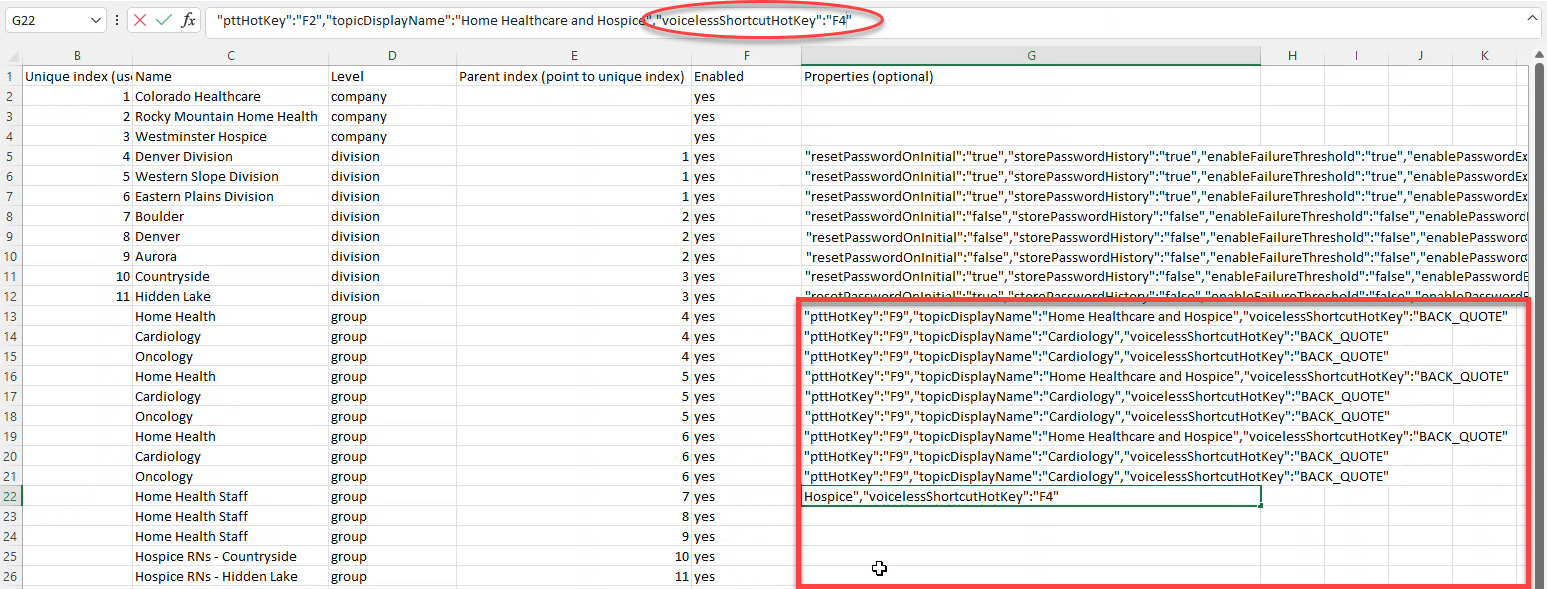
- Group organizations don't really need a Unique Index since they do not have any child organizations, but if your spreadsheet has group organizations mixed in between other org levels, you may want to number the groups to keep your numbering on track.
- Group organizations don't really need a Unique Index since they do not have any child organizations, but if your spreadsheet has group organizations mixed in between other org levels, you may want to number the groups to keep your numbering on track.
- Make sure to SAVE your file!
- Next...upload your file!
Properties
Company Level Properties
N/A
Division Level Properties
Properties for the division can be listed in any order, but must be separated by a coma as shown below:
"resetPasswordOnInitial":"true","storePasswordHistory":"true","enableFailureThreshold":"true","enablePasswordExpiration":"true","passwordHistoryCount":"5","passwordExpirationDays":"90","passwordExpirationNotificationDays":"14","numFailureThreshold":"5","passwordStrength":"weak"
- "passwordStrength":"weak"- This is the Password Strength property. Options are "weak" "medium" or "strong".
- For more information about this setting see Edit Division: Password Strength
- "resetPasswordOnInitial":"true"- This is the Reset on Initial Sign In property. Options are "true" or "false".
- For more information about this setting see Edit Division: Reset on Initial Sign In
- "storePasswordHistory":"true"- This is the Password History property. Options are "true" or "false".
- For more information about this setting see Edit Division: Password History
- "passwordHistoryCount":"5"- This is the History Count threshold for the Password History property. This can be set to any integer.
- For more information about this setting see Edit Division: History Count
- "enableFailureThreshold":"true"- This is the Lockout property. Options are "true" or "false".
- For more information about this setting see Edit Division: Lockout
- "numFailureThreshold":"5"- This is the Maximum Failure threshold for the Lockout property. This can be set to any integer.
- For more information about this setting see Edit Division: Maximum Failure
- "enablePasswordExpiration":"true"- This is the Password Expiration property. Options are "true" or "false".
- For more information about this setting see Edit Division: Password Expiration
- "passwordExpirationDays":"90"- This is the Maximum Age threshold for the Password Expiration property. This can be set to any integer.
- For more information about this setting see Edit Division: Maximum Age
- "passwordExpirationNotificationDays":"14"- This is the Warning Time threshold for the Password Expiration property. This can be set to any integer.
- For more information about this setting see Edit Division: Warning Time
Group Level Properties
Properties for the group can be listed in any order, but must be separated by a comma as shown below:
"pttHotKey":"F9","allowUseText":"true","allowUseAudio":"true","topicDisplayName":"General Medicine","pttHotKeyModifiers":"ctrl","retainTextDuration":"365","retainAudioDuration":"365","retainJournalDuration":"365","retainDictInfoDuration":"365","voicelessShortcutHotKey":"BACK_QUOTE","voicelessShortcutHotKeyModifiers":"shift"
- "topicDisplayName":"General Medicine"- This is the property for the dictation Topic. Options are the topics listed at Dictation Topics for Group
- For more information about this setting see Client Settings for Group: Topic
- "pttHotKey":"F9"- This is the Dictation Hotkey property. You can set this to be any key on the keyboard, but it should be one that is not used for another purpose. Moreover the selected hotkey must be different than the one configured for popup shortcuts or voice shortcuts.
- For more information about this setting see Client Settings for Group: Dictation Hotkey
- "pttHotKeyModifiers":"ctrl"- This is the property for modifier key(s) for the dictation hotkey. You would only use this property if you want users to have to press more than one key to record dictation. For example, if you want them to press the Ctrl key and the F9 key at the same time to start recording dictation you would enter "ctrl" for this property and "F9" for the pttHotKey property. You can include more than one modifier, such as "ctrl alt". If you do that, users will have to press three keys, the hotkey (F9) and two modifier keys (Ctrl and Alt), to record dictation. The following key combinations are not allowed because they are already assigned to functions in Windows: Ctrl A, Ctrl C, Ctrl F, Ctrl S, Ctrl V, Ctrl X, Ctrl Y, and Ctrl Z.
- For more information about this setting see Client Settings for Group: Dictation Hotkey
- "voicelessShortcutHotKey":"BACK_QUOTE" - This is the Popup Shortcut Hotkey property. You can set this to be any key on the keyboard, but it should be one that is not used for another purpose. Moreover the selected hotkey must be different than the one configured for dictation or voice shortcuts.
- For more information about this setting see Client Settings for Group: Popup Shortcut Hotkey
- "voicelessShortcutHotKeyModifiers":"shift" - This is the property for modifier key(s) for the Popup Shortcut Hotkey. You would only use this property if you want users to have to press more than one key to open the popup shortcut menu. For example, if you want them to press the Shift key and the Back Quote (`) key at the same time to open the popup menu, you would enter "shift" for this property and "BACK_QUOTE" for the voicelessShortcutHotKey property. You can include more than one modifier, such as "shift alt". If you do that, users will have to press three keys, the hotkey (BACK_QUOTE) and two modifier keys (Shift and Alt) to open the popup menu. The following key combinations are not allowed because they are already assigned to functions in Windows: Ctrl A, Ctrl C, Ctrl F, Ctrl S, Ctrl V, Ctrl X, Ctrl Y, and Ctrl Z.
- For more information about this setting see Client Settings for Group: Popup Shortcut Hotkey
- "allowUseAudio":"true"- This is the Allow Use of Audio property. The Allow Use of Audio setting controls whether or not audio from dictations can be used to improve dictation accuracy and modeling. Options are "true" or "false".
- For more information about this setting see Client Settings for Group: Allow Use of Audio
- "allowUseText":"true"- This is the Allow Use of Text property. This setting controls how long text from dictation transcripts is stored in nVoq Administrator for review on the Review & Correct page. Options are "true" or "false".
- For more information about this setting see Client Settings for Group: Allow Use of Text
- "retainAudioDuration":"365"- This is the Keep Audio property. This setting controls how many days audio from dictations and voice shortcuts is stored in nVoq Administrator for review on the Review & Correct page. Options are 0 (for never), 1, 2, 3, 4, 5, 6, 7, 14, 30, 60, 90, 180, or 365.
- For more information about this setting see Client Settings for Group: Data Retention -Audio
- "retainTextDuration":"365"- This is the Keep Text property. This setting controls how long text from dictation transcripts is stored in nVoq Administrator for review on the Review & Correct page. Options are 0 (for never), 1, 2, 3, 4, 5, 6, 7, 14, 30, 60, 90, 180, or 365.
- For more information about this setting see Client Settings for Group: Data Retention -Keep Text
- "retainDictInfoDuration":"365"- This is the Save Dictation Information property. This setting controls how long External Identifier (External ID), Metadata, Client Product, Client Vendor, Client Version and Microphone information is stored. Options are 0 (for never), 1, 2, 3, 4, 5, 6, 7, 14, 30, 60, 90, 180, or 365.
- For more information about this setting see Client Settings for Group: Data Retention -Dictation Information
- "retainJournalDuration":"365" - This is the Save Dictation Troubleshooting Data property. This setting controls how long backend dictation data is stored for troubleshooting. Options are 0 (for never), 1, 2, 3, 4, 5, 6, 7, 14, 30, 60, 90, 180, or 365. The value of this setting must be less than or equal to the value of the Keep Audio setting, as the audio is also needed for troubleshooting. If you attempt to save this property with a greater value than what is configured for Keep Audio, the setting will automatically change to the same value as the Keep Audio setting.
- For more information about this setting see Client Settings for Group: Data Retention -Dictation Troubleshooting Data