Follow these instructions to add multiple shortcuts and folders at once to an organization or a user account using a Comma Separated Values (CSV) file.
- Go to the Shortcuts page in nVoq Administrator.
- Optionally, click the Manage icon in the sidebar to hide the sidebar while you work.
- Select the appropriate organization from the organization menu at the very top of the screen.
- Navigate this menu by using the Expand All button to open all organizations, by clicking the > arrow next to each organization level to open it, or by typing an organization name in the Filter text field.
- Navigate this menu by using the Expand All button to open all organizations, by clicking the > arrow next to each organization level to open it, or by typing an organization name in the Filter text field.
- Select the appropriate radio button to upload shortcuts for an account or an organization:
Upload Account Shortcuts
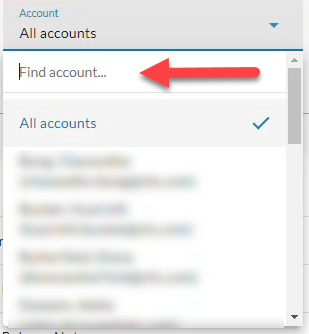
- Select the Account radio button.
- Then select an account from the Account menu.
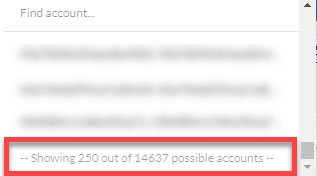
- The menu will display a maximum of 250 accounts. If there are more than 250 accounts in the selected organization, the bottom of the menu will say, "Showing 250 out of [#] possible accounts."
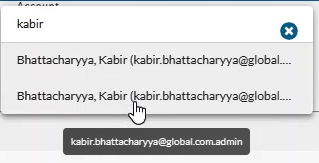
- To see shortcuts and folders for an individual user account, type part of the person's name in the the Find Account field. This will find any account that exists in the selected organization, even if it is not displayed in the menu.
- If the username is cut off, hover your mouse over the name to see the username in a tooltip.
- The menu will display a maximum of 250 accounts. If there are more than 250 accounts in the selected organization, the bottom of the menu will say, "Showing 250 out of [#] possible accounts."
Upload Organization Shortcuts
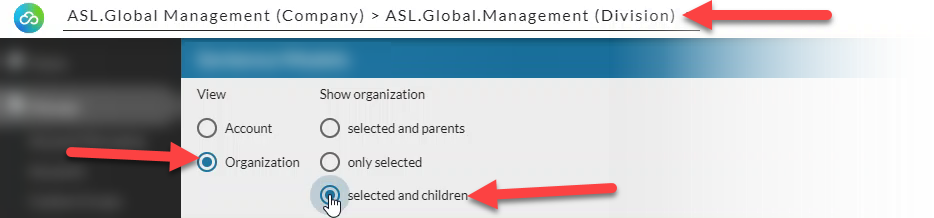
- Select the Organization radio button.
- Then select the appropriate Show Organization radio button to view existing shortcuts for the selected organization:
- Choose selected and parents to see shortcuts created for the organization selected in the Organization menu and all parent organizations above it.
- Choose only selected to see shortcuts created for only the organization selected in the Organization menu.
- Choose selected and children to see shortcuts created for the organization selected in the Organization menu and all child organizations below it.
- If the option you want to see is already selected when you first bring up this page you may need to select a different option and then re-select the option you want to view in order to display the selection.
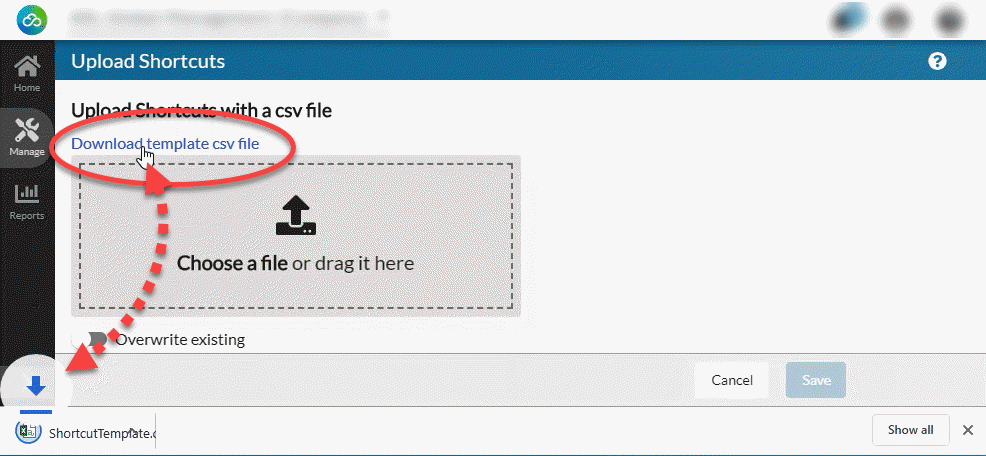
- Click the upload icon
 in the blue toolbar.
- If you are creating a new file, click Download template CSV file and enter the information in the CSV file that downloads. The downloaded file is named ShortcutTemplate.csv.
(If you already have your file, go to Step 6.)
The file will download in your browser, which may look different depending on the browser you are using. Chrome is shown below.
Create your file for upload
- Open the shortcutTemplate.csv file, or select to Save As and save the file someplace you can easily find it.
- Enter the information for the shortcuts and/or folders. The downloaded template contains the required column headings.
- Your file can include a maximum of 10,000 shortcuts but be aware that a file containing approximately 5,000 shortcuts may take about 5 minutes to upload.
- Save the file someplace you can easily find it and be sure that it has a .csv file extension!
All shortcut text must comply with UTF-8 character encoding without BOM.
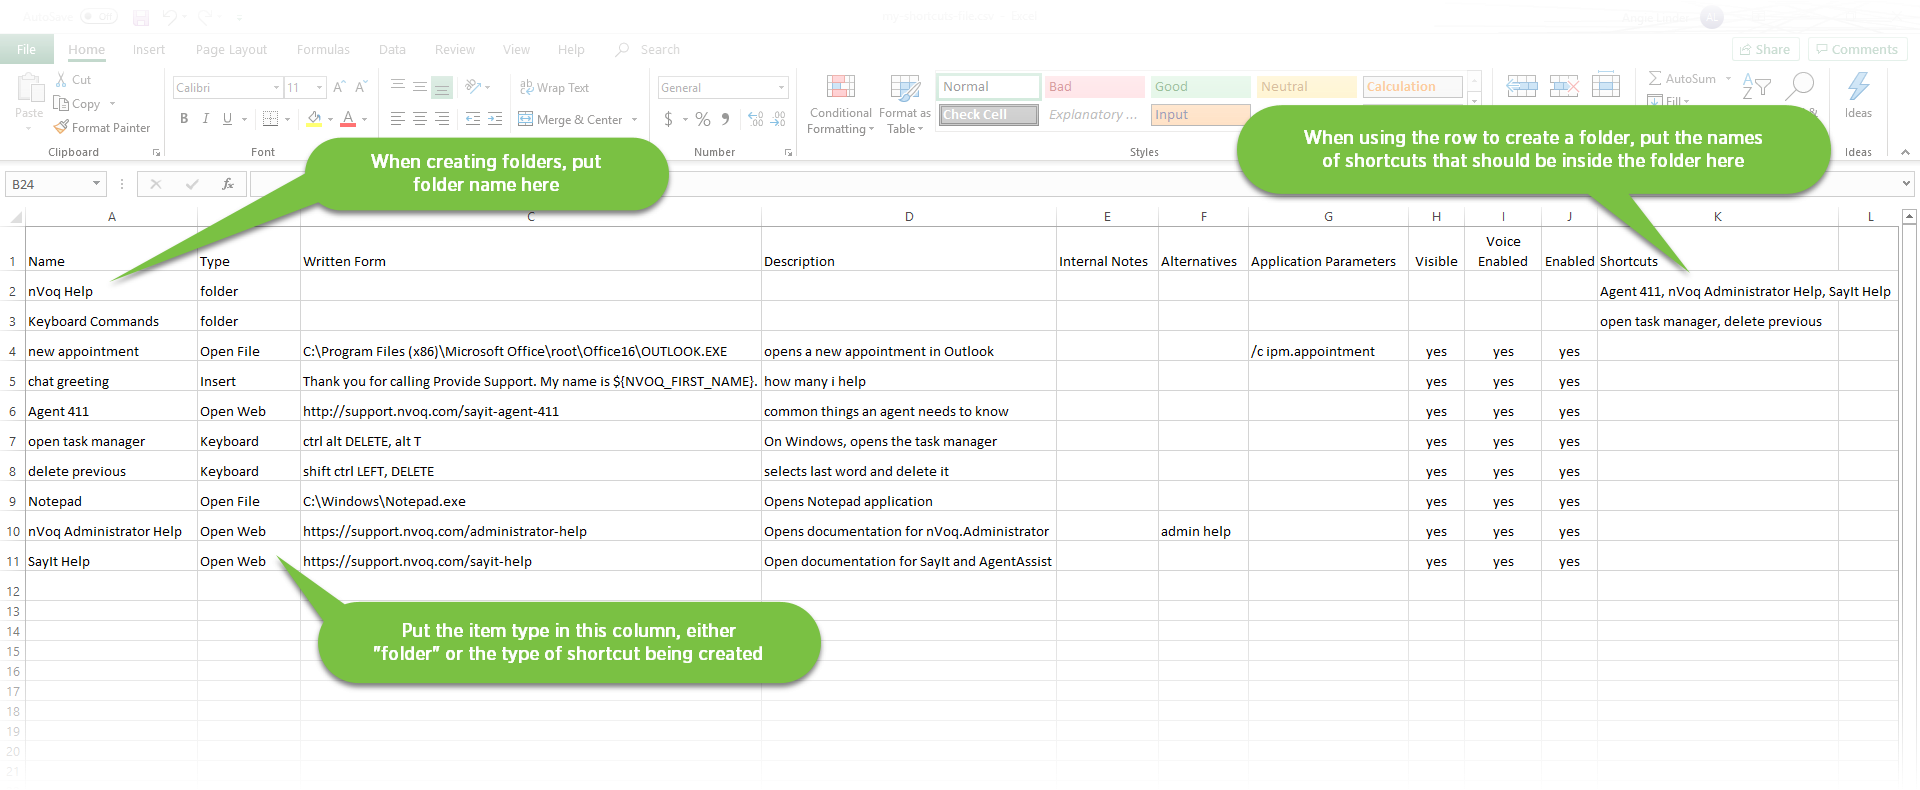
Shortcut Template Column Headings
- Name: (Required)Enter the name of the shortcut or folder. Only alphabetic or numeric characters are allowed.
- For shortcuts, this is the command that will be said aloud (voice shortcuts) or selected from a menu (popup shortcuts) to run the shortcut. There is a 100 character limit on shortcut names.
- For folders, this is the name of the folder. There is a 45 character limit on folder names.
- A folder cannot have the same name as any other folders in the organization hierarchy.
- Type: (Required) This is the type of item you are creating.
- Enter
folderto create a new folder. - Enter one of the following shortcut types to create a new shortcut:
insert,open web,open file,keyboard,workflow,template, orhtml - Only INSERT shortcuts work in nVoq Voice and nVoq Mobile Voice.
- For information on shortcut types, see Shortcut Types.
- Written Form: (Required)Enter what the shortcut should return to the user.
- What is entered here depends on the Type. It could be text that you want the shortcut to paste, or a URL that should be opened, or a script that the shortcut should run when the shortcut is invoked/selected.
- Workflow or HTML automations may not work in Excel when the total number of characters exceeds 32,767 characters in a cell.
- Description: (Optional) Enter information about the shortcut, like how or where it works. This field can accept up to 255 characters.
- The shortcut description can only be seen in nVoq Administrator, and in Mobile Voice if the user has the ability to use User shortcuts.
- Internal Notes: (Optional) Enter notes about this shortcut that only appear in nVoq Administrator.
- Notes entered here appear in nVoq Administrator on the Add or Edit Shortcut screen and on the History tab.
- Internal Notes are included as part of shortcut export from nVoq Administrator.
- This field has a character limit of 255.
- Alternatives: (Optional) Enter alternative pronunciations or names for the shortcut here. Only alphabetic or numeric characters are allowed. This setting does not apply to any nVoq product.
- Alternative shortcut names will NOT be visible in the shortcut client by default. After upload, you can manually check that box for the shortcut if you DO want the alternate to be visible.
If an alternative name for a shortcut is the same as an existing shortcut name or as another alternative voice command for a different shortcut, the shortcut on the spreadsheet will not be added on upload. When you attempt to upload you will receive a message stating, "...shortcut not unique...
- Application Parameters: (Optional) Shortcuts that opens an application ("Open File") can have an application parameter. See Application Parameters in the Shortcut Guide for more information.
- Visible: (Optional) By default, shortcuts display in the Popup shortcuts menu, and in the shortcut menu in nVoq Voice. Enter "No" or "False" in this column to make the name of the shortcut invisible to users. If anything other than "No" or "False" is entered into this field, the default value ("True") will be set and the shortcut will be visible.
If Voice Enabled is "Yes" or "True" and Visible in My Shortcuts is "No" or "False", users will still be able to say the name to use it as a voice shortcut, but Popup users will not see the shortcut in their list.
- Voice Enabled: (Optional) By default, users are able to say the names of shortcuts to use them as a voice shortcut. Enter "No" or "False" if the shortcut is a workflow automation that is only called by another shortcut. Entering "No" or "False" also removes the voice command from the grammar file. If anything other than "No" or "False" is entered into this field, the default value ("True") will be set and the shortcut will be voice enabled. Shortcuts are not voice enabled in nVoq Voice. This setting does not apply to any nVoq product.
If Voice Enabled is "Yes" or "True" and Visible in My Shortcuts is "No" or "False", users will still be able to say the name to use it as a voice shortcut, but Popup users will not see the shortcut in their list.
- Enabled: (Optional) Leave this column blank OR enter "Yes" or "True" to add the shortcut as an active shortcut that can be used. Enter "No" or "False" if the shortcut should be added to the organization or account as inactive. Entering "No" or "False" also removes the voice command from the grammar file. If anything other than "No" or "False" is entered into this field, the default value ("True") will be set and the shortcut will be enabled.
- Shortcuts: (Optional) This column is used when this row creates a folder (Type = folder). Enter the names of the shortcuts (separated by a comma) that should go into this folder. You can enter names of new or existing shortcuts.
You cannot add new shortcuts to an existing folder in the CSV file.
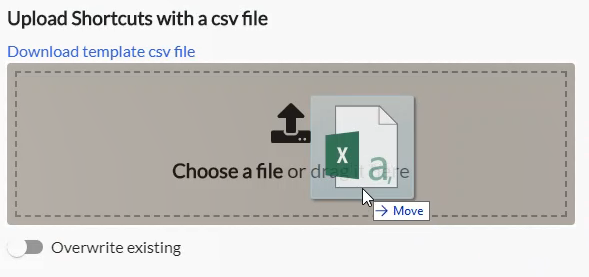
- Click on the Choose a file link in the dotted line box and navigate to your saved CSV file OR drag your CSV file from an open directory into the dotted line box.
- You can upload one file at a time.
- The Owner column on a shortcut file exported from nVoq Administrator will be ignored.
- You can upload a shortcut/folder file in nVoq Administrator that was downloaded from SayIt Administrator.
- The system will check the file for issues.
- If there are no issues with the file, skip to step 8.
- Certain issues, such as an invalid file type or if required column headers are missing, will not allow the file to be uploaded at all.
Click the X next to the file name to remove it from the page, fix the errors in the file, and then try the upload again. - If you see a message that nothing in the file survived validation, that means nothing in the file can be uploaded. Click the X next to the file name to remove the file from the box and fix the issues before attempting to upload again.
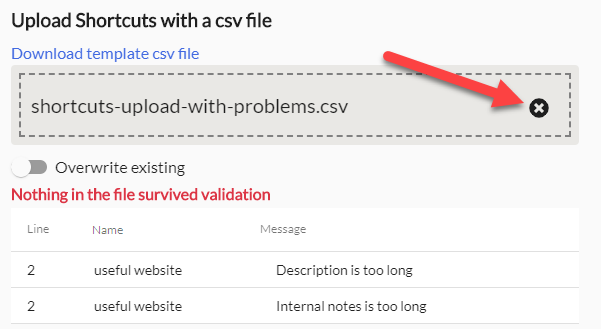
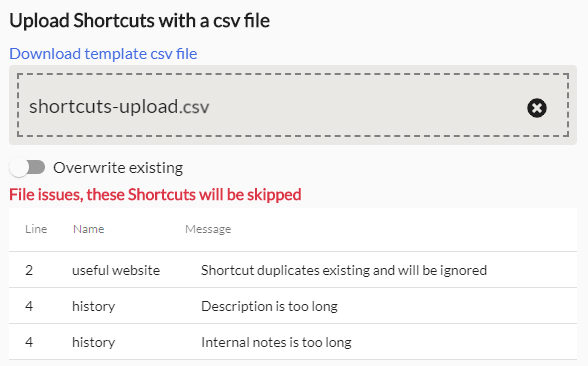
- Other issues, such as those listed in the image below, will be presented below the file, along with the line number in the file that the issue exists and a note that those shortcuts will be skipped. With these types of issues, you can go ahead with the upload and the system will add the other shortcuts in the file that did not have issues, OR you can click the X next to the file name to remove it from the page, fix the errors in the file, and then try the upload again.
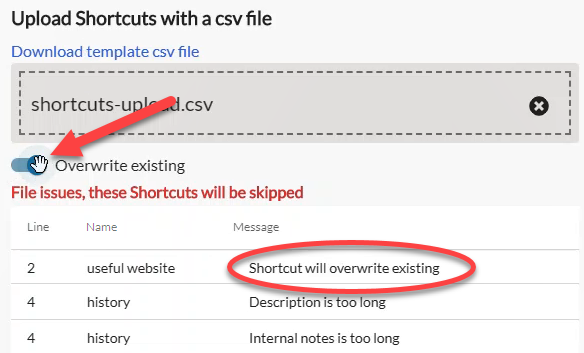
- Optionally, slide the Overwrite Existing toggle to on/blue if you want shortcuts in your file to replace existing shortcuts that have the same name.
- Shortcuts listed with an issue of "Shortcut duplicates existing and will be ignored" will now say, "Shortcut will overwrite existing".
- Overwrite existing is for shortcuts only. It does not work on folders.
- If the file is accepted, you'll see a message stating, Your file looks good, now to add the Shortcuts press save. Click the Save button at the bottom of the page.
- If the shortcuts and folders are successfully added to the account or organization you will see a popup message letting you know the number of shortcuts being added.

If any of the shortcuts or folders could not be added, the popup message will let you know, and you can click on the Notifications icon for more details on which shortcuts or folders could not be added and why.
Some things that won't work:
- You cannot add shortcuts to an existing folder via the spreadsheet. (You can do this manually by editing the folder.)
- You cannot create a new folder with the same name as any other folder in the organization hierarchy.