The Update Organizations page is where you can make mass updates to multiple organizations. This page opens when one or more organizations is selected on the Organizations page list view and the Mass Updates icon![]() is clicked.
is clicked.
 You can update the list view to display the information that you want to change. For example, if you are planning to change the Dictation Hotkey, select Dictation Hotkey on the Customize Columns menu as one of the columns to display. The columns you select here will also be listed on the Update Organizations page.
What do you want to update?
Company-Level Updates
Enabled/Disable Companies
When a company is disabled all divisions and groups below that company (and accounts in them) are also disabled. Disabled accounts within the organization cannot log in to any nVoq application.
When a company is enabled all divisions and groups below that company (and accounts in them) are also enabled. Enabled accounts in enabled organizations have active billing subscriptions.
- Put a checkmark in the Enable/disable companies box at the top of the page (under What do you want to update?) to display the Enabled toggle.
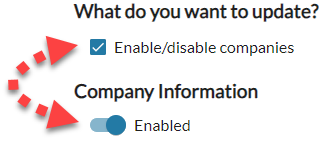
- Slide the Enabled toggle to off (white) to disable the organizations, or on (blue) to enable them.
- Click the Save button at the bottom of page.
- A confirmation message lets you know how many organizations are about to be updated with the changes selected on the screen. Click the Yes, update organizations button to make the changes.
- A popup notification displays near the top-right of the screen when complete. Click the notifications icon
 to see more information.
Division-Level Updates
Enable/Disable Divisions
When a division is disabled all groups below it (and accounts in them) are also disabled. Disabled accounts within the organization cannot log in to any nVoq application.
When a division is enabled all groups below it (and accounts in them) are also enabled. Enabled accounts in enabled organizations have active billing subscriptions.
- Put a checkmark in the Enable/disable divisions box at the top of the page (under What do you want to update?) to display the Enabled toggle.
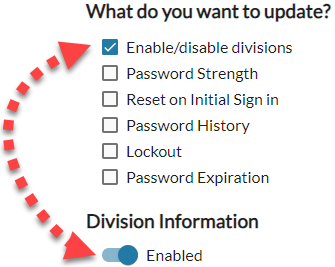
- Slide the Enabled toggle to off (white) to disable the organizations, or on (blue) to enable them.
- Click the Save button at the bottom of page (after you have updated all selected options).
- A confirmation message lets you know how many organizations are about to be updated with the changes selected on the screen. Click the Yes, update organizations button to make the changes.
- A popup notification displays near the top-right of the screen when complete. Click the notifications iconto see more information.
Password Strength
This parameter configures the minimum password complexity required to log in to an nVoq application with an nVoq username and password. Stronger passwords increase password security. For more information about Password Strength, see Password Security for Divisions: Password Strength.
The default password strength displays on the page even if there is a different strength set for the division.
- Put a checkmark in the Password Strength box at the top of the page (under What do you want to update?) to display the Password Strength menu.
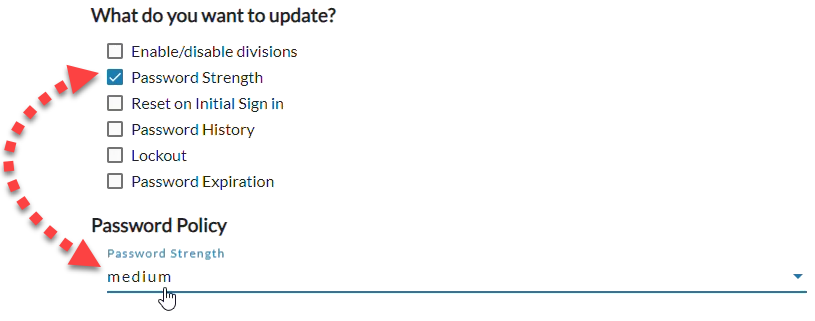
- Open the Password Strength menu and select a new strength (weak, medium, or strong).
- Click the Save button at the bottom of page (after you have updated all selected options).
- A confirmation message lets you know how many organizations are about to be updated with the changes selected on the screen. Click the Yes, update organizations button to make the changes.
- A popup notification displays near the top-right of the screen when complete. Click the notifications iconto see more information.
Reset on Initial Sign In
This parameter configures whether users are required to enter a new nVoq password the very first time they log in to an nVoq application and after password resets.
- Put a checkmark in the Reset on Initial Sign In box at the top of the page (under What do you want to update?) to display the Reset on Initial Sign In toggle.
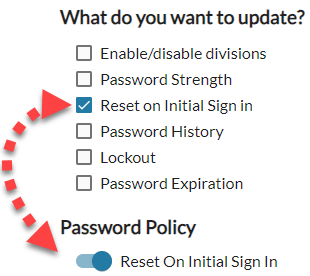
- Slide the Reset on Initial Sign In toggle to off (white) to disable this feature, or on (blue) to enable it.
- Click the Save button at the bottom of page (after you have updated all selected options).
- A confirmation message lets you know how many organizations are about to be updated with the changes selected on the screen. Click the Yes, update organizations button to make the changes.
- A popup notification displays near the top-right of the screen when complete. Click the notifications iconto see more information.
Password History
Enabling password history prevents a certain number of previous nVoq passwords from being reused. The number of passwords that cannot be reused is configured under History Count. For more information about Password History and History Count, see Password Security for Divisions: Password History.
- Put a checkmark in the Password History box at the top of the page (under What do you want to update?) to display the Password History toggle and History Count field.
The default History Count value displays on the page even if there is a different value set for the division.
- Slide the Password History toggle to off (white) to disable this feature, or on (blue) to enable it.
- If enabling Password History, enter the number of the number of previous nVoq passwords that cannot be reused in the History Count field or use the up and down arrows to the right of the field to raise or lower the number. A history count of "1" means user cannot reuse the current password. A history count of "5" means the user cannot reuse the current password or the four previous passwords.
- Click the Save button at the bottom of page (after you have updated all selected options).
- A confirmation message lets you know how many organizations are about to be updated with the changes selected on the screen. Click the Yes, update organizations button to make the changes.
- A popup notification displays near the top-right of the screen when complete. Click the notifications iconto see more information.
Lockout
When this setting is enabled the system will automatically lock a user account after a certain number of failed login attempts. The number of failed login attempts allowed is configured under Maximum Failure. When this setting is disabled, the user has unlimited login attempts. For more information about Lockout, see Password Security for Divisions: Lockout.
The default Maximum Failure value displays on the page even if there is a different value set for the division.
- Put a checkmark in the Lockout box at the top of the page (under What do you want to update?) to display the Lockout toggle and Maximum Failure field.
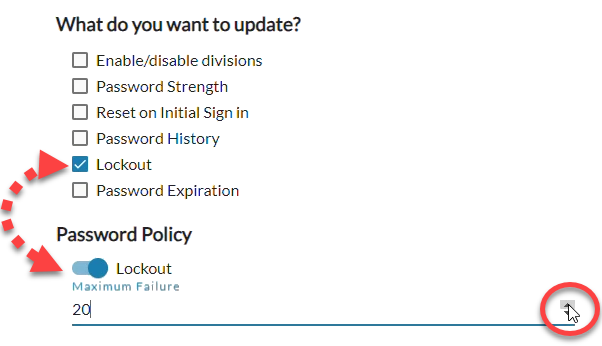
- Slide the Lockout toggle to off (white) to disable this feature, or on (blue) to enable it.
- If enabling Lockout, enter the number of the allowed number of failed login attempts before the system locks the account in the Maximum Failure field or use the up and down arrows to the right of the field to raise or lower the number.
- Click the Save button at the bottom of page (after you have updated all selected options).
- A confirmation message lets you know how many organizations are about to be updated with the changes selected on the screen. Click the Yes, update organizations button to make the changes.
- A popup notification displays near the top-right of the screen when complete. Click the notifications iconto see more information.
Password Expiration
When enabled, this parameter configures password expiration and requires nVoq passwords to be reset after a certain number of days starting from account creation. The number of days is configured under Maximum Age. When cleared, passwords will never expire. For more information about Password Expiration, see Password Security for Divisions: Password Expiration.
The default Maximum Age and Warning Time values display on the page even if there are different values set for the division.
- Put a checkmark in the Password Expiration box at the top of the page (under What do you want to update?) to display the Password Expiration toggle, the Maximum Age (days) field, and the Warning Time (days) field.
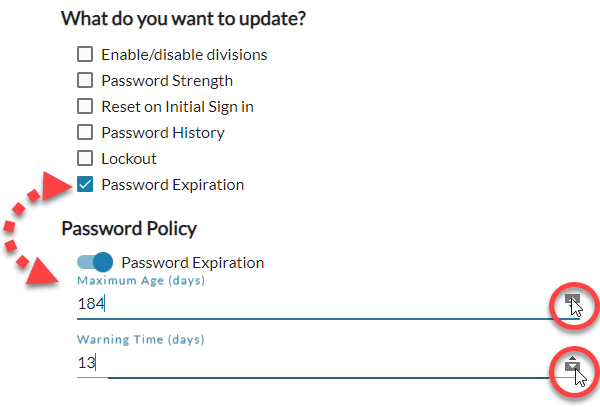
- Slide the Password Expiration toggle to off (white) to disable this feature, or on (blue) to enable it.
- If enabling Password Expiration, enter the number of days that an nVoq password will be valid in the Maximum Age (days) field. After the number of days entered in this field, the password will expire.
- If enabling Password Expiration, enter the number of days prior to nVoq password expiration that the system will notify users that their passwords are going to expire in the Warning Time (days) field.
- Click the Save button at the bottom of page (after you have updated all selected options).
- A confirmation message lets you know how many organizations are about to be updated with the changes selected on the screen. Click the Yes, update organizations button to make the changes.
- A popup notification displays near the top-right of the screen when complete. Click the notifications iconto see more information.
Group-Level Updates
Enable/Disable Groups
When a group is disabled all accounts in it are also disabled. Disabled accounts within the organization cannot log in to any nVoq application.
When a group is enabled all accounts in it are also enabled. Enabled accounts in enabled organizations have active billing subscriptions.
- Put a checkmark in the Enable/Disable Groups box at the top of the page (under What do you want to update?) to display the Enabled toggle.
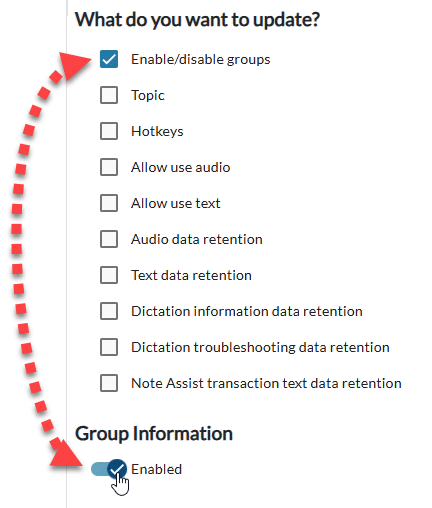
- Slide the Enabled toggle to off (white) to disable the organizations, or on (blue) to enable them.
- Click the Save button at the bottom of page (after you have updated all selected options).
- A confirmation message lets you know how many organizations are about to be updated with the changes selected on the screen. Click the Yes, update organizations button to make the changes.
- A popup notification displays near the top-right of the screen when complete. Click the notifications iconto see more information.
Topic
The topic selected here is the default topic that appears in the dictation client. For more information about the Dictation Topic, see Client Settings: Topic.
- Put a checkmark in the Topic box at the top of the page (under What do you want to update?) to display the dictation Topic drop-down menu.
The default topic displays on the page even if there is a different topic set for the group.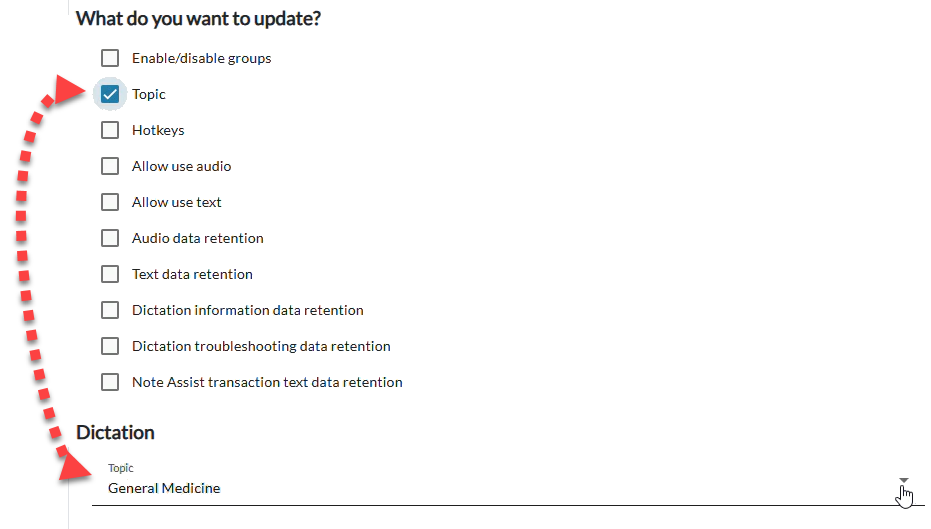
- Open the Topic menu and select a new dictation topic.
- Click the Save button at the bottom of page (after you have updated all selected options).
- A confirmation message lets you know how many organizations are about to be updated with the changes selected on the screen. Click the Yes, update organizations button to make the changes.
- A popup notification displays near the top-right of the screen when complete. Click the notifications iconto see more information.
Hotkeys
The hotkey(s) selected here for Dictation and/or Popup Shortcut are the default hotkeys that will be used in nVoq applications. For more information about Hotkeys, see Client Settings: Dictation Hotkey.
- Put a checkmark in the Hotkeys box at the top of the page (under What do you want to update?) to display the dictation and popup shortcut hotkey fields.
The default hotkeys display on the page even if there are different hotkeys set for the group..png)
- Place your cursor on the line below the label of the hotkey you want to change and then press the key (or keys) on your keyboard that you want the groups to use to record dictations. The key or key(s) will automatically be entered on the line.
- You can press press multiple modifier keys (like Shift, Ctrl, or Alt) together with at least one other key.
- The following key combinations are not allowed because they are already assigned to functions in Windows: Ctrl A, Ctrl C, Ctrl F, Ctrl S, Ctrl V, Ctrl X, Ctrl Y, and Ctrl Z. If you attempt to use one of these key combinations you will see a message that states, "Invalid hotkey."
- Both hotkeys will be updated with whatever displays here, even if you do not make changes.
- Click the Save button at the bottom of page (after you have updated all selected options).
- A confirmation message lets you know how many organizations are about to be updated with the changes selected on the screen. Click the Yes, update organizations button to make the changes.
- A popup notification displays near the top-right of the screen when complete. Click the notifications iconto see more information.
Allow Use Audio
This toggle controls whether or not audio from dictations can be used to improve dictation accuracy and modeling. For more information about Allowing the Use of Audio, see Client Settings: Allow Use of Audio.
- Put a checkmark in the Allow Use Audio box at the top of the page (under What do you want to update?) to display the Allow Use of Audio toggle.
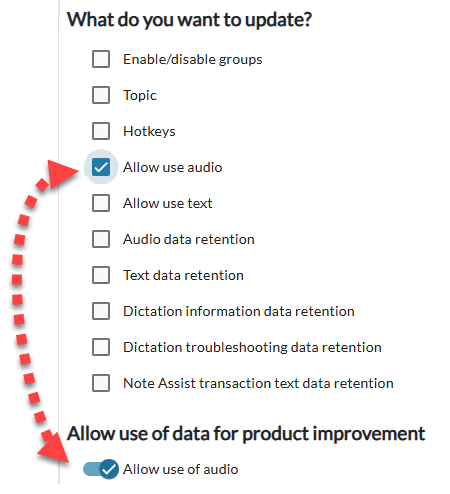
- Slide the Allow Use of Audio toggle to off (white) to disallow the use of the group's audio to improve accuracy, or on (blue) to allow it.
- A popup message appears to let you know that changing this setting affects audio going forward (until the property is changed again). If you want to update the setting, click the Yes, change this setting button. (The setting will not be updated until you click the Save button on the page.)
- Click the Save button at the bottom of page (after you have updated all selected options).
- A confirmation message lets you know how many organizations are about to be updated with the changes selected on the screen. Click the Yes, update organizations button to make the changes.
- A popup notification displays near the top-right of the screen when complete. Click the notifications iconto see more information.
Allow Use Text
This setting controls whether or not text from dictations by this group can be used to build and improve dictation topics. For more information about Allowing the Use of Text, see Client Settings: Allow Use of Text.
- Put a checkmark in the Allow Use Text box at the top of the page (under What do you want to update?) to display the Allow Use of Text toggle.
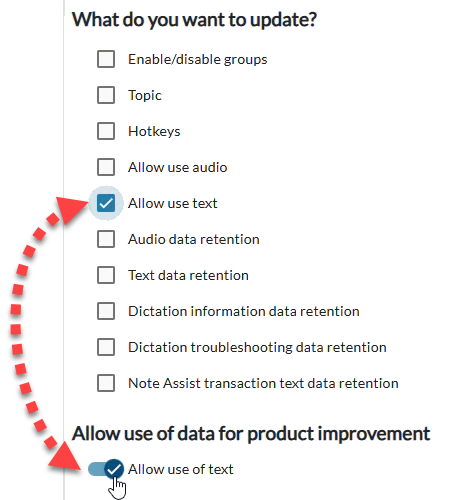
- Slide the Allow Use of Text toggle to off (white) to disallow the use of the group's dictated text to improve dictation topics, or on (blue) to allow it.
- A popup message appears to let you know that changing this setting affects text going forward (until the property is changed again). If you want to update the setting, click the Yes, change this setting button. (The setting will not be updated until you click the Save button on the page.)
- Click the Save button at the bottom of page (after you have updated all selected options).
- A confirmation message lets you know how many organizations are about to be updated with the changes selected on the screen. Click the Yes, update organizations button to make the changes.
- A popup notification displays near the top-right of the screen when complete. Click the notifications iconto see more information.
Audio Data Retention
This setting controls how long audio from dictations and voice shortcuts is stored in nVoq Administrator for review on the Review & Correct page for troubleshooting and sentence modeling. For more information about this setting, see Client Settings: Data Retention - Audio.
- Put a checkmark in the Audio data retention box at the top of the page (under What do you want to update?) to display the Data Retention Audio drop-down menu.
The default value displays on the page even if there is a different value set for the group.
- Open the Audio menu and select the number of days dictation and voice shortcut audio should be stored, or select "Never" to never store it at all.
- Click the Save button at the bottom of page (after you have updated all selected options).
- A confirmation message lets you know how many organizations are about to be updated with the changes selected on the screen. Click the Yes, update organizations button to make the changes.
- A popup notification displays near the top-right of the screen when complete. Click the notifications iconto see more information.
Text Data Retention
This setting controls how long text from dictations and shortcuts is stored in nVoq Administrator for review on the Review & Correct page. For more information about this setting, see Client Settings: Data Retention - Text.
The default value displays on the page even if there is a different value set for the group.
- Put a checkmark in the Text data retention box at the top of the page (under What do you want to update?) to display the Data Retention Text drop-down menu.
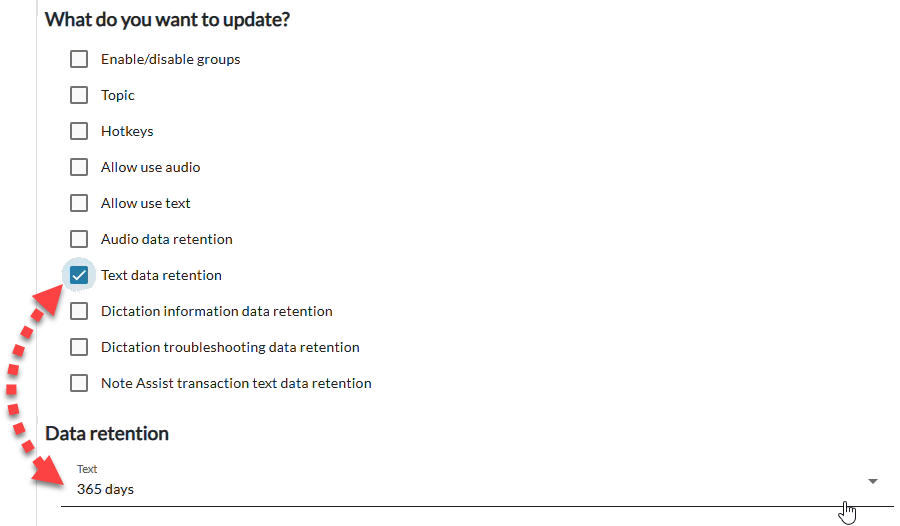
- Open the Text menu and select the number of days dictation and shortcut text should be stored, or select "Never" to never store it at all.
- Click the Save button at the bottom of page (after you have updated all selected options).
- A confirmation message lets you know how many organizations are about to be updated with the changes selected on the screen. Click the Yes, update organizations button to make the changes.
- A popup notification displays near the top-right of the screen when complete. Click the notifications iconto see more information.
Dictation Information Data Retention
This setting controls how long External Identifier (External ID), Metadata, Client Product, Client Vendor, Client Version and Microphone information is stored. For more information about this setting, see Client Settings: Data Retention - Dictation Information.
The default value displays on the page even if there is a different value set for the group.
- Put a checkmark in the Dictation Information Data Retention box at the top of the page (under What do you want to update?) to display the Dictation Information drop-down menu.
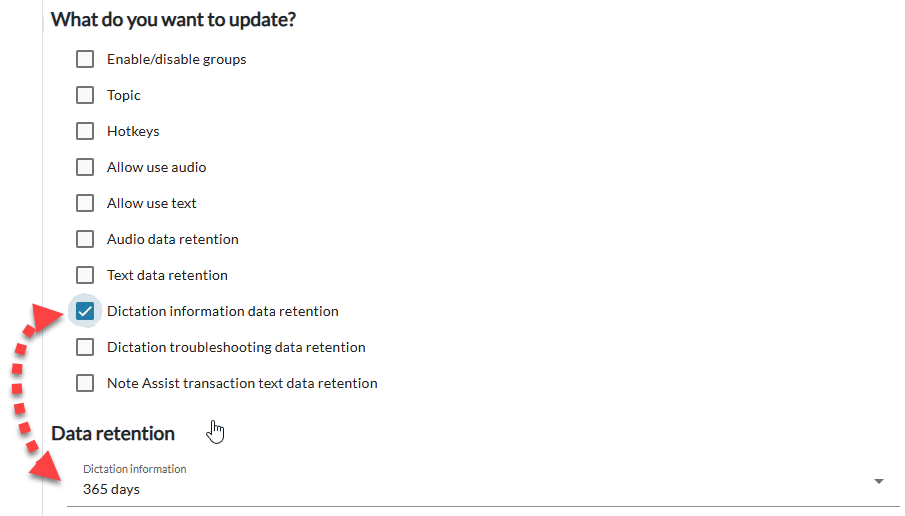
- Open the Dictation Information menu and select the number of days External Identifier (External ID), Metadata, Client Product, Client Vendor, Client Version and Microphone information should be stored, or select "Never" to never store it at all.
- Click the Save button at the bottom of page (after you have updated all selected options).
- A confirmation message lets you know how many organizations are about to be updated with the changes selected on the screen. Click the Yes, update organizations button to make the changes.
- A popup notification displays near the top-right of the screen when complete. Click the notifications iconto see more information.
Dictation Troubleshooting Data Retention
This setting controls how long backend dictation data is stored for troubleshooting. For more information about this setting, see Client Settings: Data Retention - Dictation Troubleshooting Data.
The default value displays on the page even if there is a different value set for the group.
- Put a checkmark in the Dictation Troubleshooting Data Retention box at the top of the page (under What do you want to update?) to display the Dictation Troubleshooting Data drop-down menu.
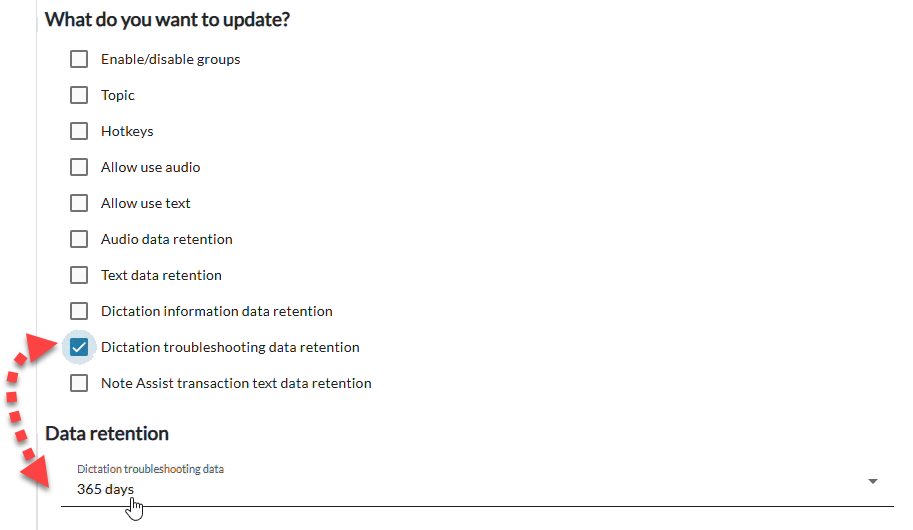
- Open the Dictation Troubleshooting Data menu and select the number of days back-end troubleshooting data should be stored, or select "Never" to never store it at all.
- The value of this setting must be less than or equal to the value of the Audio Data Retention setting.
- Click the Save button at the bottom of page (after you have updated all selected options).
- A confirmation message lets you know how many organizations are about to be updated with the changes selected on the screen. Click the Yes, update organizations button to make the changes.
- A popup notification displays near the top-right of the screen when complete. Click the notifications iconto see more information.
Note Assist Transaction Text Data Retention
This setting controls how long the narrative text that a Note Assist review is run against is stored. For more information about this setting, see Client Settings: Note Assist Transaction Text.
The default value displays on this page even if there is a different value set for the group.
- Put a checkmark in the Note Assist Transaction Text Data Retention box at the top of the page (under What do you want to update?) to display the Note Assist Transaction Text drop-down menu.
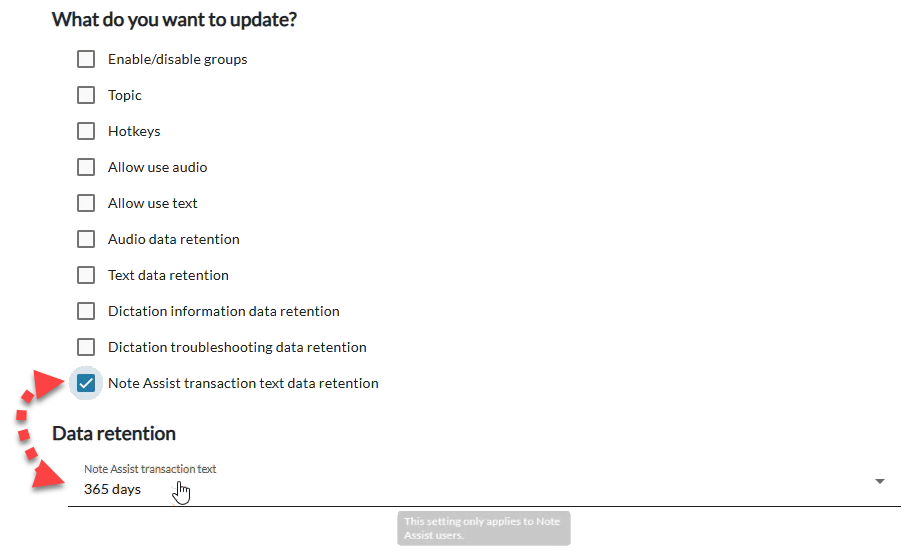
- Open the Note Assist Transaction Text menu and select the number of days narrative text that a Note Assist review is run against should be stored, or select "Never" if you want to never store it at all.
- Click the Save button at the bottom of page (after you have updated all selected options).
- A confirmation message lets you know how many organizations are about to be updated with the changes selected on the screen. Click the Yes, update organizations button to make the changes.
- A popup notification displays near the top-right of the screen when complete. Click the notifications iconto see more information.