On the Organizations page you can create company, division, and group level organizations. You can change password security settings for divisions, or update client settings (like hotkeys and dictation topic) for groups of users.
Organization Hierarchy

System: The first level of the hierarchy is the SYSTEM. nVoq has multiple systems, including Healthcare, Canada, and Test.
The Healthcare system is for production data in the United States and is compliant with U.S. compliance standards (HIPAA).
The Canada system is for production data for customers located in Canada, which has different compliance standards (PIPEDA).
The Test system is for user acceptance testing and includes changes that are coming to nVoq products in an upcoming release.
Tenant: The first level of your organization hierarchy on a particular system is your TENANT. You may have tenants on different systems, for example, you may have a tenant organization on healthcare.nvoq.com and also one on test.nvoq.com. nVoq creates your tenant for you and configures some default options for organizations and accounts there, like what plans or services you have available. Underneath the tenant are three organization levels which can be used to divide user accounts, and act as containers for resources and reporting data. Resources are things like vocabulary, substitutions, shortcuts, and sentence models. These can be added at any organization level, so consider who needs to use them when deciding how to set up your organization hierarchy. Resources added at the tenant level are available to all companies, divisions, and groups. A tenant includes one or more companies.
Company: The organization level under tenant is COMPANY. There are no settings configured at this level, but resources can be added at this level as well. Resources added at the company level are available to all divisions and groups below it. A company includes one or more divisions.
Division: The next organization level is DIVISION and this is where password and security settings are configured for nVoq client-only user accounts in groups below this organization. Resources added at the division level are available to all groups below it. A division includes one or more groups.
Group: This lowest organization level is GROUP and only users belonging to a group have the ability to use dictation. Client settings such as the dictation topic are configured for all accounts at this level. Data retention is also configured here. Resources added at the group level are available to all accounts in the group. A group includes one or more accounts.
Account: An account is an individual end-user. An end-user account may be created at any level of the organization hierarchy (such as a tenant-level administrator), but accounts must belong to a group to use dictation. Resources can also be added at this level, and these can only be used by the account holder.

BEST PRACTICE: Create a branch of the organization (Company, Division, and Group) for non-billable accounts assigned to individuals who support your end-users and manage items such as shortcuts, Note Compose designs, or Note Assist audits. This allows administrators to test their work on those features in a dictation client. Name the organizations with ADMIN in the name and include only non-billable accounts in it. This helps nVoq recognize these accounts as non-billable and also makes it easier for you to exclude non-billable accounts from adoption reports.
Organizations Page Toolbar

Mass Update
This icon will appears in the toolbar when one or more organizations is selected using the checkmark to the left of the list. Click the icon to open the Update Organizations page where you can select one or more changes to make on the selected organizations.
 You can update the list view to display the information that you want to change. For example, if you are planning to change the Dictation Hotkey, select Dictation Hotkey on the Customize Columns menu as one of the columns to display. The columns you select here will also be listed on the Update Organizations page.
Delete 
When one or more organizations are selected in the list on the Organizations page, the delete (trash can) icon appear in the toolbar IF the logged in user has the ability to make changes to the organizations. Click the trash icon to delete the selected organization(s). You will be asked to confirm that you want to delete the organization before it is removed.
New 
Click on the plus symbol to create a new organization. The organization level that you create depends on the organization level selected in the Organization menu at the top of the page. For example, if you have the tenant level selected at the top of the page, this icon will create a new company level organization. If you have a division selected, this icon will create a new group. See Add or Edit Company Organizations, Add or Edit Division Organizations, or Add or Edit Group Organizations
Upload 
Click the upload icon to add up to 10,000 organizations by uploading a spreadsheet instead of creating them one at a time. This feature can only be used to add new organizations, not modify existing ones. See Upload Organizations
Download 
Click on the download icon to download a comma-separated values (CSV) file that includes all organizations in the list view, all organizations in the list view and their child organizations, all selected organizations, or all selected organizations and their child organizations. Download existing organizations that you want to copy to another system, tenant, or organization and use the upload feature to do so. If you want to upload several organizations along with their properties (other than dictation topic), download the organization levels one at a time so that the properties will be included in your downloaded file. See Download Organizations
Support Center 
Click on the question mark icon in the blue toolbar to go directly to the online documentation for the Organizations page. (The black question mark icon at the top right goes to the nVoq Administrator main help page.)
Search
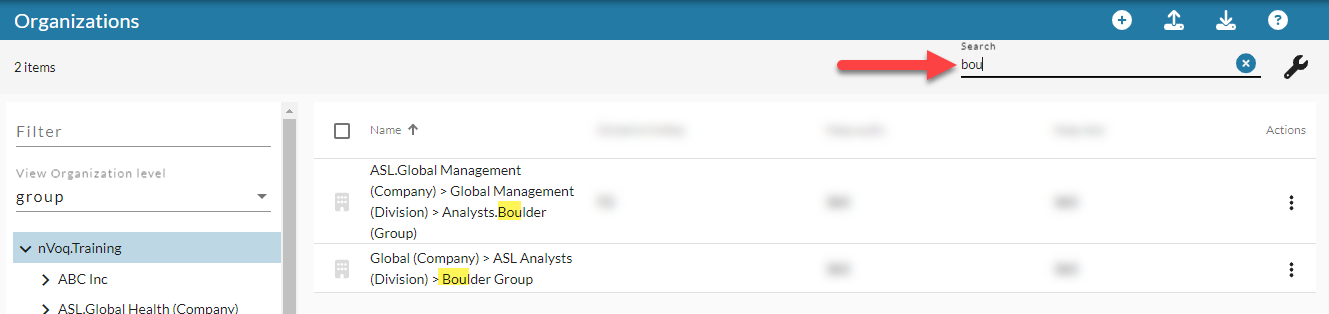
Use the Search field at the top right of the page to search for text in any of the columns in the list view visible on screen. Enter all or part of a word or name.
Customize Columns
Click on the tool icon to open the Customize Columns window where you can select which columns you want to display in the list view, as well as change the order in which they appear.
In the Customize Columns window:
- You can only see settings that are configured at the organization level you are viewing. If you select a division-level setting (like Password Strength) but you're looking at groups, the Password Strength column will be blank.
- Use the checkbox next to the column name to add or remove columns from the Organizations page list view and on the Update Organizations page. At least one column must be selected in order to save your changes.
- Columns appear in the list view in the same order that they appear in this window. You can use the grab icon
 to drag and drop columns in this window to change the order that they appear in the list view.
 - Use the Reset Columns button to reset columns back to the default columns and order. When this button is clicked, the Customize Columns window closes automatically and the default columns are displayed in the list view.
- Use the Cancel button to close the Customize Columns window without saving changes.
- Use the Save button to save any changes you made to the columns that display and/or their order in the list view. Saved changes are immediately visible in the list (you do not need to click the refresh icon). The column selection and order is remembered when you navigate to other pages in nVoq Administrator, and when you log out and log back in.
- Once columns have been customized and saved, the Customize Columns window lists the columns that display on the page at the top of the list, and the columns that are not displayed are listed alphabetically below.
Organizations List View
On the left side of the Organizations page is the menu of organizations that exist in the tenant. Use this menu to filter organizations in the list view on the right of the screen.
While working on this page it does not matter what is selected on the Organization menu at the top of the page. However that menu will change along with your selections.
- Use the Filter field to filter results in the organization menu by name.

- Select an organization level from the View Organization Level drop-down menu to view organizations at that level on the right side of the screen. All organizations below the selected organization display.

- Selecting an organization on the list will also display the organizations below it on the right side of the screen.
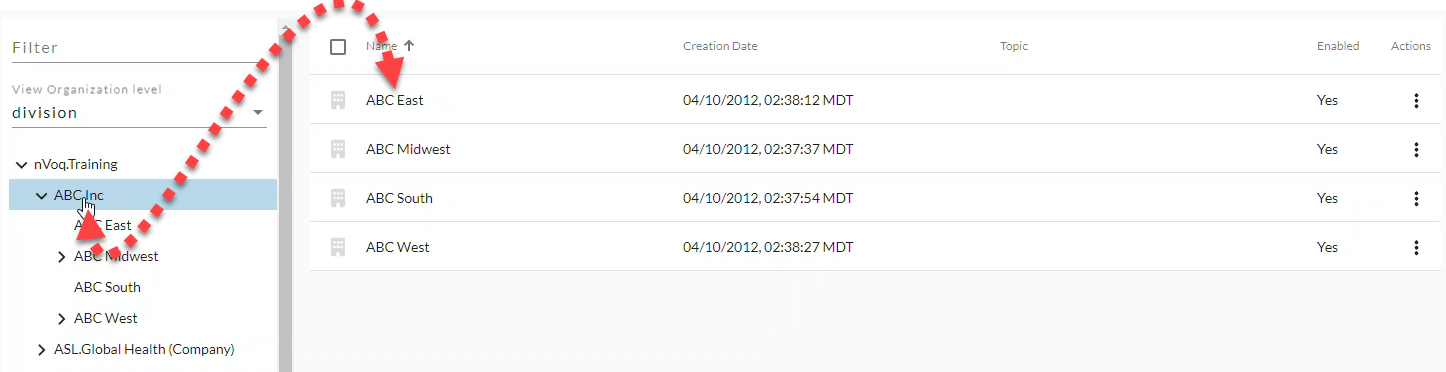
- Regardless of what organization you click on in the menu, you have to also ensure that the View Organization Level menu is set to the level you want to work with. In the example below we have clicked on the company organization, so division names display in the list view. But what we are actually viewing is the groups below the divisions, because the group level is selected in the View Organization Level menu. If we wanted to actually work with divisions, the division level needs to be selected in the View Organization Menu also.

Organizations Page Columns
Click on any column header on the page to sort information in ascending or descending order. The sort order is retained after selecting a different organization in the organization menu. Additionally, sorting and scrolling location are remembered when leaving and returning to a page, even if you log out and back in.
You can change the columns that appear on this page using Customize Columns.

Building Icon / Checkbox
Hover your mouse over the building icon ![]() to put a checkmark in the box to select the organization in order to perform an action on it from the blue toolbar. Once selected, the row turns green and there is a checkmark on the left side.
to put a checkmark in the box to select the organization in order to perform an action on it from the blue toolbar. Once selected, the row turns green and there is a checkmark on the left side.
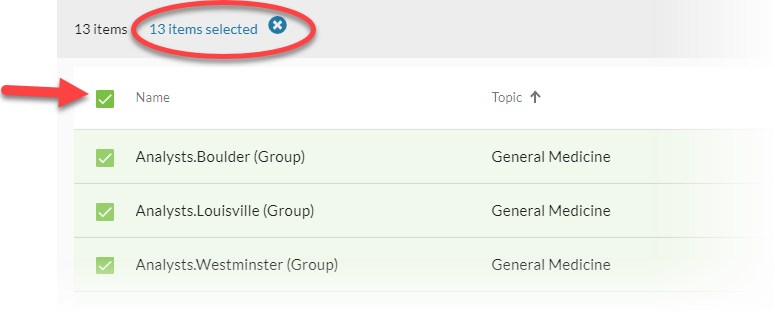
- You can select multiple organizations by clicking on each icon and then perform actions available from the icons in the blue toolbar on all selected organizations.
- You can select all organizations in the list by putting a checkmark in the box to the left of the column headers (above the organization icons).
Name
The name of the organization.
- You can use the Search field near the top-right (in the gray area) to search for an organization by name.
- Double-click on an organization name to edit the organization.
Topic
This column is only available when viewing a list of group organizations. This is the dictation topic that is configured for the group. You can use the Search field near the top-right (in the gray area) to search for an organization by topic name.
Creation Date
The date and time that the organization was created. The time is listed in 24-hour (military) format. You can use the Search field near the top-right (in the gray area) to search for an organization by creation date.
Enabled
This column lists a "Yes" or "No" depending on whether the organization is active (Yes) or disabled (No).
Allow Use of Audio
This column can be displayed in the list by selecting it in the Customize Columns window.
This is a group-level setting that controls whether or not audio from dictations by the group can be used to improve dictation accuracy and modeling. The default setting is on (yes).
This information is stored with each dictation based on the state of the setting at the time of the dictation. If the setting is enabled and disabled, only dictations that occurred while the setting was enabled may be used to improve dictation accuracy and modeling.
Allow Use of Text
This column can be displayed in the list by selecting it in the Customize Columns window.
This is a group-level setting that controls whether or not text from dictations by this group can be used to build and improve dictation topics. The default setting is on (yes).
This information is stored with each dictation based on the state of the setting at the time of the dictation. If the setting is enabled and disabled, only dictations that occurred while the setting was enabled may be used to build and improve dictation topics.
Dictation Hotkey
This column can be displayed in the list by selecting it in the Customize Columns window.
This is a group-level setting that configures the default dictation hotkey in nVoq Voice. The default setting is F2. This property will only display if it was changed to something other than the default at some point, otherwise it will appear blank. For more information, see Client Settings: Dictation Hotkey.
Keep Audio
This column can be displayed in the list by selecting it in the Customize Columns window.
This is a group-level setting that controls how long audio from voice shortcuts and dictations is stored in nVoq Administrator for use on the Review & Correct page. The default value is 365 days. For more information see Client Settings: Keep Audio
Keep Text
This column can be displayed in the list by selecting it in the Customize Columns window.
This is a group-level setting that controls how long text from dictations and shortcuts is stored in nVoq Administrator for use on the Review & Correct page. The default value is 365 days. For more information, see Client Settings: Keep Text.
Lockout
This column can be displayed in the list by selecting it in the Customize Columns window.
This is a division-level setting that enables the system to automatically lock a user's nVoq account after a certain number (see Lockout Maximum Failure) of failed login attempts. The default is on (yes). When disabled the user has unlimited login attempts. For more information, see Password Security: Lockout.
This setting does not affect SSO accounts.
Lockout Maximum Failure
This column can be displayed in the list by selecting it in the Customize Columns window.
This division-level parameter sets the number of failed login attempts a user can make before their nVoq account is temporarily locked. The default value is 15.
This setting does not affect SSO accounts.
Password Expiration
This column can be displayed in the list by selecting it in the Customize Columns window.
This division-level setting enables the ability for nVoq accounts to expire, requiring them to be reset after a certain number (see Password Expiration Maximum Age) of days. When disabled, nVoq passwords never expire. The default setting is on (yes).
This setting does not affect SSO accounts.
Password Expiration Maximum Age (days)
This column can be displayed in the list by selecting it in the Customize Columns window.
This division-level setting configures the number of days that an nVoq account password will be valid, after which the password will expire. The default value is 180 days.
This setting does not affect SSO accounts.
Password Expiration Warning Time (days)
This column can be displayed in the list by selecting it in the Customize Columns window.
This division-level setting configures the number of days prior to password expiration the system will notify users that their nVoq password is going to expire. The default value is 14 days.
This setting does not affect SSO accounts.
Password History
This column can be displayed in the list by selecting it in the Customize Columns window.
This division-level setting prevents a certain number (see Password History Count) of previous nVoq passwords from being used. The default setting is on (yes).
This setting does not affect SSO accounts.
Password History Count
This column can be displayed in the list by selecting it in the Customize Columns window.
This division-level setting configures the number of previous nVoq passwords that cannot be reused. A history count of "1" means the current password cannot be reused. A history count of "5" means the user cannot reuse the current password or the four previous ones. The default value is 1.
This setting does not affect SSO accounts.
Password Strength
This column can be displayed in the list by selecting it in the Customize Columns window.
This division-level setting configures the minimum password complexity required for users to log in to an nVoq application with an nVoq username. The default value is weak. For more information, see Password Security: Password Strength.
This setting does not affect SSO accounts.
Popup Shortcut Hotkey
This column can be displayed in the list by selecting it in the Customize Columns window.
This group-level setting configures the default hotkey that the group will use to open the popup shortcut menu in nVoq Voice. The default hotkey is F4. This property will only display if it was changed to something other than the default at some point, otherwise it will appear blank. For more information, see Client Settings: Popup Shortcut Hotkey.
Reset On Initial Sign In
This column can be displayed in the list by selecting it in the Customize Columns window.
This division-level setting configures whether the user must create a new password the first time they log in to an nVoq application.
This setting does not affect users who sign in with an SSO account.
Save Dictation Information
This column can be displayed in the list by selecting it in the Customize Columns window.
This group-level setting controls how long External Identifier (External ID), Metadata, Client Product, Client Vendor, Client Version and Microphone information is stored. The default value is 365 days. For more information, see Client Settings: Save Dictation Information.
Save Dictation Troubleshooting Data
This column can be displayed in the list by selecting it in the Customize Columns window.
This group-level setting controls how long back-end dictation data is stored for troubleshooting. The default value is 365 days. For more information, see Client Settings: Save Dictation Troubleshooting Information.
Keep Note Assist Transaction Text
This column can be displayed in the list by selecting it in the Customize Columns window.
This group-level setting controls how long the narrative text that a Note Assist review is run against is stored. The default value is 365 days. For more information, see Client Settings: Keep Note Assist Transaction Text.
Actions
Click on the Actions icon![]() to open a menu and select an action to take with the organization.
to open a menu and select an action to take with the organization.
Possible actions may include:
- Edit Organization: Make changes to settings configured for the organization. (This is only visible if your account has the ability to make changes to the organization.)
- View Organization: See settings configured for the organization, but cannot make changes. (This is only visible if your account does NOT have the ability to make changes to the organization.)
- Clone Organization: Make a copy of the organization.
- Delete: Eliminate the organization.