Use Conversation Capture in Voice for Android to record, transcribe, and summarize multi-speaker discussions with your care team or patient. Capture details in real-time so you can stay fully present and engaged in the conversation.
You must be signed in to use this feature. Tap Sign in to Voice.

Record a Conversation
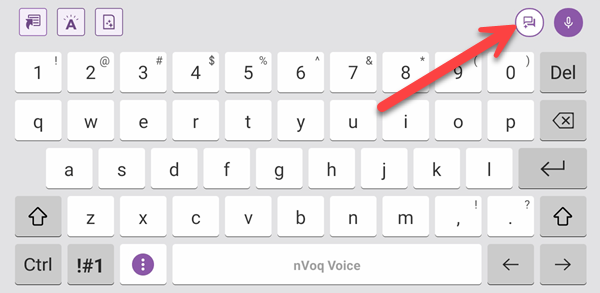
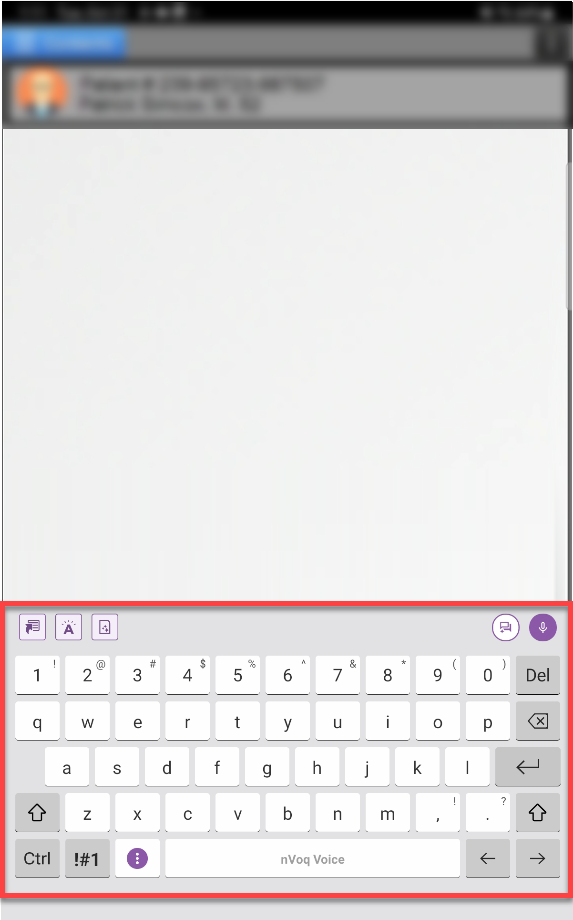
On the keyboard, tap the Voice Assistant button.
If you don't see your keyboard, tap the nVoq Voice icon on the home screen to bring up the settings screen, then tap Launch Voice Assistant.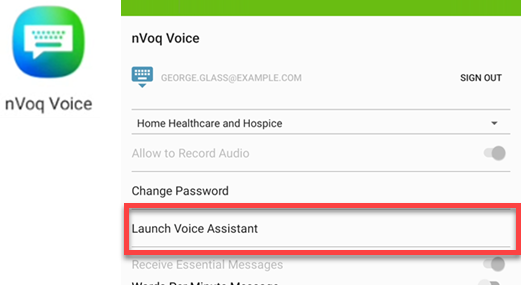
The screen you see when you launch Voice Assistant depends on whether you already have some saved recordings. You can start a recording even if you are offline.
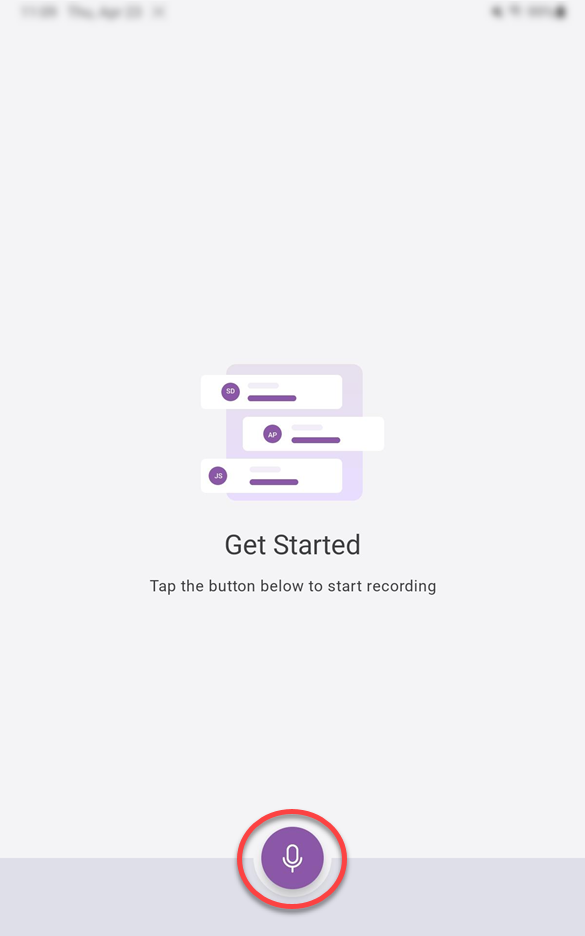
If you have no saved recordings, the Get Started screen appears. Tap the microphone button to start a Voice Assistant recording.
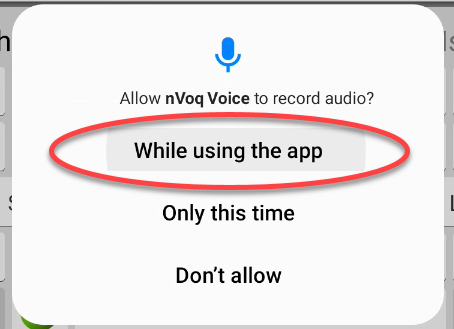
If this is also your first time recording with Voice for Android, a message appears asking you to allow nVoq Voice to record audio. Tap While using the app.
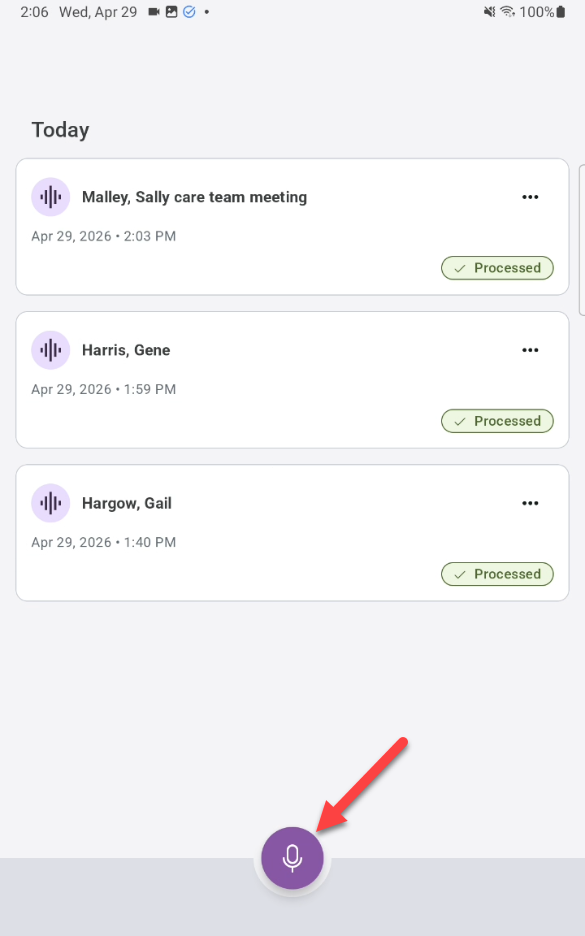
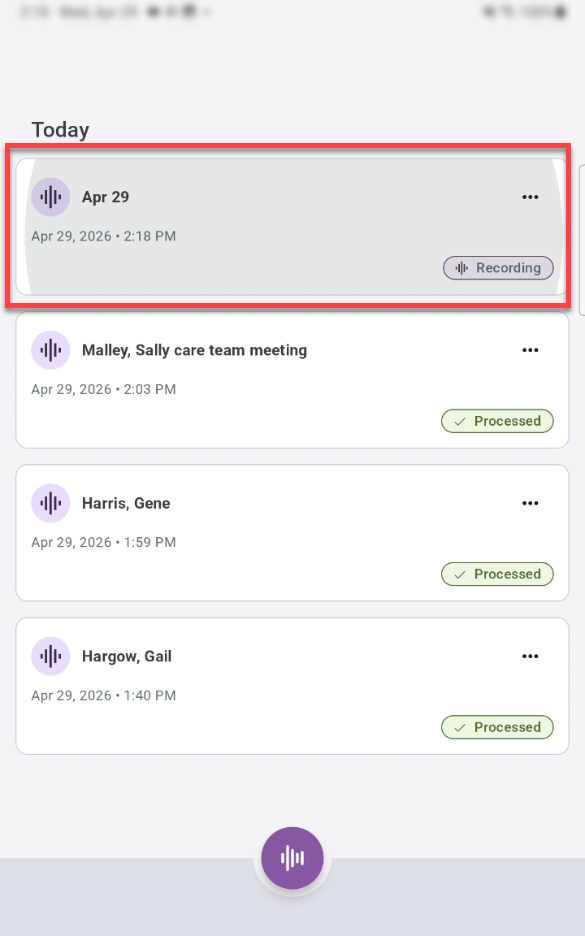
If you have saved recordings, those will display on the Home screen of Voice Assistant. Tap the dictation/microphone button at the bottom of the screen to start recording a multi-speaker discussion.
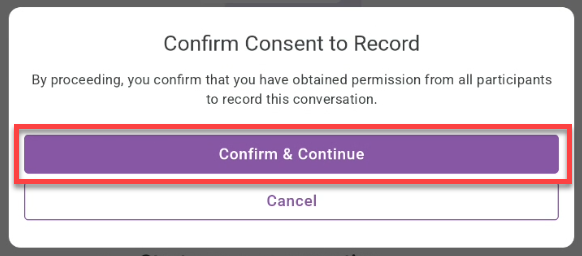
A message appears asking you to confirm whether you have obtained consent from all participants to record their audio. If you have their consent, tap the Confirm & Continue button to record.
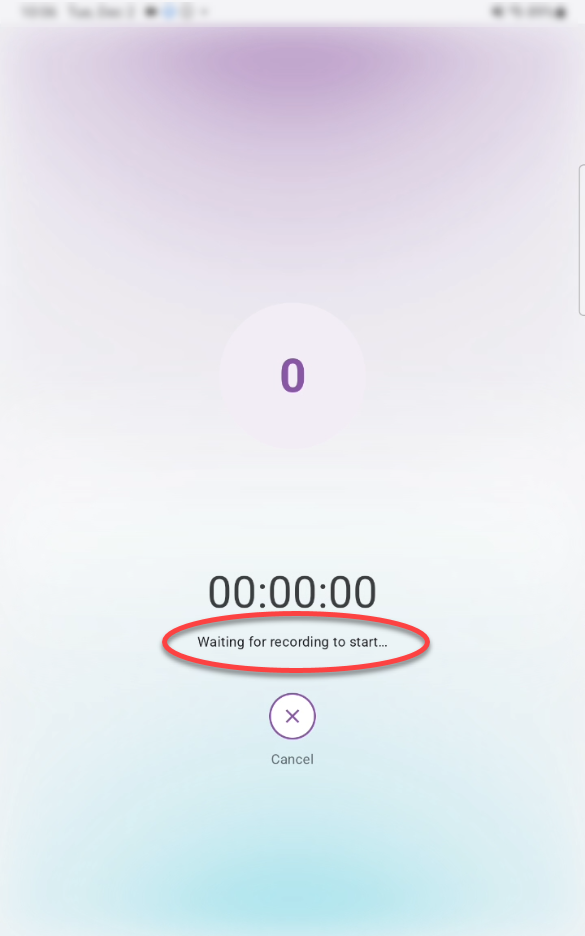
There is a countdown before recording starts. DO NOT LEAVE THIS SCREEN BEFORE RECORDING STARTS. If you do, your recording will not start.

Then a brief message about waiting for recording to start while the service is starting.
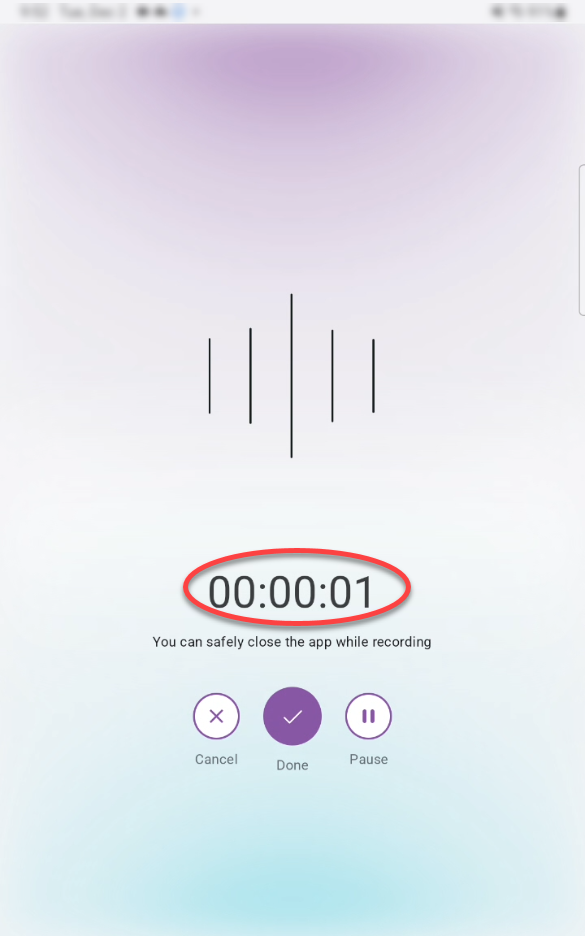
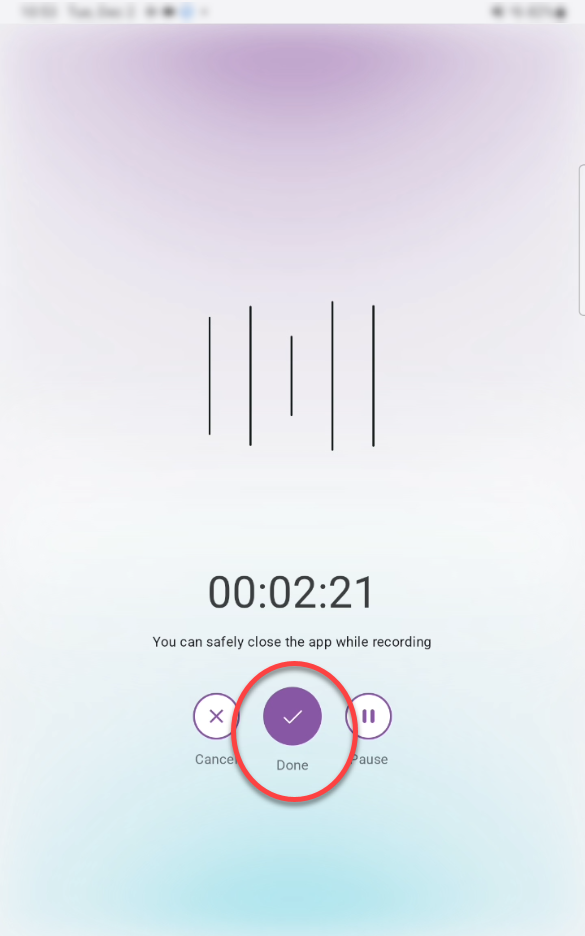
When Voice Assistant is ready to record, a timer begins. At this point, your conversation is being recorded.
Shortly after recording starts a notification appears in your notification panel. You can pause or stop the recording using the buttons on the notification, or stop the recording by swiping the notification left or right.
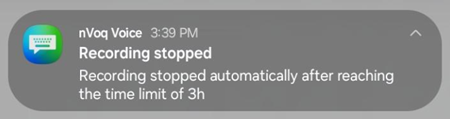
You can record for up to 3 hours (or whenever your device runs out of enough space or battery life to continue).
If your device goes offline while you are recording, a message appears at the top of the screen and remains visible until the device is back online. You can continue recording while offline, and your recording is saved locally on your device until connectivity is restored.

Talk with your patient or care team as you would normally speak (don't worry about punctuation).
Note: Formatting commands (like "new paragraph" or "number next"), punctuation, substitutions, vocabulary, shortcuts, and sentence modeling are not supported when recording a conversation.Be sure to say aloud what is happening and your findings so that they will be included in your note.
You can leave the recording screen and access other apps on your device while recording your conversation. The keyboard will be available when you tap into a text area.
You can type and even record a regular dictation while simultaneously recording in Voice Assistant.
Return to Voice Assistant by tapping the Voice Assistant button on the keyboard.
On the Voice Assistant Home screen the recording card for the recording in progress says "Recording." Tap the recording card to return to the recording screen.
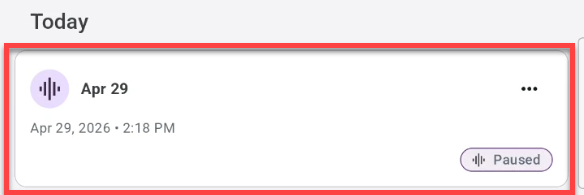
If the discussion shifts to something unrelated or is temporarily suspended, tap Pause to stop recording until you’re ready to continue. You can pause the recording for up to 24 hours. Pause as many times as you like.

If you leave Voice Assistant while paused, just tap the recording card to return to the recording screen.
Tap Resume on the recording screen to resume recording.
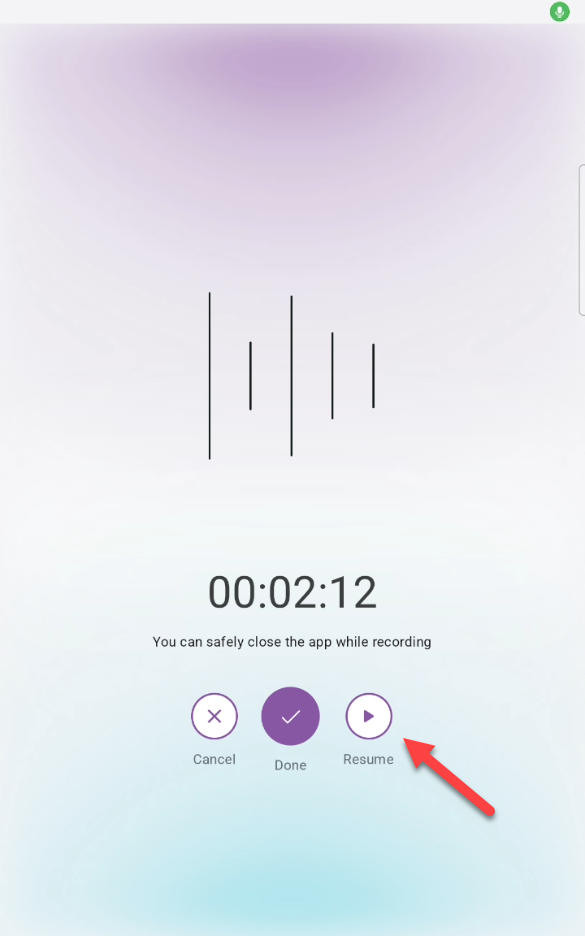
If you attempt to cancel a recording that is in progress, a warning message will ask if you want to cancel. Tap Delete to cancel, or tap Continue to keep recording.
Tap Done when your conversation is complete.
A confirmation will appear. Tap Stop and Finalize to end the recording.
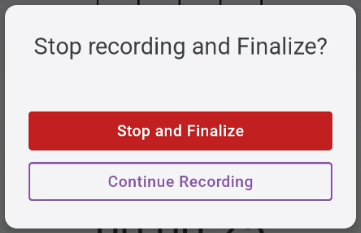
Tapping Continue Recording will resume recording.
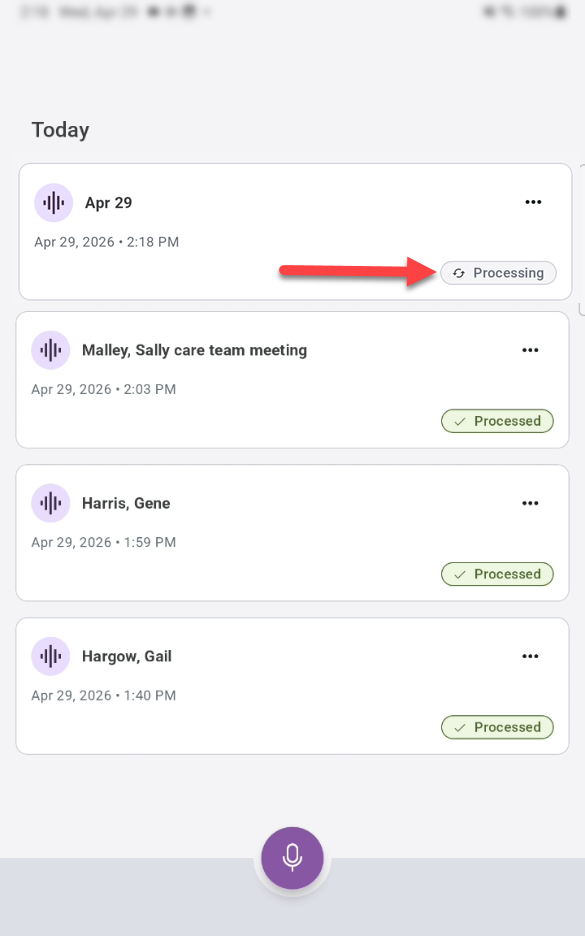
The Voice Assistant Home screen appears, the recording card displays in the list of recordings for Today. If the recording is still processing, that is indicated on the card.
If you are offline, the recording card will say "In queue" and will be automatically processed when your Internet or WiFi connection is restored. You can safely start a new recording while your previous offline recording is in queue.
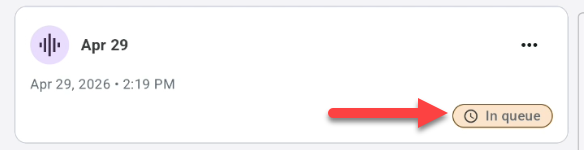
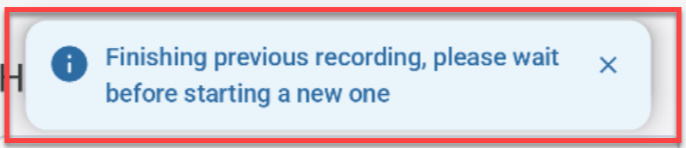
If an online recording shows a status of “In queue,” it means the previous recording is still finishing up. Starting a new online recording at this time may interrupt the new recording. To prevent this, the app will not allow a new recording to start until the previous recording has fully finished processing. If you try to start a recording during this time, a message will appear asking you to wait until the previous recording is complete.
When processing is complete, a confirmation message is displayed on the screen you are currently viewing, to let you know. Once processing is complete, your recording and transcript are saved in nVoq Administrator on the Review & Correct page.
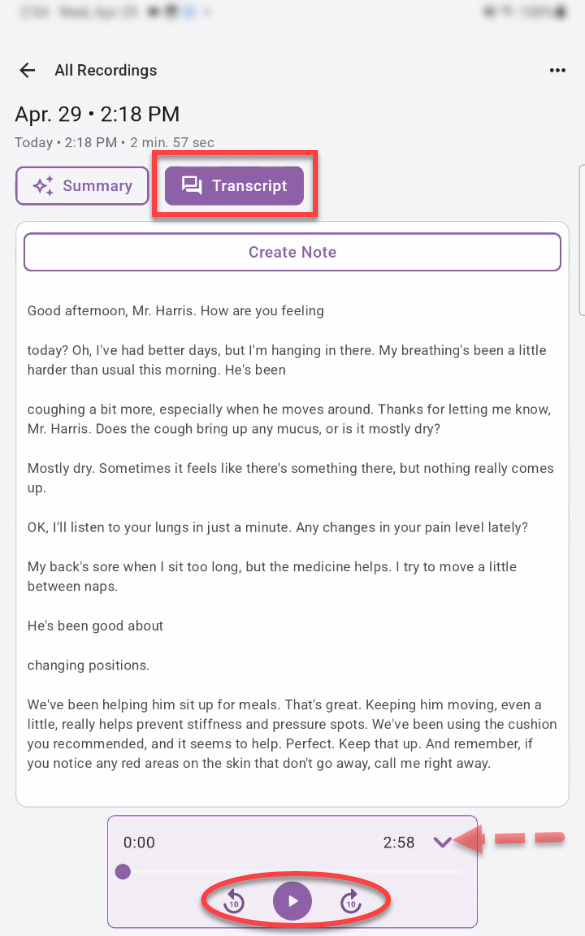
 The processing status is also updated on the recording card below the timestamp. Tap the recording card to open the transcript and summary.
 A transcript of your conversation appears on the Transcript tab. At the bottom of the screen are the playback controls that allow you to listen to the recording. If necessary tap the carat arrow to view all three buttons.
In some cases, after more than 24 hours have passed, a recording’s transcript may not display when you first open it. The audio will still be available, but the transcript area may appear blank.
If this occurs, exit the transcript view and reopen the same recording. The transcript will then display as expected.
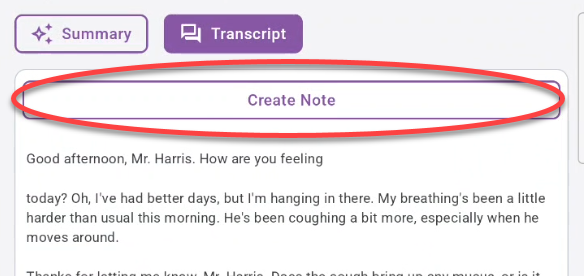
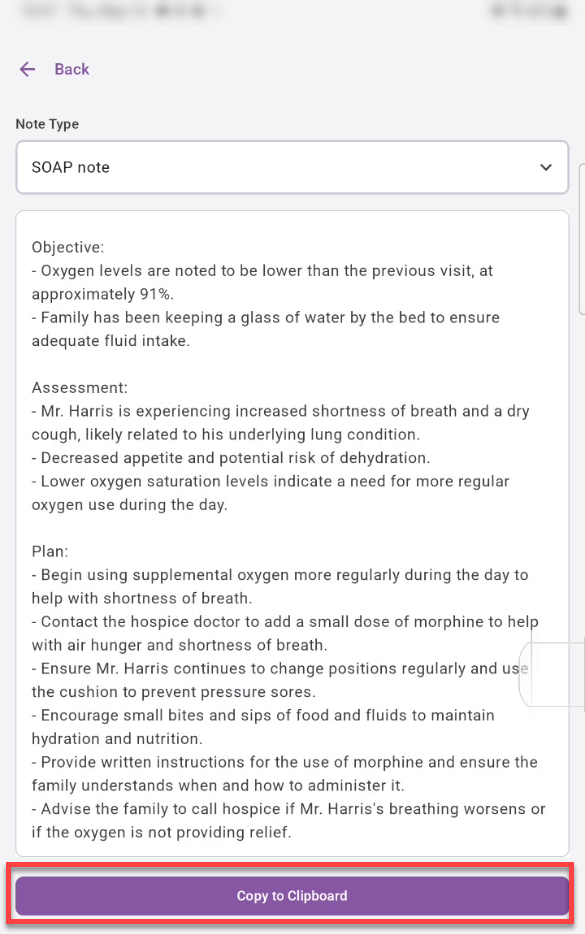
Optionally tap Create Note to create a formatted note from the conversation transcript using Note Compose. (The original transcript remains read-only.)
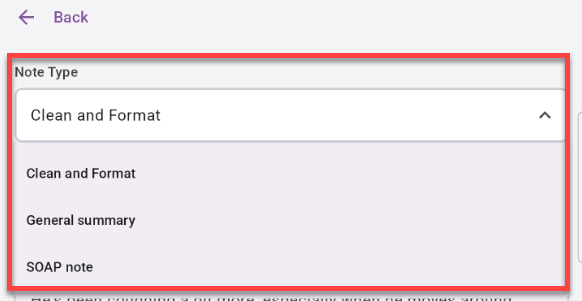
The Clean & Format option will run automatically. When it’s done you can select a different formatting option, if desired.
Select a formatting option from the Note Type menu.
The note is automatically generated from the transcript.

Tap into the text area to open the keyboard and make changes to the note.
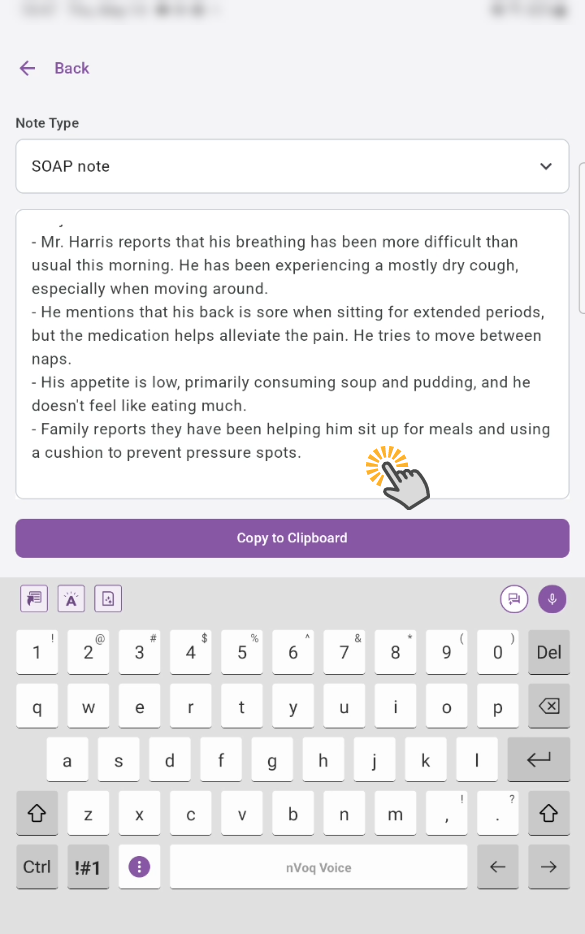
Tap the Copy to Clipboard button to copy the generated note, which you can paste into your EMR.
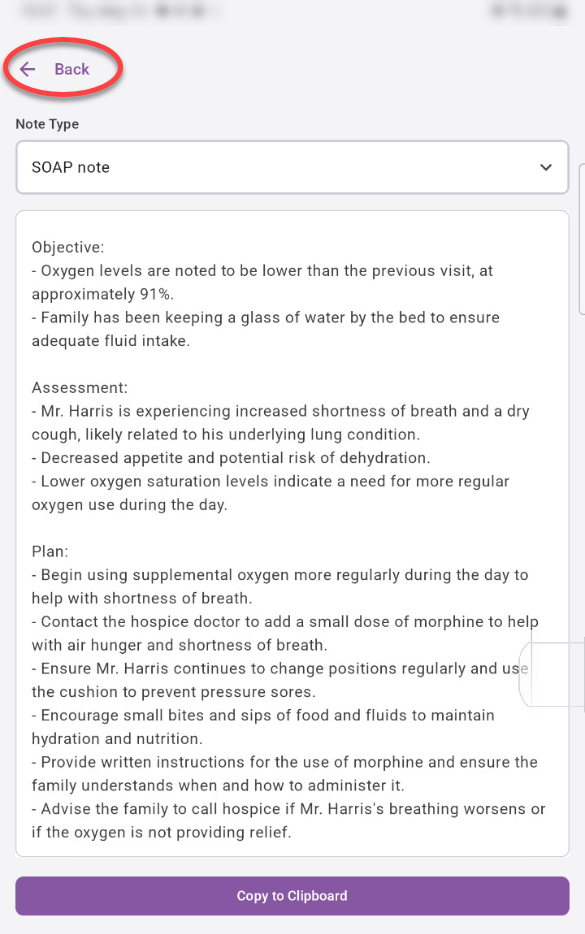
Use the back arrow to go back to the Voice Assistant conversation screen.
Tap the Summary tab to view a summary of your conversation.
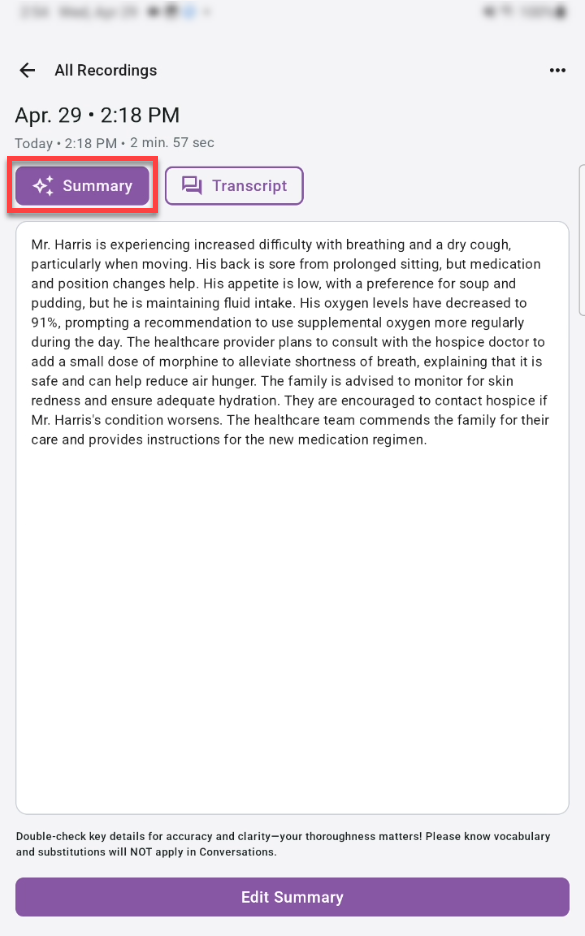
If you'd like to make changes to the summary, tab the Edit Summary button.

When you tap the Edit Summary button the keyboard appears at the bottom allowing you to dictate or type into the summary text area. Make your changes by dictating or typing, and then tap the Update button.
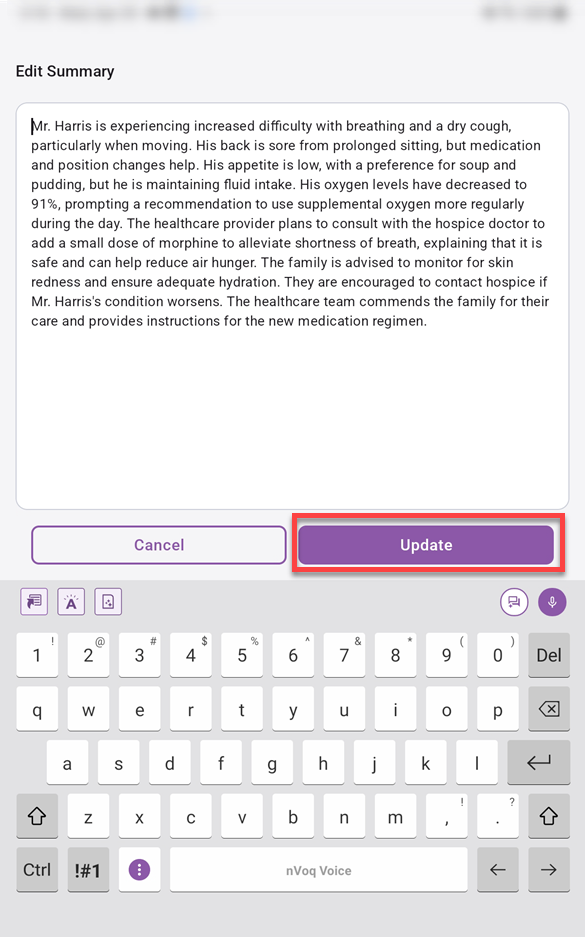
Be sure to REVIEW your summary before posting into your application. Remember that YOU are responsible for the accuracy of your documentation!
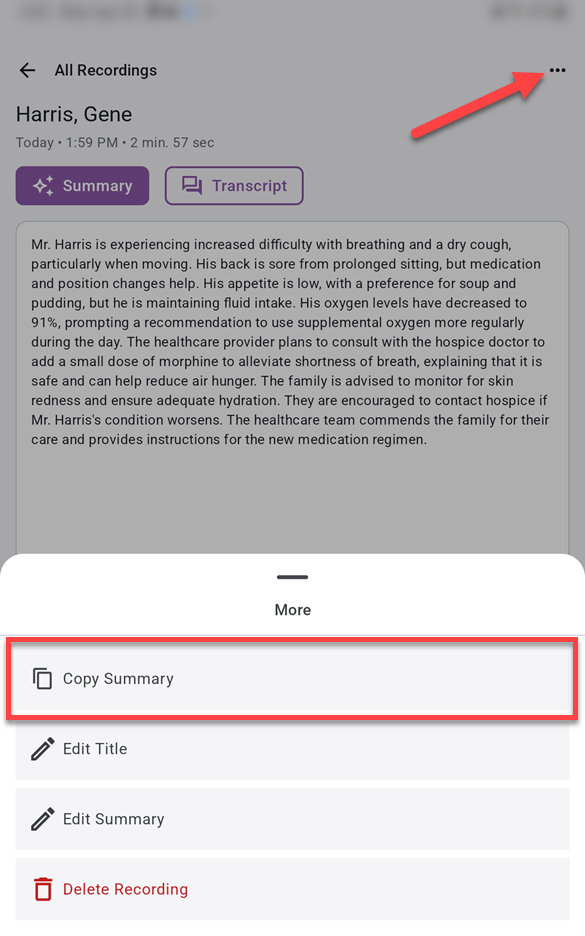
To copy the summary, tap the menu in the upper-right corner of the screen and then tap the Copy Summary button. You can then paste the summary into your system of record.
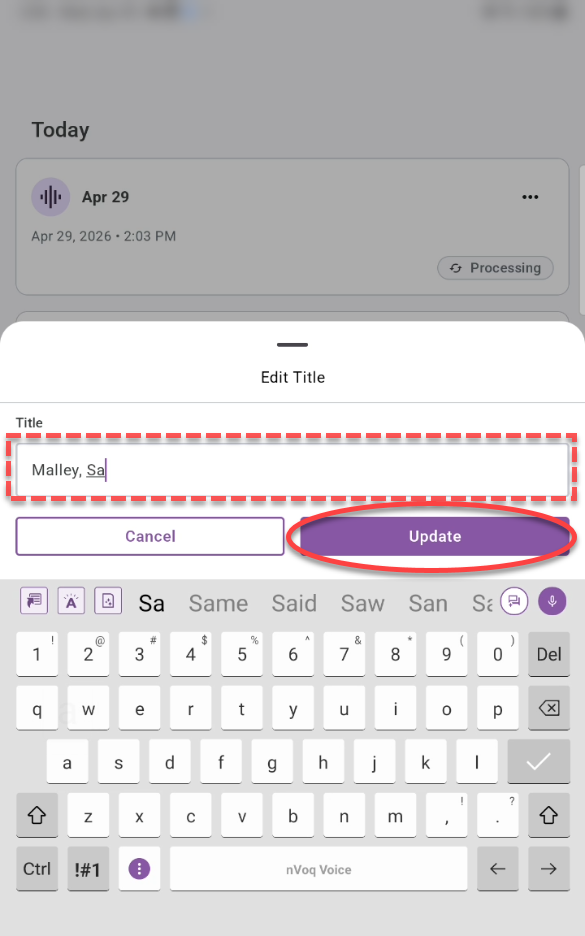
Edit a Conversation Title
The conversation title can be edited while the recording is still processing.
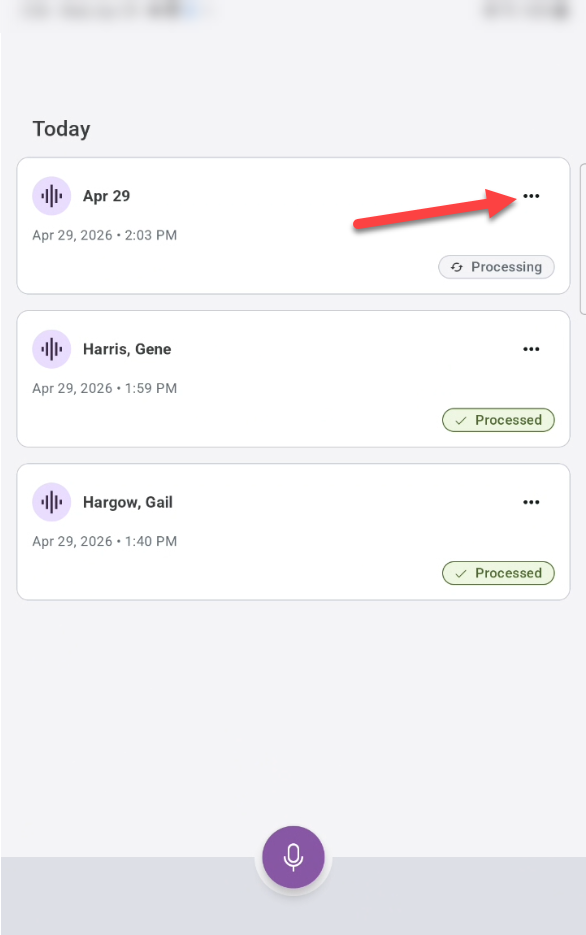
On the Voice Assistant screen tap the More options menu (three dots) of the conversation you want to edit.
On the menu at the bottom of the screen, tap the Edit Title button.
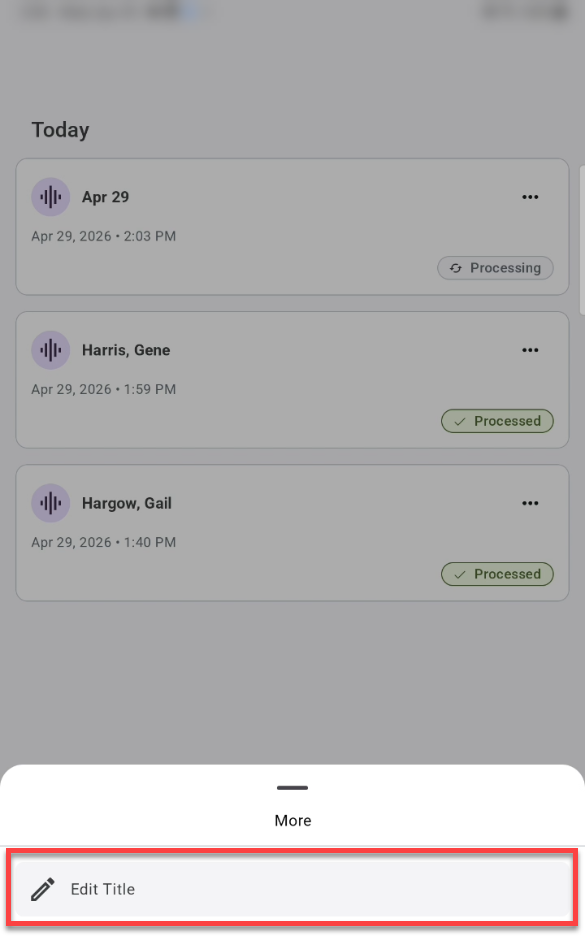
Delete the existing title and enter your new title, then tap the Update button to save your changes (or tap Cancel to keep the original title).
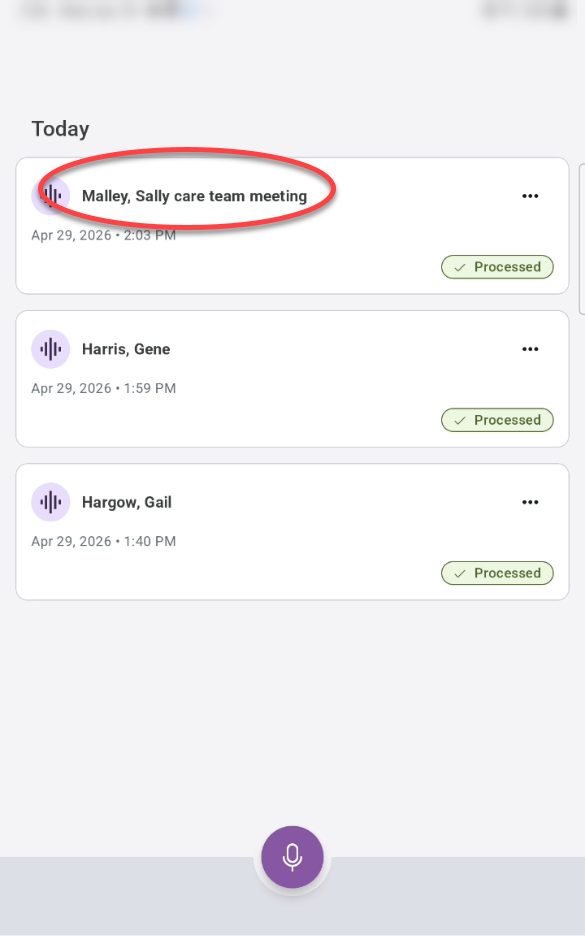
Your recording card displays with the new title on the Voice Assistant home screen.
Delete a Recording Card
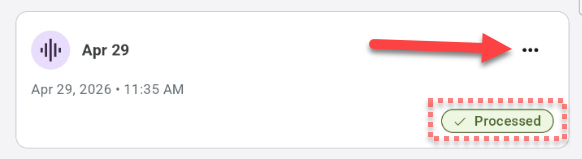
Recordings can only be deleted once they are finished processing.
Tap the three-dot menu on the recording card you want to delete.
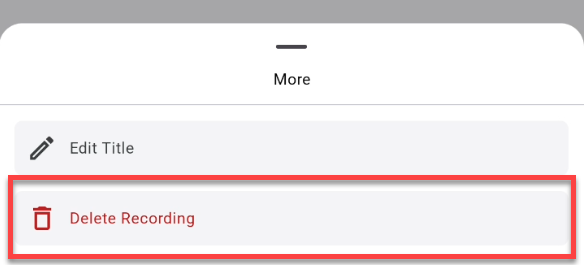
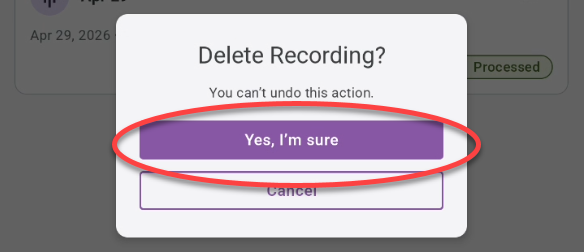
On the menu that slides up from the bottom of the screen, tap Delete Recording. (This option is only available if the recording is processed.)
A confirmation will appear. Tap Yes, I’m sure to delete the recording from your device. (The recording is still saved in nVoq Administrator.)
About Voice Assistant
Formatting commands (like "new paragraph"), punctuation, substitutions, vocabulary, shortcuts, and sentence modeling are not supported when recording a conversation.
If you cancel the recording at any time it will not be added to the list of recordings on the Voice Assistant Home screen, but will be sent to Review & Correct in nVoq Administrator.
Only the conversation transcript is visible in nVoq Administrator (Review & Correct). The summary of the conversation is not.
Because screen height is limited in landscape mode on smaller devices, we restrict Voice Assistant to portrait mode on phone-sized screens.
Dark mode is not supported with Voice Assistant.
Data Security
The following security measures are in place when Voice Assistant is enabled for your account:
Passwords are never stored. When you sign out of the app, any password you entered is cleared automatically.
Sessions expire after 24 hours. For security and HIPAA compliance, the app automatically signs you out after 24 hours of continuous use. If you remain logged in for a full 24-hour session, you’ll be required to sign in again. See also How Recordings Are Managed (below).
The device locks after 30 minutes of inactivity. If the device is inactive for 30 minutes, the screen will lock to prevent unauthorized access. To continue using the app, simply unlock your device using your PIN, face recognition, fingerprint, or your chosen unlock method. See also How Recordings Are Managed (below).
After 30 minutes, the screen’s unlock prompt appears. Depending on your device, this may be a PIN, face recognition, fingerprint, or another unlock method.
How Audio Transcripts & Recordings are Managed
To protect your privacy and keep your device free of unnecessary files, local copies of transcripts and summaries (including edited summaries) are automatically deleted 24 hours after processing is complete.
Transcripts and summaries are encrypted while they are saved locally on your device.
Once transcripts and summaries are removed from your device, they are securely stored in the cloud. You can still open the recording card at any time to view them. Any edits you make to a summary are saved locally when needed (within the 24-hour window) and securely stored in the cloud for future access.
Audio recordings are securely uploaded to nVoq Administrator (Review & Correct). After it's processed on your device, your recording is marked with the date and time it was successfully uploaded.
To protect your privacy and keep your device free of unnecessary files, local copies of recordings are automatically deleted 24 hours after processing is complete. This ensures that sensitive information is not stored on your device longer than necessary.
You can still play your recordings even if they’re no longer stored on your device. They’ll automatically pull from the server and will be ready to play as soon as they finish loading.
Active (un-paused) recordings are automatically stopped after three hours or when the device does not have enough space to continue, whichever comes first. A notification is displayed when recording is stopped.
Your device will lock after 30 minutes of "inactivity," but recording will continue. If your screen locks while you’re recording, the recording will keep going in the background.
If your 24-hour session expires mid-recording, the app waits. You won’t be logged out until you stop the recording, so nothing is lost. Recordings are sent for processing automatically after you sign back in. Any unsent recordings stored on your device will upload for processing once you log in again.
Offline with Voice Assistant
If your device goes offline while using Voice Assistant, a notification will appear at the top of the screen to let you know you’re offline. You can continue recording, and everything will process once the device is back online. The notification appears whether or not you’re actively recording. If you dismiss the message and the device stays offline, it will not reappear automatically unless you restart Voice Assistant or the device switches between offline and online again.
When a user is offline during a recording, or goes offline while a recording is in progress, the app may take up to 30 minutes after the user comes back online to begin processing the recording. During this time, the status will display “In Queue.” When processing begins, the status will automatically change to “Processing.” Once processing starts, it may take approximately the same amount of time as the original recording to complete. This applies to each recording that is currently in the In Queue state.