You can upload Note Compose designs that you have downloaded, or you can create your own file to upload.
Note Compose designs (other than "Clean and Format") are only available in nVoq Voice if Note Compose for structured has been purchased (or if the "advancedInteligentFormatting" property is TRUE for the account or organization).
Upload an Existing File
Open the Note Compose page under the System menu.
Click the Upload icon in the blue toolbar.
On the Upload Note Compose Designs page, click the Choose a file link in the gray box to navigate to your saved comma-separated values (.csv) file, OR drag your saved comma-separated values (.csv) file into the gray box. You can upload a file that you have downloaded, or create your own file.
The system will check the file for issues. If there are no issues with the file, skip to step 5.
Issues with designs will be presented below the file along with the line number in the file on which the issue exists and a message that the design will be skipped (as shown in the image below). You can optionally go ahead with the upload and the system will add the other designs in the file that did not have issues (if any), OR you can click the X next to the file name to remove it from the page, fix the errors in the file, and then try the upload again.
Certain issues, such as an invalid file type or required column headers missing, will not allow the file to be uploaded at all. Click the X next to the file name to remove it from the page, fix the errors in the file, and then try the upload again.
If you see a message that nothing in the file survived validation, that means nothing in the file can be uploaded. Click the X next to the file name to remove the file from the box and fix the issues before attempting to upload again.
Optionally, slide the Overwrite Existing toggle to on/blue if you want designs in your file to replace existing designs in your tenant.
Designs listed with an issue of "Note Compose Design duplicates existing and will be ignored" will now say, "Note Compose Design will overwrite existing".
If the file is accepted, you'll see a message stating, Your file looks good... Click the Save button at the bottom of the page.
If the designs are successfully added to the account or organization you will see a popup message letting you know the number of designs being added. If any of the designs could not be added for some reason you'll see a popup message letting you know. Click on the Notifications icon (
 ) for more details on which ones could not be added and why.
 You may want to open the design in nVoq Administrator and test it to make sure it is working as expected. See Edit Note Compose.
Create Your Own File
It may be easier to create Note Compose designs using the designer rather than creating them inside of a spreadsheet. However, if you want to create your own, here's what you will need to do...
Open the Note Compose page under the System menu.
Click the Upload icon in the blue toolbar.
On the Upload Note Compose Designs page, click the Download template csv file link. This will download a template file (noteComposeDesignSystemTemplate.csv) to your computer.
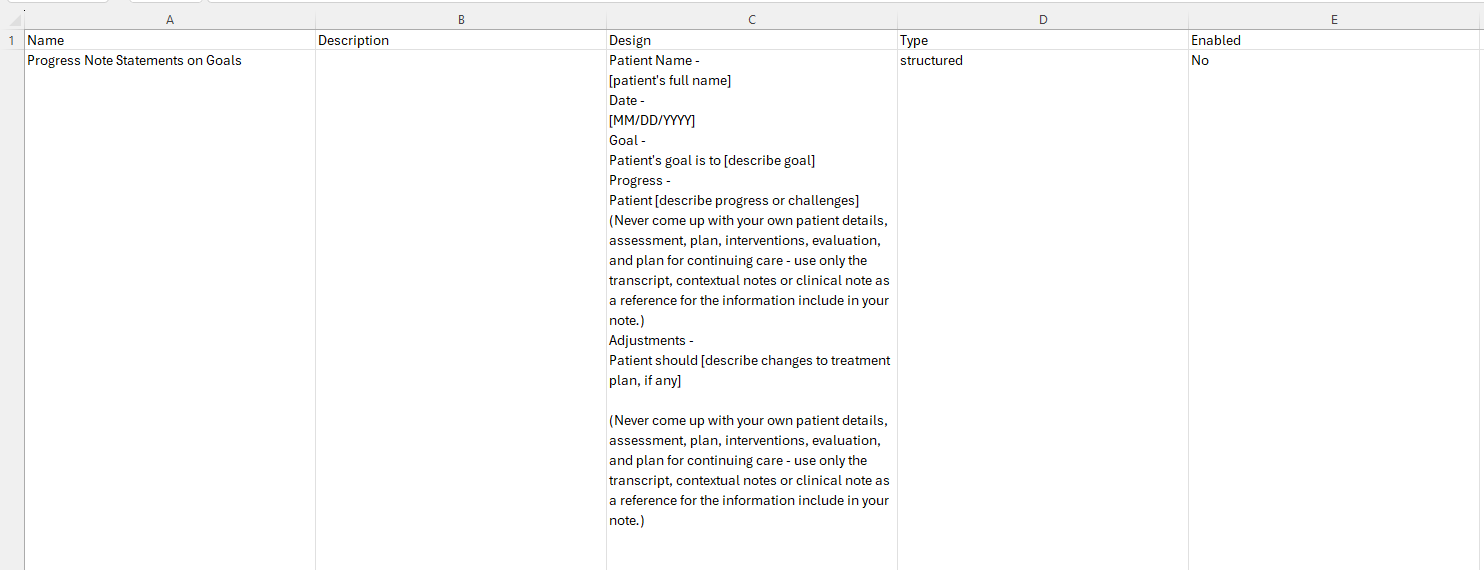
The template includes four column headers: Name, Description, Design, Type, and Enabled. Complete the columns below each header to create your file for upload:
Name: Enter a name for your Note Compose Design. This is the name that will appear in the nVoq Voice Note Compose drop-down menu. (In order for nVoq Voice to have an Note Compose drop-down menu, Note Compose for structured notes must be purchased (or if the "advancedInteligentFormatting" property is TRUE for the account or organization).
Description: Optionally, add a description of your design. The description is only visible in nVoq Administrator.
Design: This is where the actual formatting design goes.
Add headings for each section, as needed. Headings appear as-is in the formatted note.
Add brackets [] to indicate where information from the clinical note should be added into the design during formatting. Between the brackets type what information from the clinical note should be added there. These are called "placeholders."
Add any text you want to appear in the formatted design as-is before or after placeholders. This text should not appear between brackets or parenthesis.
Optionally copy and paste Placeholder Instructions: (Never come up with your own patient details, assessment, plan, interventions, evaluation, and plan for continuing care - use only the transcript, contextual notes or clinical note as a reference for the information include in your note.) These are instructions to the artificial intelligence basically telling it to only use text that is included in the clinical note and not to improvise anything. Add these instructions after a placeholder, outside the brackets. Be sure to include the parenthesis.
Optionally add Final Instruction: (Never come up with your own patient details, assessment, plan, interventions, evaluation, and plan for continuing care - use only the transcript, contextual notes or clinical note as a reference for the information include in your note.) These are instructions to the artificial intelligence that can be added at the bottom of a design, basically telling it to only use text that is included in the clinical note and not to improvise anything. Be sure to include the parenthesis.
Type: Enter the word "structured" or "format" in this column. (This column only appears on the System-level template and system-level downloads. This column is not required, but designs in any file that does not have the Type specified will be automatically classified as "structured.")
Structured: This type of note takes the original text and formats into a specific structure, such as a SOAP Note, in addition to adding punctuation, etc..
Format: This type of note adds punctuation and may fix some typos or add capital letters where they need to be added.
Enabled: Enter "yes" or "no" in this column. A "yes" in this column means the design is enabled. Enabled designs are displayed in nVoq Voice (if the clinician has Note Compose for structured notes). For that reason you may want to keep your design disabled until it is complete and tested to make sure it works as expected.
Save your file somewhere you can easily find it.