On the Upload Accounts page you can add up to 1,000 accounts at once by uploading a comma-separated values file. By uploading accounts, agency account administrators can quickly create and easily upload small or large batches of accounts for clinicians as an alternative to individual creation of each account individually.
If you sign out, close the browser window, refresh the page, or otherwise end your browser session, the upload account job will be aborted. It is recommended to upload fewer accounts at a time. Uploading 1,000 accounts takes about 3 hours, uploading 80 accounts takes about 15 minutes. If your job is aborted you can re-start the upload process using the same file. The system will pick up adding accounts where it left off.
Upload a Spreadsheet of Accounts
To upload a Comma Separated Values (CSV) file of accounts:
- Go to the Accounts page in nVoq Administrator.
Optionally, click the Manage icon in the sidebar to hide the sidebar while you work. - Select the appropriate organization from the organization menu at the top of the page.
Navigate the organization menu by using the Expand All button to open all organizations, by clicking the > arrow next to each organization level to open it, or by typing an organization name in the Filter text field.- Accounts created with a tenant or a company-level organization selected on this menu will automatically adhere to Password & Security Settings for Accounts with an Admin Role. To create accounts that adhere to division-level password settings, select a division- or group-level organization from this menu before creating the accounts.
- Note however that all accounts with an Administrator Role are required to change their password when they first log in and the password will (at that point) automatically adhere to Password & Security Settings for Accounts with an Admin Role regardless of client access or whether or not the account was created below the division level.
- Click the upload icon (
 ) in the blue toolbar.
- You can manually create the account file to upload, or you can use a file that you download from another system (or from the same system if you change the usernames).
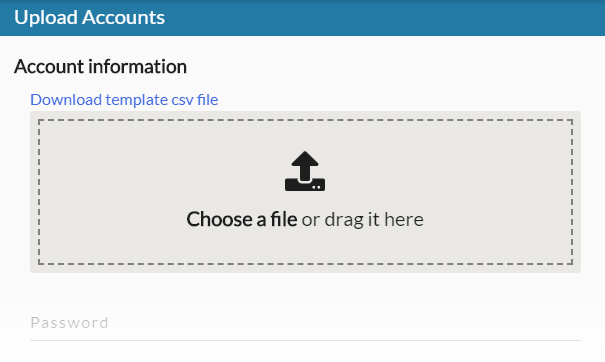
- You can use the Download template csv file link on the Upload Accounts page to download a template that includes the minimum required fields, or you can include additional fields. See Optional Columns for CSV File.
- The minimum required columns for account upload are: Username, First name, Last name, and E-mail.
- If you already have your file, go to Step 5.
- Click on the Choose a file link in the dotted line and navigate to your saved CSV file OR drag your CSV file from an open directory into the dotted line box.
- The system will check the file for issues.
- If no issues exist, go to step 7.
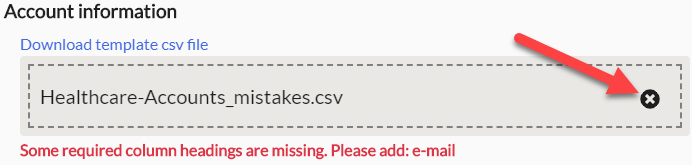
- Certain issues, such as an invalid file type or if required column headers are missing, will not allow the file to be uploaded at all. Click the X next to the file name to remove it from the page, fix the errors in the file, and then try the upload again.
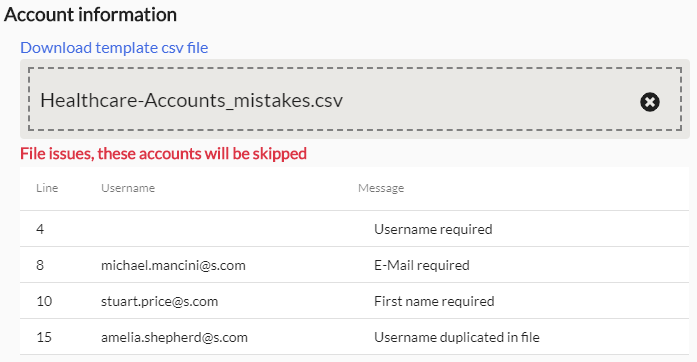
- Other issues will be presented below the file, along with the line number in the file that the issue exists and a note that those accounts will be skipped. With these types of issues, you can go ahead with the upload and the system will add the other accounts in the file that did not have issues, OR you can click the X next to the file name to remove it from the page, fix the errors in the file, and then try the upload again.
- If you see a message that nothing in the file survived validation, that means no items in the file could be uploaded. Click the X next to the file name to remove the file from the box and fix the issues before attempting to upload again.
- Complete the rest of the fields on the page. See Account Information for more information about each field.
Note that this will be the same information for all of the users on the spreadsheet unless you add optional columns to the CSV file. - Click the Save button.
Once all required information is completed on the page, the Save button at the bottom right of the page will become active.- You can navigate to other pages in nVoq Administrator while accounts are being created, but if you go back to the Accounts page you will no longer see the icon spinning indicating work being done. Instead you will see the accounts in the list that have been added so far.
- If you sign out, close the browser window, refresh the page, or otherwise end your browser session, the add account job will be aborted. Work is being done to improve this process. If your job is aborted, you can re-start the upload process using the same file. The system will pick up adding accounts where it left off.
- The process for adding 1,000 accounts may take around three hours to complete and the nVoq Administrator session will never time out during account upload.
- When the save is complete, the new accounts that were added will be listed on the Accounts page in the organization in which it was added.
- If any of the accounts could not be added, you'll see a popup message letting you know. Click on the Notifications icon
 for more details on which accounts could not be added and why.
A profile management job starts creating the user's "profile" when the account is created, but the user (if given the ability to use dictation) can start using dictation immediately even if that job has not completed. Keep in mind however that dictations performed during this time will not get the benefit of sentence modeling or vocabulary (if any) until the profile management job is complete.
Create a CSV File to Upload
- Go to the Accounts page in nVoq Administrator.
Optionally, click the Manage icon in the sidebar to hide the sidebar while you work. - Click the upload iconin the blue toolbar.
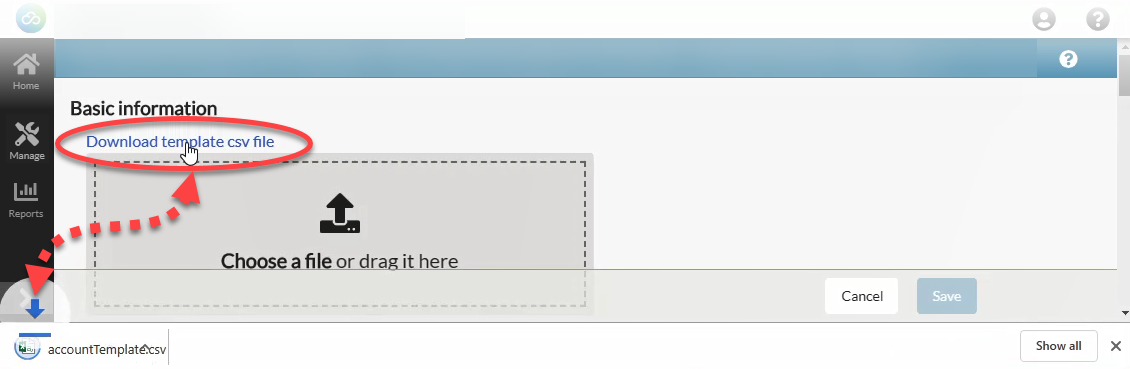
- On the Upload Accounts page, click the Download template csv file link to download a template that you can use to create the spreadsheet of accounts. This file includes the minimum required fields required to upload accounts. If you want to include optional columns in your file, see Optional Columns on CSV File.
- Enter the user information into the appropriate the template columns (Username, First name, Last name, E-Mail) for each account.
- ENSURE THAT NO EXTRA SPACE OR BREAK CHARACTERS ARE ENTERED INTO THE SPREADSHEET CELLS. This can happen when copying and pasting from another application. When you highlight information in a cell of the spreadsheet, there should be no extra spaces highlighted. If there are, delete them before saving and uploading the spreadsheet.
- All text must comply with UTF-8 character encoding without BOM.
- The following characters are NOT allowed in a username: " * / : < > ? | { } & ; \ # +, space, control, or non-ASCII characters
- The spreadsheet cannot contain " * / : < > ? \ | ' & ; # + or other non-English characters.
- The spreadsheet can include a maximum of 1000 accounts, and a minimum of 1.
- Username must be unique in the file and across the entire system (e.g. healthcare, canada, or secure), including system account usernames.
- Username cannot contain spaces.
- Username can include a maximum of 100 characters.
- First Name and Last Name can include a maximum of 45 characters each.
- Email address can include a maximum of 255 characters.
- By default all users on the spreadsheet will have the same password and be added to the same Client Group, etc. by using the fields on the Upload Accounts page. It is possible to add some optional columns to the CSV file to put users in different Client Groups or have different passwords, for example. For more information, see Optional Columns on CSV File.
- If you are creating non-billable accounts, please be sure to add one of the following extensions to each of the usernames so that we at nVoq can see why the accounts are non-billable:
- .admin – For a non-billable user who will be using this account to administer client users (for example: george.glass@email.com.admin).
- .demo – For a non-billable user who will be using this account to demo the client (for example: george.glass@email.com.demo).
- .supp – For a non-billable user who needs an account for supporting client users (for example: george.glass@email.com.supp).
- Save the file someplace you can easily find it. Make sure it has a .csv file extension!
- Upload the file.
Optional Columns on CSV File
You can include any of the following optional columns in the CSV file to add specific information for individual users.
Column headers (titles) are CASE SENSITIVE!
- Any of the fields in the account creation API (https://test.nvoq.com/apidoc/administration#operation/AccountsPost) can be used as an optional column in the CSV file, however some of the columns require a UUID or special code.
- Information on the CSV file overwrites information entered on the Account Upload page during the file upload. You still need to enter required information on the Upload Accounts page. The information on the spreadsheet will OVERRIDE the information entered on the page.
- The column header/title must be the SAME CASE as listed in the API.
- password has a maximum character count of 45. Note: If the column is labeled Password (capital "P"), account passwords are not created or updated. Instead, an account property named Password is created, which appears on the Account Properties tab of the Edit Account page. To create or update account passwords successfully, the column heading must be password (lowercase "p").
- comments has a maximum character count of 256.
- products (if added via CSV file) must be added using the product code listed in the API documentation, with multiple products separated with a comma (e.g.
NVDSK-VOC-000,NVMBD-KEY-000). For a list of available product codes, see https://test.nvoq.com/apidoc/administration#tag/Products/operation/ProductsGet This information is easier to enter on the Upload Accounts page during file upload. Note:NVMBD-KEY-000should be used for both nVoq Voice for Android and for iOS. - adminLevel must be a UUID. This information is easier to enter on the Upload Accounts page during file upload.
- plan must be a special code. This information is easier to enter on the Upload Accounts page during file upload.
- clientGroup must be a UUID. This information could be added on the CSV (in a human-readable form) by adding the Tenant, Company, Division, and Group columns instead (see below).
- The following optional columns must be used together on the CSV file. For example, if you are trying to add the accounts to a particular group, you must include the Tenant, Company, Division, and Group columns on the spreadsheet. It does not matter at what organization level the accounts are uploaded.
- Tenant configures an account in a particular Tenant level organization. Enter the Tenant organization name in which the account should be located.
- Company configures an account in a particular Company level organization. Enter the Company organization name in which the account should be located. This company must already exist in you organization.
- Division configures an account in a particular Division level organization. Enter the Division organization name in which the account should be located. This division must already exist in you organization.
- Group configures an account in a particular Group level organization. Enter the Group organization name in which the account should be located. This group must already exist in you organization.
You still need to select a Client Group from the drop-down menu on the Upload Accounts page. The organizations on the spreadsheet will OVERRIDE the Client Group selected from the menu.
Organizations must already exist before account upload!
Organization names are CASE SENSITIVE and names on the spreadsheet must match those in nVoq Administrator exactly.
![]() CLICK HERE to download a CSV file that includes the required fields and the most popular optional fields for account upload.
CLICK HERE to download a CSV file that includes the required fields and the most popular optional fields for account upload.