The Update Accounts page is where you can make mass updates to multiple accounts. This page opens when one or more accounts is selected on the Accounts page list view and the Mass Updates icon is clicked.
If you want to make a change to one account at a time, you can use the Edit Account page.
 You can update the list view to display the information that you want to change. For example, if you are planning to change the Enabled Through date, select Enabled Through on the Customize Columns menu as one of the columns to display.
The columns you select here will also be listed on the Update Accounts page.
You can change multiple options at once by selecting more than one checkbox at the top of the page.
Changes for each selected option will be made to all selected accounts (which are listed at the bottom of the page).
What do you want to update?
Enabled/disable accounts
Select the Enable/disable accounts checkbox if you want to activate or deactivate all selected accounts.
Disable Accounts
Put a checkmark in the Enable/disable accounts box at the top of the page (under What do you want to update?) to display the Enabled toggle.
Slide the Enabled toggle to off (white) to disable the accounts so they will not able to log in to any nVoq application.
Click the Save button at the bottom of page (once you have updated all selected options).
A confirmation message lets you know how many accounts are about to be updated with the changes selected on the screen. Click the Yes, update accounts button to make the changes.
An account that is NOT enabled does not have an active billing subscription.
A selected account will fail to be disabled if...
The account has a higher Administrator Level than yours.
The account was auto provisioned. Auto provisioned accounts can only be disabled via the SSO provider or by disabling one or more of the user's organizations.
Enable Accounts
Put a checkmark in the Enable/disable accounts box at the top of the page (under What do you want to update?) to display the Enabled toggle.
Leave the Enabled toggle on (blue) to enable the accounts.
Click the Save button at the bottom of page (once you have updated all selected options).
A confirmation message lets you know how many accounts are about to be updated with the changes selected on the screen. Click the Yes, update accounts button to make the changes.
If any of the selected accounts is new and has their Trial Expires option set to a date (as opposed to "No Trial"), enabling the account will start their trial period.
When an account is first enabled, a subscription is created in the billing system for that user in accordance with their Plan.
Accounts with a monthly "Usage" plan are billable immediately. They are billed on the 1st of the month based on client usage from the previous month.
Accounts with a non-usage plan become billable once the trial period (if any) has ended. Accounts are billed on the 1st of the month for the current month going forward.
A selected account will fail to be enabled if...
One or more of their organizations is disabled.
The account has a higher Administrator Level than yours.
The account has an Enabled Through date that has passed. You must clear or reset an expired Enabled Through date in order to enable the account.
The account was auto provisioned.
After a failed attempt to enable or disable user accounts the notification message (which you can see by clicking on the bell icon at the top of the screen) lists the usernames of the accounts that failed. The failed accounts will also be listed in red text in the Accounts page list view so you can easily find them.
Enabled Through Date
Select the Enabled Through date checkbox to change or clear the expiration date for all selected accounts.
Set a new Enabled Through Date
Put a checkmark in the Enabled Through date box at the top of the page (under What do you want to update?) to display the Enabled Through field with calendar widget.
Click on the calendar icon.

Select a new date from the calendar widget. Use the <> arrows to move through the months.
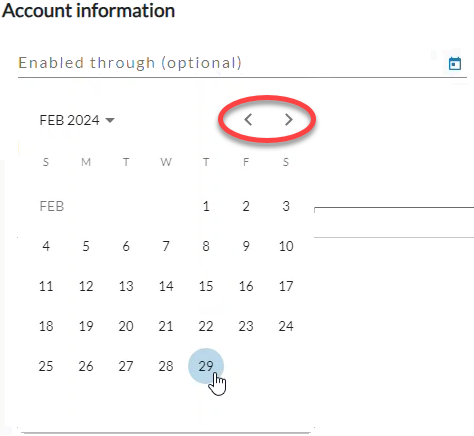
Click the Save button at the bottom of page (once you have updated all selected options).
A confirmation message lets you know how many accounts are about to be updated with the changes selected on the screen. Click the Yes, update accounts button to make the changes.
All selected accounts will become disabled on the date selected here (at the end of the day).
Clear an Enabled Through Date
Put a checkmark in the Enabled Through date box at the top of the page (under What do you want to update?) to display the Enabled Through field.
Leave the Enabled through (optional) field blank; do not select a new date.

Click the Save button at the bottom of page (once you have updated all selected options).
A confirmation message lets you know how many accounts are about to be updated with the changes selected on the screen. Click the Yes, update accounts button to make the changes.
The selected accounts will have no expiration date and will not become disabled automatically on a certain date.
A selected account will fail to have this setting changed if...
It has an Administrator Role at a higher Administrator Level than yours.
It was auto provisioned.
After a failed attempt to change the setting, the notification message (which you can see by clicking on the bell icon at the top of the screen) lists the usernames of the accounts that failed to be updated.
Client Group
Select the Client Group checkbox to change the group to which client access for all selected accounts is associated.
You cannot add a client group to ADMIN ONLY accounts using the mass update feature.
When a client group added for an account you must also select a Plan and a Product for the account. The Plan cannot be configured on the Update Accounts page at this time.
Note that attempts to add a client group to ADMIN ONLY accounts may still produce a success notification even though it didn't actually do anything.
Configure Client Group
Put a checkmark in the Client Group box at the top of the page (under What do you want to update?) to display the Client Group drop-down menu.
Select a group from the Client Group menu.
If a group was selected in theOrganization menuat the top of the pageyou will not be able to select a different group.
If an organization higher than group level was selected in the Organization menu at the top of the page navigate this menu by using the Expand All button to open all organizations, by clicking the > arrow next to each organization level to open it, or by typing an organization name in the Filter text field. See Organization Menu for more information. Because a group must be selected here all other organizations are grayed out.
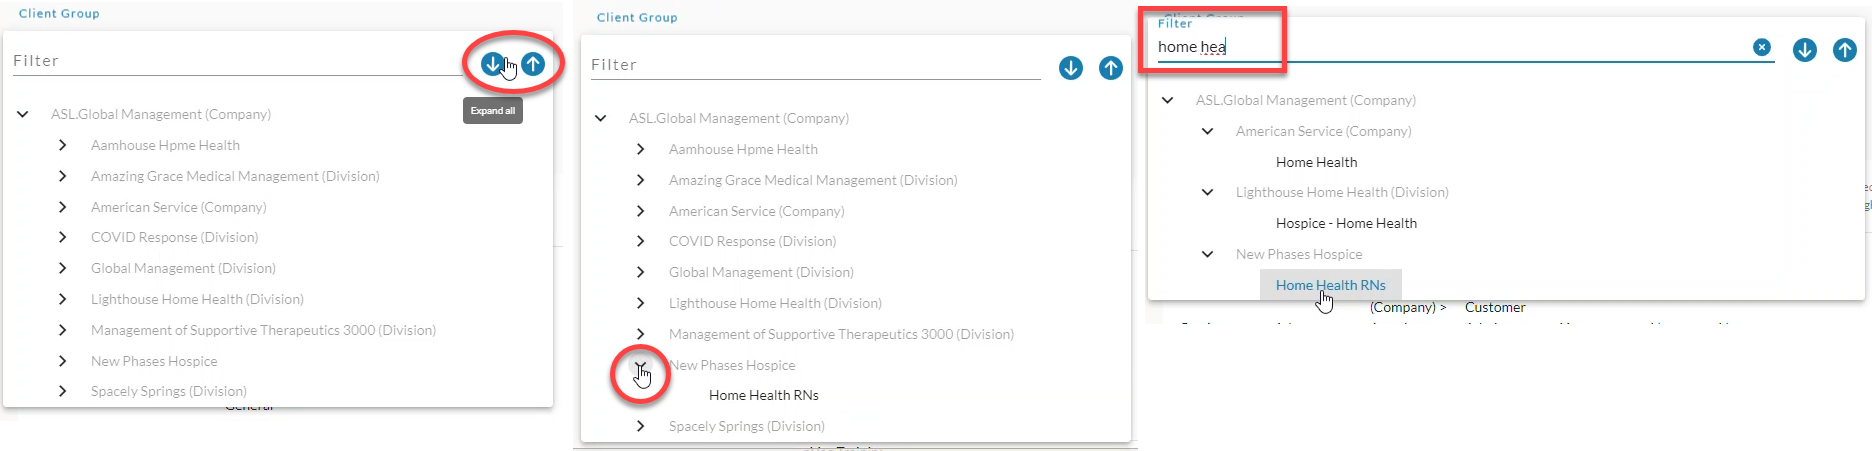
Click on the image to see it larger.
Click the Save button at the bottom of page (once you have updated all selected options).
A confirmation message lets you know how many accounts are about to be updated with the changes selected on the screen. Click the Yes, update accounts button to make the changes.
The accounts will share the new group's shortcuts, sentence models, substitutions, and vocabulary (if any).
A selected account will fail to have this setting changed if...
It has an Administrator Role at a higher Administrator Level than yours.
It was auto provisioned. That setting must be updated via the SSO provider.
After a failed attempt to change the setting, the notification message (which you can see by clicking on the bell icon at the top of the screen) lists the usernames of the accounts that failed to be updated.
Products
Select the Products checkbox to change the the dictation client(s) that all selected accounts should use.
Configure Products
Put a checkmark in the Products box at the top of the page (under What do you want to update?) to display the checkboxes for each dictation client.
Select the checkbox next to the dictation client(s) that the selected accounts should use; leave the boxes blank next to clients that should not be used.
Click the Save button at the bottom of page (once you have updated all selected options).
A confirmation message lets you know how many accounts are about to be updated with the changes selected on the screen. Click the Yes, update accounts button to make the changes.
A selected account will fail to have this setting changed if...
It has an Administrator Role at a higher Administrator Level than yours.
After a failed attempt to change the setting, the notification message (which you can see by clicking on the bell icon at the top of the screen) lists the usernames of the accounts that failed to be updated.
Mobile Voice Account Shortcuts
Select the Mobile Voice Account Shortcuts checkbox to enable or disable the ability for all selected accounts to run, add, edit, and delete account (user) shortcuts in Voice for Android. (This setting is not applicable to nVoq Voice for Windows, and is not currently supported on Voice for iOS.)
Enable User Shortcuts in Mobile Voice
Put a checkmark in the Mobile Voice Account Shortcuts box at the top of the page (under What do you want to update?) to display the Mobile Voice Account Shortcuts checkbox under Roles and Access, Options.
Leave the checkmark in the Mobile Voice Account Shortcuts box that appears under Roles and Access, Options.
Click the Save button at the bottom of page (once you have updated all selected options).
A confirmation message lets you know how many accounts are about to be updated with the changes selected on the screen. Click the Yes, update accounts button to make the changes.
The selected Android users will be able to access user shortcuts in Voice for Android within 30 minutes or the next time they sign out and sign back in.
Disable User Shortcuts in Mobile Voice
Put a checkmark in the Mobile Voice Account Shortcuts box at the top of the page (under What do you want to update?) to display the Mobile Voice Account Shortcuts checkbox under Roles and Access, Options.
Remove the checkmark from the Mobile Voice Account Shortcuts box that appears under Roles and Access, Options.
Click the Save button at the bottom of page (once you have updated all selected options).
A confirmation message lets you know how many accounts are about to be updated with the changes selected on the screen. Click the Yes, update accounts button to make the changes.
The selected Android users will only be able to run organization shortcuts within 30 minutes or the next time they sign out and sign back in.
A selected account will fail to have this setting changed if...
It has an Administrator Role at a higher Administrator Level than yours.
After a failed attempt to change the setting, the notification message (which you can see by clicking on the bell icon at the top of the screen) lists the usernames of the accounts that failed to be updated.
Mobile Voice Words Per Minute
Select the Mobile Voice Words Per Minute checkbox to enable a popup message in Voice for Android that briefly displays the user's words per minute when they stop a dictation that is longer than two seconds and includes more than five words. Users also have the ability to enable or disable this setting in Voice for Android. (This setting is not applicable to nVoq Voice for Windows, and is not currently supported on Voice for iOS.)
Enable the Words Per Minute Message in Mobile Voice
Put a checkmark in the Mobile Voice Words Per Minute box at the top of the page (under What do you want to update?) to display the Mobile Voice Words Per Minute checkbox under Roles and Access, Options.
Leave the checkmark in the Mobile Voice Words Per Minute box that appears under Roles and Access, Options.
Click the Save button at the bottom of page (once you have updated all selected options).
A confirmation message lets you know how many accounts are about to be updated with the changes selected on the screen. Click the Yes, update accounts button to make the changes.
The selected Android users will have the Words Per Minute setting enabled within 30 minutes, or the next time they sign out and sign back in.
Disable the Words Per Minute Message in Mobile Voice
Put a checkmark in the Mobile Voice Words Per Minute box at the top of the page (under What do you want to update?) to display the Mobile Voice Words Per Minute checkbox under Roles and Access, Options.
Remove the checkmark from the Mobile Voice Words Per Minute box that appears under Roles and Access, Options.
Click the Save button at the bottom of page (once you have updated all selected options).
A confirmation message lets you know how many accounts are about to be updated with the changes selected on the screen. Click the Yes, update accounts button to make the changes.
The selected Android users have the Words Per Minute setting disabled within 30 minutes, or the next time they sign out and sign back in.
A selected account will fail to have this setting changed if...
It has an Administrator Role at a higher Administrator Level than yours.
After a failed attempt to change the setting, the notification message (which you can see by clicking on the bell icon at the top of the screen) lists the usernames of the accounts that failed to be updated.
Conversation Capture
Select the Conversation Capture checkbox to enable or disable the feature for all selected accounts.
Enable Conversation Capture
Put a checkmark in the Conversation Capture box at the top of the page (under What do you want to update?) to display the Conversation Capture checkbox under Roles and Access, Options.
Note Compose will automatically be selected along with this option. If you also have Patient Visit Retrieval and/or Form Completion, those will be automatically selected too.Leave the checkmark in the Conversation Capture box (and all other Options boxes) that appear under Roles and Access, Options.
For Note Compose, select All designs to make every formatting design in the system and tenant available to the users.
If you prefer to assign only specific formatting designs, select Select designs, then check the boxes next to the designs the selected users should use. (Disabled designs appear grayed out and cannot be selected.)Click the Save button at the bottom of page (once you have updated all selected options).
A confirmation message lets you know how many accounts are about to be updated with the changes selected on the screen. Click the Yes, update accounts button to make the changes.
Form Completion, Patient Visit Retrieval, and Note Compose will all be listed on the confirmation message, even if your tenant does not have access to all of those features.
Disable Conversation Capture
Put a checkmark in the Conversation Capture box at the top of the page (under What do you want to update?) to display the Conversation Capture checkbox under Roles and Access, Options.
Note Compose will automatically be selected along with this option. If you also have Patient Visit Retrieval and/or Form Completion, those will be automatically selected too.In order to remove the checkmark from the Conversation Capture box that appears under Roles and Access, Options you must first remove the checkbox from features that require Conversation Capture (Patient Visit and Form Completion), if applicable.
If your tenant has Patient Visit Retrieval and/or Form Completion enabled, you cannot disable Conversation Capture unless those features are also disabled. Conversation Capture is required for both features to function properly.Click the Save button at the bottom of page (once you have updated all selected options).
A confirmation message lets you know how many accounts are about to be updated with the changes selected on the screen. Click the Yes, update accounts button to make the changes.
Form Completion, Patient Visit Retrieval, and Note Compose will all be listed on the confirmation message, even if your tenant does not have access to all of those features.
A selected account will fail to have this setting changed if...
It has an Administrator Role at a higher Administrator Level than yours.
After a failed attempt to change the setting, the notification message (which you can see by clicking on the bell icon at the top of the screen) lists the usernames of the accounts that failed to be updated.
Patient Visit Retrieval
Select the Patient Visit Retrieval checkbox to enable or disable the feature for all selected accounts.
Enable Patient Visit Retrieval
Put a checkmark in the Patient Visit Retrieval box at the top of the page (under What do you want to update?) to display the Patient Visit Retrieval checkbox under Roles and Access, Options.
Note Compose and Conversation Capture will automatically be selected along with this option. If you also have Form Completion, that will be automatically selected too.Leave the checkmark in the Patient Visit Retrieval box (and all other Options boxes) that appear under Roles and Access, Options.
For Note Compose, select All designs to make every formatting design in the system and tenant available to the users.
If you prefer to assign only specific formatting designs, select Select designs, then check the boxes next to the designs the selected users should use. (Disabled designs appear grayed out and cannot be selected.)Click the Save button at the bottom of page (once you have updated all selected options).
A confirmation message lets you know how many accounts are about to be updated with the changes selected on the screen. Click the Yes, update accounts button to make the changes.
Form Completion, Patient Visit Retrieval, and Note Compose will all be listed on the confirmation message, even if your tenant does not have access to all of those features.
Disable Patient Visit Retrieval
Put a checkmark in the Patient Visit Retrieval box at the top of the page (under What do you want to update?) to display the Patient Visit Retrieval checkbox under Roles and Access, Options.
Note Compose and Conversation Capture will automatically be selected along with this option. If you also have Form Completion, that will be automatically selected too.In order to remove the checkmark from the Patient Visit Retrieval box that appears under Roles and Access, Options you must first remove the checkbox from features that require Patient Visit Retrieval (Form Completion), if applicable.
If your tenant has Form Completion enabled, you cannot disable Patient Visit Retrieval unless that features is also disabled. Patient Visit Retrieval is required for the Form Completion feature to function properly.Click the Save button at the bottom of page (once you have updated all selected options).
A confirmation message lets you know how many accounts are about to be updated with the changes selected on the screen. Click the Yes, update accounts button to make the changes.
Form Completion, Patient Visit Retrieval, and Note Compose will all be listed on the confirmation message, even if your tenant does not have access to all of those features.
A selected account will fail to have this setting changed if...
It has an Administrator Role at a higher Administrator Level than yours.
After a failed attempt to change the setting, the notification message (which you can see by clicking on the bell icon at the top of the screen) lists the usernames of the accounts that failed to be updated.
Form Completion
Select the Form Completion checkbox to enable or disable an upcoming feature (currently called "Voice Assistant"), which also includes Conversation Summary, and Note Compose for all selected accounts.
Enable Form Completion
Put a checkmark in the Form Completion box at the top of the page (under What do you want to update?) to display the Form Completion checkbox under Roles and Access, Options.
Note Compose, Patient Visit Retrieval, and Conversation Capture will automatically be selected along with this option.Leave the checkmark in the Form Completion box that appears under Roles and Access, Options.
For Note Compose, select All designs to make every formatting design in the system and tenant available to the users.
If you prefer to assign only specific formatting designs, select Select designs, then check the boxes next to the designs the selected users should use. (Disabled designs appear grayed out and cannot be selected.)Click the Save button at the bottom of page (once you have updated all selected options).
A confirmation message lets you know how many accounts are about to be updated with the changes selected on the screen. Click the Yes, update accounts button to make the changes.
Disable Form Completion
Put a checkmark in the Form Completion box at the top of the page (under What do you want to update?) to display the Form Completion checkbox under Roles and Access, Options.
Note Compose, Patient Visit Retrieval, and Conversation Capture will automatically be selected along with this option.Remove the checkmark from the Form Completion box that appears under Roles and Access, Options
Click the Save button at the bottom of page (once you have updated all selected options).
A confirmation message lets you know how many accounts are about to be updated with the changes selected on the screen. Click the Yes, update accounts button to make the changes.
A selected account will fail to have this setting changed if...
It has an Administrator Role at a higher Administrator Level than yours.
After a failed attempt to change the setting, the notification message (which you can see by clicking on the bell icon at the top of the screen) lists the usernames of the accounts that failed to be updated.
Note Compose
Select the Note Compose checkbox to enable or disable Note Compose for structured notes for all selected accounts.
Enable Note Compose for Structured Notes
Put a checkmark in the Note Compose box at the top of the page (under What do you want to update?) to display the Note Compose box under Roles and Access, Options.
Put a checkmark in the Note Compose box that appears under Roles and Access, Options.
If you have access to them, Conversation Capture, Patient Visit Retrieval, and Form Completion features will automatically be selected along with this option.Select All designs to make every formatting design in the system and tenant available to the users. If you prefer to assign only specific formatting designs, select Select designs, then check the boxes next to the designs the selected users should use. (Disabled designs appear grayed out and cannot be selected.)
Click the Save button at the bottom of page (once you have updated all selected options).
A confirmation message lets you know how many accounts are about to be updated with the changes selected on the screen. Click the Yes, update accounts button to make the changes.
Disable Note Compose for Structured Notes
Put a checkmark in the Note Compose box at the top of the page (under What do you want to update?) to display the Note Compose checkbox under Roles and Access, Options.
In order to remove the checkmark from the Note Compose box that appears under Roles and Access, Options you must first remove the checkbox from features that require Note Compose ( Conversation Capture, Patient Visit, and Form Completion), if applicable.
If your tenant has Conversation Capture, Patient Visit Retrieval, or Form Completion enabled, you cannot disable Note Compose unless those features is also disabled. Note Compose is required for those features to function properly.Click the Save button at the bottom of page (once you have updated all selected options).
A confirmation message lets you know how many accounts are about to be updated with the changes selected on the screen. Click the Yes, update accounts button to make the changes.
A selected account will fail to have this setting changed if...
It has an Administrator Role at a higher Administrator Level than yours.
After a failed attempt to change the setting, the notification message (which you can see by clicking on the bell icon at the top of the screen) lists the usernames of the accounts that failed to be updated.
Note Assist
Select the Note Assist checkbox to enable or disable the Note Assist feature and to assign reviews to the all selected accounts.
Enable Note Assist and Assign Reviews
Put a checkmark in the Note Assist box at the top of the page (under What do you want to update?) to display the Note Assist box under Roles and Access, Options.
Put a checkmark in the Note Assist box that appears under Roles and Access, Options.
Select All reviews to make every review in the tenant available to the users. If you prefer to assign only specific ones, select Select reviews, then check the boxes next to the reviews the selected users should use.
Click the Save button at the bottom of page (once you have updated all selected options).
A confirmation message lets you know how many accounts are about to be updated with the changes selected on the screen. Click the Yes, update accounts button to make the changes.
The selected users will have access to Note Assist and the reviews assigned.
In Voice for Windows enabling Note Assist allows users to use the back quote key (by default) to run a review of text based on categories that are configured for their organization. Enabling this feature also adds the Note Assist Hotkey setting to the Settings screen in Voice, from which users can change the default key used to initiate Note Assist. If this setting is enabled while the user is signed in to Voice, the hotkey will become enabled and the hotkey setting will appear on the Settings screen within 5 minutes. (If the Settings screen is open when this happens the user will need to close and re-open the Settings to see the change.)
In Voice for Android and nVoq Voice for iOS enabling Note Assist adds the Note Assist button to the keyboard from which users can run an review of text based on categories that are configured for their organization. If this setting is enabled while the user is signed in to Voice for Android or Voice for iOS, the user should see the Note Assist button appear on their keyboard within 30 minutes.
Disable Note Assist
Put a checkmark in the Note Assist box at the top of the page (under What do you want to update?)
Remove the checkmark from the Note Assist box that appears under Roles and Access, Options.
Click the Save button at the bottom of page (once you have updated all selected options).
A confirmation message lets you know how many accounts are about to be updated with the changes selected on the screen. Click the Yes, update accounts button to make the changes.
The selected users will no longer be able to access Note Assist.
In Voice for Windows disabling Note Assist removes the Note Assist Hotkey setting to the Settings screen in Voice. If this setting is disabled while the user is signed in to Voice, the hotkey will become disabled and the hotkey setting will disappear from the Settings screen within 5 minutes. (If the Settings screen is open when this happens the user will need to close and re-open the Settings to see the change.)
In Voice for Android and Voice for iOS, disabling Note Assist removes the Note Assist button from the keyboard. If this setting is disabled while the user is signed in to Voice for Android or Voice for iOS, the user should see the Note Assist button disappear from their keyboard within 30 minutes.
If the setting is disabled while the user has the Note Assist window open, a message appears in that window stating, "Note Assist has been disabled. Please see your administrator for assistance." and button to run a review will become disabled.
A selected account will fail to have this setting changed if...
It has an Administrator Role at a higher Administrator Level than yours.
After a failed attempt to change the setting, the notification message (which you can see by clicking on the bell iconat the top of the screen) lists the usernames of the accounts that failed to be updated.
Updating [#] accounts.
The accounts listed here will be updated with all of the changes selected above when you click the Save button.
The Save button becomes active when all chosen options have a valid selection.
Selections made will replace current settings for these accounts when you click the Save button.
The columns on this page are the same as on the Accounts page list view.
You can change the columns to display the information that you want to change. For example, if you are planning to change the Enabled Through date, select the "Enabled Through" column on the Customize Columns menu on the Accounts page. The columns you select there will also be displayed here.
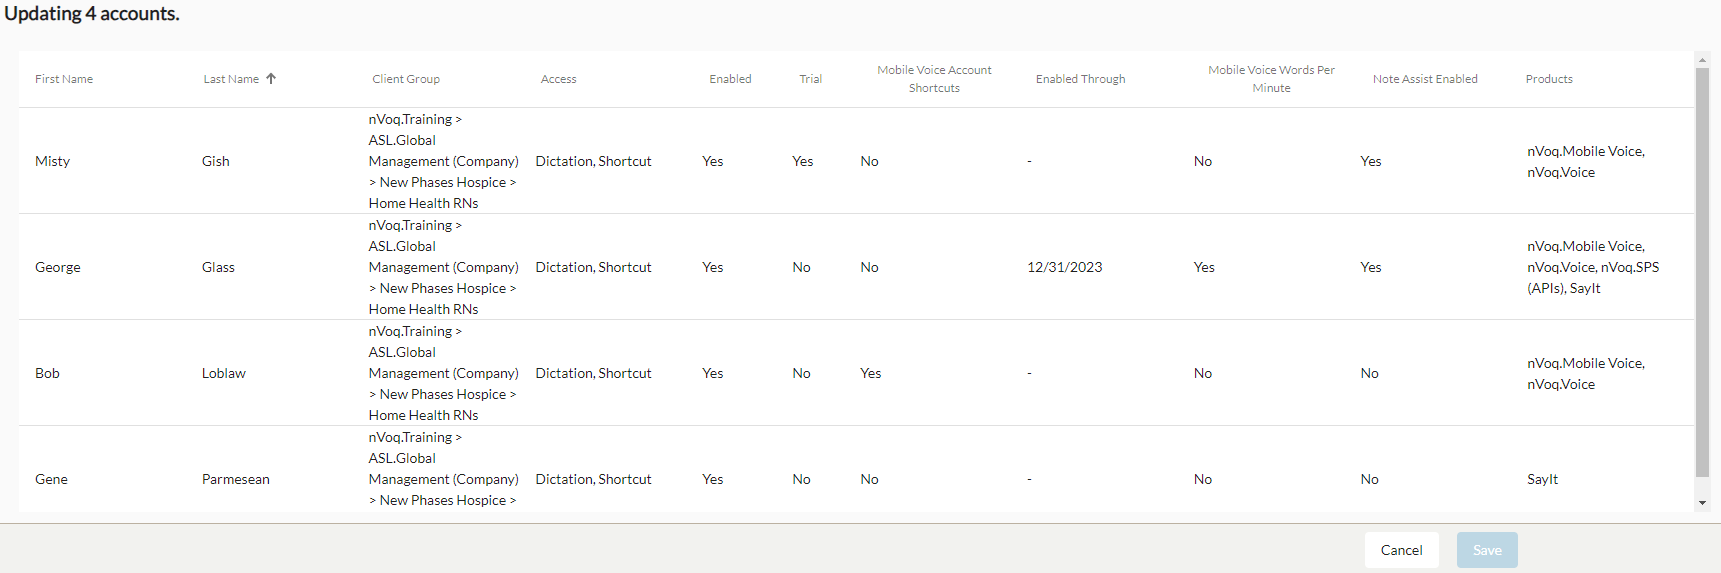
Click on the image to see it larger.
All items will be updated even if you receive a timeout error after changes take more than 5 minutes to process.
The account updates selected on this page happen in the background, and may take a while to complete depending on how many changes are being made and how many accounts you have selected. Your changes will be completed even if you receive a 504 timeout error.