Create an Account
Create a new user account with access to use dictation and shortcuts, or view or edit account information in nVoq Administrator.

If you need to create several accounts, try the Upload Accounts feature!
- Go to the Accounts page in nVoq Administrator.
- Optionally, click the Manage icon in the sidebar to hide the sidebar while you work.
- Select the appropriate organization from the organization menu.
- Click the New icon
 in the blue toolbar to go to the Add Account page.
 - You can also click the New icon while you're on this page to clear the form fields and start over.
- You can also click the New icon while you're on this page to clear the form fields and start over.
- Complete the account information and roles and access information (see below).
- If you do not want to immediately start a billing subscription or a trial for the account be sure to DISABLE THE ACCOUNT BEFORE YOU SAVE IT.
- DO NOT use the "Non-Billable" setting for anything other than accounts for testing or troubleshooting
- A disabled does not have an active billing subscription and cannot log in to and use a dictation client or the administrator console.
- When an account is enabled, a subscription is created in the billing system for that user in accordance with the account Plan.
- If the account has a trial period configured, the trial begins when the account is enabled and the billing subscription is created when the trial period ends.
- If you do not want to immediately start a billing subscription or a trial for the account be sure to DISABLE THE ACCOUNT BEFORE YOU SAVE IT.
- Save the account.
- If you attempt to save the account with required information missing, either a warning or the word "required" will appear near the field or section that is missing information.
- All accounts require: Username, First Name, Last Name, Password, Confirm Password, and either Client Access or Admin Access (or both)
- Accounts with Client Access require: Client Group, and Plan
- Accounts with Administrator Access require: Administrator Organization
- When the save is complete, the new account will be listed on the Accounts page in the organization in which it was added.
A profile management job starts creating the user's "profile" when the account is created, but the user (if given the ability to use dictation) can start using dictation immediately even if that job has not completed. Dictations performed during this time will not get the benefit of sentence modeling or vocabulary (if any) until the profile management job is complete.
- If you attempt to save the account with required information missing, either a warning or the word "required" will appear near the field or section that is missing information.
Account Information
Username
This is the username that will be used to sign in to nVoq products. It can also be used in shortcuts as an environment variable. This field can have a maximum of 100 characters.
- The username must be unique across the entire system (e.g. healthcare.nvoq.com, canada.nvoq.com, or secure.nvoq.com).
- We do NOT recommend having multiple speakers dictating on a single account. Each dictation is tailored for the specific user to improve accuracy. If multiple speakers use the same account, the user profile will adjust to the most recent speaker's voice. This will be distorted by the fact that it was originally tuned to another speaker and degrade dictation accuracy.
- The following characters are NOT allowed: " * / : < > ? | { } & ; \ # +, space, control, or non-ASCII characters
- Usernames are case insensitive and cannot contain spaces.
- If you are creating a non-billable account you must also enable the Non-Billable setting on this page.
- Due to strict HIPAA compliance rules, an existing account should not be renamed for another user. A NEW accounts should be created for the incoming account and the existing account to be replaced should be disabled.
- Usernames for accounts created on the Provisioning page start with
provision_.These system-created usernames cannot be changed. - Username for auto provisioned accounts cannot be edited in nVoq Administrator. That setting must be updated via the SSO provider.
First Name
This is the given name of the user who holds this account. This (as well as first name initial) can be used in shortcuts as an environment variable. This field can include a maximum of 45 characters.
- The First Name of accounts created on the Provisioning page is
Provisioning. These system-created names cannot be changed. - First Name for auto provisioned accounts cannot be edited in nVoq Administrator. That setting must be updated via the SSO provider.
Last Name
This is the surname or family name of the user who holds this account. This (as well as last name initial) can be used in shortcuts as an environment variable. This field can include a maximum of 45 characters.
- The Last Name of accounts created on the Provisioning page is
User. These system-created names cannot be changed. - Last Name for auto provisioned accounts cannot be edited in nVoq Administrator. That setting must be updated via the SSO provider.
Email Address
This is the email address is used to for automated password reset and forgotten username retrieval. It can also be used in shortcuts as an environment variable. This field can include a maximum of 255 characters.
- The e-mail address for accounts created on the Provisioning page is listed as
not-real@nvoq.com. - Email address auto provisioned accounts cannot be edited in nVoq Administrator. That setting must be updated via the SSO provider.
Password
This is a string of characters that, along with the username, allows access to all nVoq products.
This setting is required, but is not applicable if signing in with SSO.
- Passwords are case sensitive.
- This field can include a maximum of 45 characters.
- Users can change their password after they log in.
- A checkmark appears when the minimum required password strength is met.
- Password strength requirement ranges from Weak to Strong:
- Weak: Requires at least 1 character.
- Medium: Requires at least 7 characters and must contain a letter and number.
- Strong: Requires at least 8 characters and must contain a lowercase letter, an uppercase letter, a number, and a symbol.
What password strength is required for the account?
A strong password is required if:
- The tenant level organization is selected on the Organization menu when creating the account.
- A client-only account will follow its division level settings when changing their password in Voice (unless the Form Completion option was enabled at the tenant level).
- The account is given an Administrator Role.
- The division organization requires a strong password.
- The Form Completion option was enabled at the tenant level.
- This requires all accounts in the tenant to have a strong password regardless of division settings.
- The tenant level organization is selected on the Organization menu when creating the account.
A medium password is required if:
- The company level organization is selected on the Organization menu when creating the account.
- A client-only account will follow its division level settings when changing their password in Voice (unless the Form Completion option was enabled at the tenant level).
- The division organization requires a medium password.
- The company level organization is selected on the Organization menu when creating the account.
A weak password is allowed if:
- A division or group level organization is selected on the Organization menu
and - The division organization requires a weak password.
- A division or group level organization is selected on the Organization menu
Confirm Password
A checkmark appears when the password matches the one entered above.
Employee ID
This field optional and can be used to keep track of extra information about the user.
Comments
This field optional and can be used to keep track of extra information about the user. The field has a maximum character count of 256. There is a counter at the bottom right of the field to keep track of how many characters have already been entered. Click the slashed lines icon in the lower right corner (above the character counter) to enlarge the field.
- For accounts created on the Provisioning page the following comments are automatically displayed in this field:
Account created automatically by IdentityProviderJwtServiceHibernate for account provisioning.
Enabled
This toggle, on (blue) by default, should be off (which) if you do not want the user to be able to log in to any nVoq application. An account that is NOT enabled does not have an active billing subscription. When this toggle is on, the Enabled column on the Accounts page shows "Yes". If off, the column shows "No". If this toggle is disabled and grayed out (unavailable), one or more of the organizations to which this account belongs is likely disabled OR the account was auto provisioned.
You can use this setting to delay the start of a billing subscription for an account. See Managing Billing for New Accounts (video).
- If the Trial Expires menu is set to a date (as opposed to "No Trial"), sliding this toggle on (blue) will start the trial period. If you do not want the trial period to begin, slide this toggle off before you click the Save button. A Trial period BEGINS when the account is FIRST ENABLED. The Trial period ENDS on the date selected on the Trial Expires menu.
- A subscription billing Plan BEGINS when an account that does not have a trial period configured is FIRST ENABLED. If you do not want a billing plan to begin for an account, UNCHECK this box before you click the Save button.
- Accounts with a monthly "Usage" plan are billable immediately. They are billed on the 1st of the month based on client usage from the previous month.
- Accounts with a non-usage plan become billable once the trial period (if any) has ended. Accounts are billed on the 1st of the month for the current month going forward.
- Enabled status for auto provisioned accounts must be updated via the SSO provider UNLESS the account is disabled. Auto provisioned accounts can only be disabled via the SSO provider or by disabling one or more of the user's organizations.
Enabled Through
Use the Enabled Through date to set an expiration date for an account. The account will become disabled on the date selected (at the end of the day).
- To add an Enabled Through date, click into the field to type in a date, or click the the calendar icon on the right side of the field to select a date.
- To remove an Enabled Through date put your cursor in the field and delete the date.
- You can use this field to automatically disable accounts on the same date as the Trial Expires date to keep accounts from becoming billable on the following day. If you manually type a date that does not exist into the Enabled Through field, the system will AUTOMATICALLY ADJUST the date to the next valid date as soon as your cursor is removed from the field. For example, if you type
2/30/2022into this field, the system will change it to3/2/2022. - The Enabled Through date for auto provisioned accounts cannot be changed in nVoq Administrator. That setting must be updated via the SSO provider.
Roles and Access
Client Access
The Client Access toggle configures ability to use dictation and/or shortcuts. To give this user account the ability to log into a dictation or shortcut client, this toggle must be enabled (blue) AND you must assign the account to a Client Group (below). If you want to create an admin-only account that only has access to nVoq Administrator and cannot use dictation and/or shortcuts, disable this toggle (white). nVoq does not bill for accounts that do not have access to dictation and/or shortcuts.
- Adding Client Access to an existing account that was previously an admin-only account does not automatically disable the Non-Billable toggle. If the account should be billable, you will need to manually disable the Non-Billable toggle on this page.
- Client Access for auto provisioned accounts cannot be changed in nVoq Administrator. That setting must be updated via the SSO provider.

BEST PRACTICE: Give client access to any account with an Administrator role if the user may be creating items such as shortcuts, Note Compose designs, or Note Assist reviews. This allows the administrator to test their work in a dictation client. Be sure to place the account in a group clearly labeled as an ADMIN group, and include only non-billable accounts in that group. This not only helps nVoq to understand that these accounts should be non-billable, but also helps you to exclude them from reports.
Client Group
Client Group is the group to which the user's client access is associated. The account will share this group's shortcuts, sentence models, substitutions, and vocabulary (if any). This is a drop-down menu that includes all of the groups within the organization selected from the Organizations menu at the top of the page. Use the Filter at the top of the drop-down menu to find a specific group in the list. This menu will be grayed-out (unavailable) if the Client Access toggle above is off.
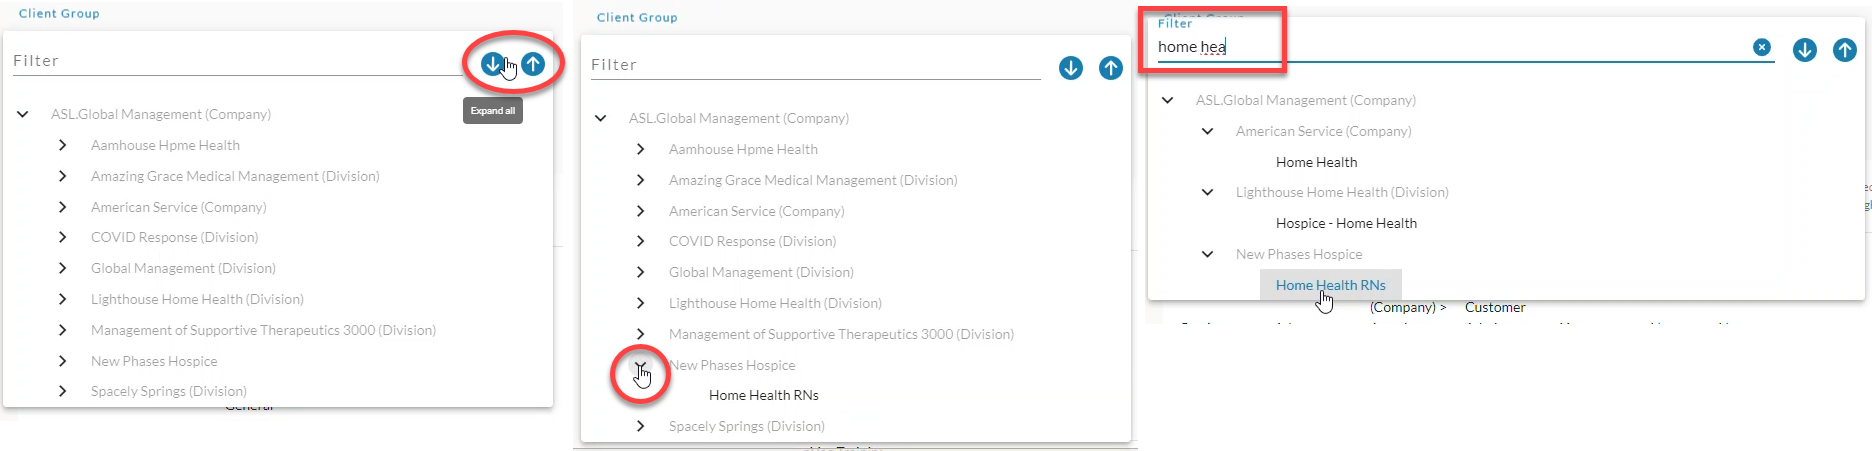 Click on the image to see it larger.
- If a group was selected in the Organizations menu at the top of the page, that will be the only group listed in this menu.
- If an organization higher than group level was selected in the organization menu at the top of the page, navigate this menu the same way you navigate the organization menu at the top of the page by using the Expand All button to open all organizations, by clicking the > arrow next to each organization level to open it, or by typing an organization name in the Filter text field. See Organization Menu for more information. Because a group must be selected here, all organizations except groups are grayed out.
- Client Group for auto provisioned accounts cannot be changed in nVoq Administrator. That setting must be updated via the SSO provider.
Plan
This field allows you to select whether the user will be able to use the dictation and shortcuts, and how they are billed. This setting can be changed on accounts at any time.
This setting is MANDATORY if the account has Client Access, and must be selected even if the account is non-billable.
If only one plan is available for your tenant, the plan will be selected automatically.
The available subscription Plans that you see may be different than what is listed below, as this is a tenant-level configuration.
- Shortcuts and Dictation (Monthly): This is a monthly subscription Plan that allows the account to use both dictation and shortcuts, and is billed on the 1st of each month for the current month. For example, on August 1st, the account is invoiced for August. Billable accounts enabled after the 1st of the month will be billed on the 1st of the following month, and the invoice will include the previous month as well.
- Lines of Dictation (Monthly): This is a monthly usage-based subscription Plan that allows the account to use both dictation and shortcuts, and is billed based on lines of dictation for the previous month. A "line" of dictation is 65 characters. Invoices are sent on the 1st of the month for usage in the previous month. For example, on August 1st, the account is invoiced for July usage.
- Shortcuts and Dictation (Enterprise): This is a pre-paid subscription Plan that allows the account to use both dictation and shortcuts. Billing subscriptions are managed manually for these plans at this time.
Non-Billable
This toggle is active for system-level and tenant-level administrators only; for lower-level administrators it is is grayed-out and cannot be changed. By enabling this toggle (blue) tenant-level and system-level customer administrators can create free, non-billable accounts with Client Access for testing and troubleshooting. You still need to select a Plan in order to give the account access to dictation and/or shortcuts.
- The Non-Billable setting should NEVER be used to delay billing for an account that will be billable. Create a "disabled" account instead. See Enabled.
- The Non-Billable setting should NEVER be used to configure a "trial" for client accounts that will be billable. Create a "disabled" account instead. See Enabled.
- Admin-only accounts without Client Access are automatically non-billable. If you create an account without selecting the Client Access option, the Non-Billable box will automatically be checked once you save the account.
Trial Expires
This setting, which is enabled at the tenant-level, configures a trial period for a user account, during which the account will not be billable. If the setting is not enabled for your tenant, you won't see this setting at all. (This setting has nothing to do with the account being active or inactive, only the billing for the account.) A trial period can last up to two months. If an account is within a trial period, the Trial column on the Accounts page shows "Yes". If the account is not in a trial or if the trial has expired, the column shows "No". If a date selected, that is the date that a trial period will END. (A trial START date is the first date that an account is Enabled.)
- You can change this setting on an existing account IF the account is within an active trial period, but you must do so by the LAST DAY of the FIRST MONTH of a TRIAL PERIOD. On the 1st day of the following month, this property will be disabled.
- Dates on this menu may be off by a day depending on your time zone if you are viewing the menu around midnight. For best results, we recommend making changes to this setting during typical business hours (not around midnight).
- Accounts with an Enterprise Plan do not count towards billable users for the tenant until a trial has expired.
- For new accounts, Trial Expires is a drop-down menu from which you can select from three options:
- No Trial (This is the default setting)
- If this option is selected the account is immediately billable from the beginning of the month in accordance with the account Plan once the account is enabled.
- If this option is selected, the setting cannot be changed once you save the account.
- Auto-provisioned accounts (created via an identity provider, like Okta) automatically have this setting.
- The date that is the last day of the current month
- If this option is selected, billing will begin on the 1st day of next month once the account is enabled.
- If this option is selected, you can change this setting after the account has been saved until the last day of this month. After that, the option is grayed out.
- The date that is the last day of the month after next
- If this option is selected, billing will begin on the 1st day of the month after next once the account is enabled.
- If this option is selected, you can change this setting after the account has been saved until the last day of this month. After that, the option is grayed out.
- No Trial (This is the default setting)
Services
Accuracy Optimization: Accuracy Optimization Service (AOS) is a personalized service designed to maximize dictation accuracy and user experience with nVoq dictation. With this service, a specially trained team of medical transcriptionists reviews the user’s dictations, correct errors generated by the dictation engine, and tunes the user’s account to maximize accuracy and usability. When you check this box, a warning appears on the page letting you know that the service carries an additional cost.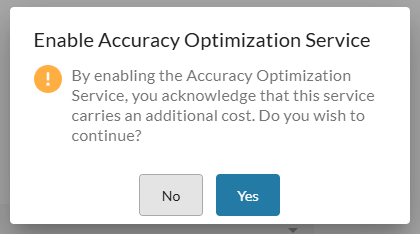
There is a one-time fee associated with this service. When an account is configured to receive the service, a separate subscription that is specifically for the accuracy optimization is created. This allows accounts that are not yet billable (still in a trial period) or non-billable to receive the service, if desired. (You may not see this setting on your Accounts page; it can be disabled for an entire Tenant at the System level.) You CANNOT UNCHECK this box after you save the account.
- See Accuracy Optimization Service for more information about this service.
Products
Put a checkmark in the box beside the dictation client(s) this account should use. This setting is MANDATORY if the account has Client Access, and must be selected even if the account is non-billable. The setting is for accounting purposes only and does not currently limit a user's ability to sign in to or use any client.
Options include:
- Select this option to assign nVoq Voice for Android
- Select this option to assign nVoq Voice for iOS
- Select this option to assign nVoq Voice
- Select this option for
Options
Fast Dictation
This setting is not applicable for any nVoq client.
Fast Dictation enables a WebSocket connection to the dictation server for ISV partner clients instead of HTTP, which should result in faster dictation results.
- ISV Partners: If you do not specify whether the account will use WebSocket dictation in the API, the behavior will default to what is selected here.
- About Fast Dictation:
- All dictations from Voice for Android and Voice for iOS use a WebSocket connection regardless of this property.
- Dictations in nVoq Voice for Windows use WebSocket connections regardless of this property unless recorded using the nVoq Wireless Microphone for Android, in which case they automatically use HTTP.
- All dictations recorded with the nVoq Wireless Microphone for Android use HTTP dictation regardless of this property. (The iOS Wireless Microphone uses WebSocket connections for dictation regardless of this property unless otherwise specified via API.)
- If no dictation server is available for WebSocket connection, a user will see a message stating that "The dictation service is temporarily unavailable".
- WebSocket jobs are not queued, so the system limits the number of jobs per user so that one person does not consume all available resources. If there are other jobs already being done on the account (another dictation processing, profile jobs like adding vocabulary or sentence modeling, etc.), the user will see a message stating, "Too many pending dictations at this time. Please try again later."
- If WebSocket-specific whitelisting is needed,
wss://healthcare.nvoq.com:443is the best URL to whitelist.
Mobile Voice Account Shortcuts
This setting is not applicable to nVoq Voice for Windows, and is not currently supported on Voice for iOS.
A checkmark in this box enables the ability for users to run, add, edit, and delete user shortcuts (a.k.a account shortcuts) in Voice for Android. If this box is unchecked users will only be able to run organization shortcuts in Voice for Android. This setting is on by default, but can be changed at any time, including for auto provisioned accounts.
- This setting is not honored in nVoq Voice for iOS, as that application does not run shortcuts at this time.
Mobile Voice Words Per Minute
This setting is not applicable to nVoq Voice for Windows, and is not currently supported on Voice for iOS.
A checkmark in this box enables a popup message in Voice for Android that briefly displays the user's dictation rate when they submit a dictation that is longer than two seconds and includes more than five words. This setting is enabled by default but can be changed at any time, including for auto provisioned accounts. The user also has the ability to enable or disable this setting in Voice for Android. Voice for Android is updated with a change to this property within 30 minutes, or when the user signs out and signs back in. If the user updates the setting in Voice for Android, the property is updated in nVoq Administrator immediately.
- This setting is not honored in nVoq Voice for iOS, as that application does not have the feature at this time.
Conversation Capture
This option only displays if it has been enabled for the tenant. When enabled for the tenant, all users in the tenant automatically have the setting enabled also.
Removing the checkmark from this box disables the feature for the user.
This feature requires Note Compose, which is enabled automatically.
The Conversation Capture feature captures and transcribes discussions between multiple speakers, then produces a clear summary of the key points.
Patient Visit Retrieval
This option only displays if it has been enabled for the tenant. When enabled for the tenant, all users in the tenant automatically have the setting enabled also.
Removing the checkmark from this box disables the feature for the user.
Note: This setting does not enable Patient Visit Retrieval in Voice for iOS or Windows.
This feature requires Conversation Capture and Note Compose, which are enabled automatically.
The Patient Visit Retrieval feature pulls patient visit data from PointCare and displays it in nVoq Voice for Android. Visit notes can then be typed or recorded in nVoq Voice for Android that are associated with a specific patient visit.
Stay tuned for more information about this feature in upcoming releases.
Form Completion
This option only displays if it has been enabled for the tenant. When enabled for the tenant, all users in the tenant automatically have the setting enabled also.
Removing the checkmark from this box disables the feature for the user.
This feature requires Conversation Capture, Patient Visit Retrieval, and Note Compose which are enabled automatically.
Stay tuned for more information about this feature in upcoming releases.
Note Compose
This option only displays if it has been enabled for the tenant. When enabled for the tenant, all users in the tenant automatically have the setting enabled also.
Removing the checkmark from this box disables Note Compose for structured notes for the user.
Without Note Compose for structured notes, accounts only have access to the Note Compose "Clean & Format" option, which adds punctuation to transcripts. Note Compose for structured notes goes beyond punctuation and adds structure to the transcript. It pulls out the important details, cuts the filler, and organizes your dictation into structured, ready-to-use notes. It supports common formats like SOAP notes, and can also apply custom templates defined on the Note Compose page in nVoq Administrator. These designs are also available as part of the Conversation Capture feature.
When this option is enabled, a list of the available Note Compose Designs appears below it on the Add/Edit Account page.
Note Assist
This option only displays if it has been enabled for the tenant. When enabled for the tenant, all users in the tenant automatically have the setting enabled also.
Removing the checkmark from this box disables the Note Assist feature for the user.
Note Assist streamlines documentation by reviewing patient notes for required details. The criteria are fully customizable in nVoq Administrator.
When this option is enabled, a list of the available Note Assist reviews appears below on the Add/Edit Account page.
Note Compose Designs
First, choose whether to assign all existing formatting designs to the user or to assign only specific formatting designs.
- Select All designs to assign all formatting designs to the user.
- If you choose Select designs, all Note Compose designs that exist for the system and tenant are listed with a checkbox next to each one. (Disabled designs appear grayed out and cannot be selected.) Check the box next to each formatting design you want to assign to the user.
Note Assist Reviews
First, choose whether to assign all reviews to the user or to assign only specific reviews.
- Select All reviews to assign all existing Note Assist reviews to the user.
- If you choose Select reviews, all Note Assist reviews available for the tenant will appear in a list with a checkbox next to each one. (If no reviews exist, you will see a message indicating that no Note Assist reviews have been created.) Check the box next to each review you want to make available to the user.
Administrator Role
Leave this on the default setting of "None" for most users. If someone needs to create, update, or monitor accounts, usage, organizations, organization shortcuts, or other resources, select an Administrator Role.
- None: Select None if the user does not need to access organization information in nVoq Administrator. Client-only users can still log in to nVoq Administrator to create and edit shortcuts for their own account.
- Customer Administrator: This role can manage user accounts and organizations, and all dictation and shortcut resources within the selected Administrator Organization. This role has the ability to send password or username emails directly from the Accounts page to users who have forgotten their username or password. This role may also use the API or other utilities to submit jobs for client users in their organization.
- Only Customer Administrators with TENANT LEVEL access (see Administrator Organization) are able to see the API Key, Identity Providers, Note Compose Designer, and Note Assist pages in nVoq Administrator.
- Only Customer Administrators are able to Send Username Email or Send Password Email from the Accounts page.
- Shortcut Designer: Accounts with a Shortcut Designer role are able to edit organization and account shortcuts in nVoq Administrator for all users within the selected Administrator Organization. They can access organization shortcuts at and below the organization selected on the Administrator Organization menu. In nVoq Administrator they do not have access to any other page other than Shortcuts.
- Read-Only: This role can view information in nVoq Administrator, but cannot perform any actions or make changes.
Administrator Organization
When an Administrator Role is selected, the Administrator Organization drop-down menu can be opened. What you select here is the organization level at which this account's Administrator Role will have access for viewing or modifying data in nVoq Administrator.
- The organizations available in the Administrator Organization drop-down menu depend on what organization was selected from the organization menu at the top of the page. Select the highest organization to which you have access at the top of the page in order to create an Administrator Role with the highest possible Administrator Organization.
- You cannot create an nVoq Administrator account with a higher Administrator Organization than your own account.
- If an organization higher than group was selected in the organization menu at the top of the page, navigate this menu by using the Expand All button to open all organizations, by clicking the > arrow next to each organization level to open it, or by typing an organization name in the Filter text field.
Require Administrator two-factor authorization
This setting is off by default, but when this toggle is enabled (blue), this account will be required to use two-factor authentication to sign in to nVoq Administrator. This setting can only be enabled for accounts that have an Administrator Role. Accounts that also have Client Access will NOT be required to use two-factor authentication to sign in to a dictation or shortcut client. If the Administrator Role for the account is removed, this setting is automatically disabled. Two-factor authentication in nVoq Administrator works with Cisco's Duo Multi-Factor Authentication. Users will be prompted to set up Duo authentication the next time they sign in to nVoq Administrator. See Admin: Two Factor Authentication for more information.
Auto Provision Information
Auto provisioning information is listed at the bottom of the Edit Account page for accounts that were created via SSO provider and cannot be edited.
External account bk: The SSO provider's external identifier (Example: Kz-SAi-jc_QGWADRw)
Last auto provisioning update: The last time the account was updated by via the SSO provider (Example: 08/28/2023, 16:46:06 MDT)