You can open Voice for Android directly after installation or by tapping the app icon on your device. Then follow the setup wizard.
![]()
Setup Wizard
The wizard is locked in portrait mode.
Installation screens will not switch to landscape mode even if you rotate your device.
- Opening nVoq Voice for the first time takes you directly to the setup wizard.

- On the Step 1 screen of the wizard, tap ENABLE VOICE.
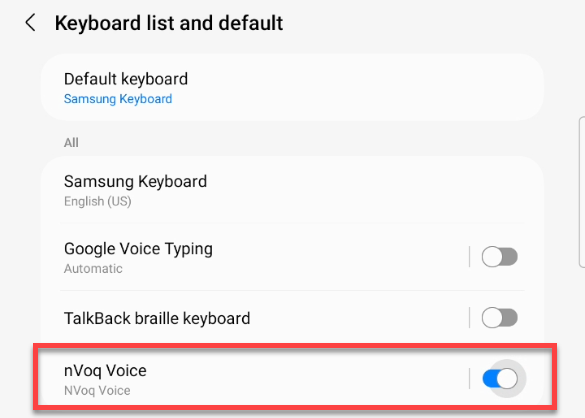
- On the Keyboard List screen, tap the toggle next to nVoq Voice.
TAP directly ON THE TOGGLE and not around it. The setup wizard will not advance beyond this screen until you do so.
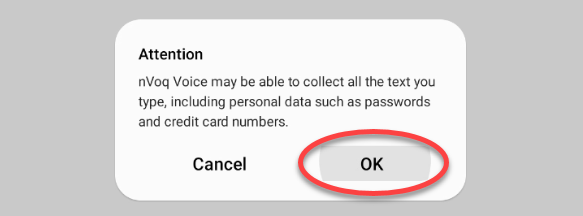
- A message appears at the bottom of the screen letting you know that nVoq Voice may be able to collect the text you type. Tap OK.
nVoq Voice is a HIPAA (Health Insurance Portability and Accountability Act of 1996) compliant application, so you don't need to worry about typing or dictating sensitive information using it.
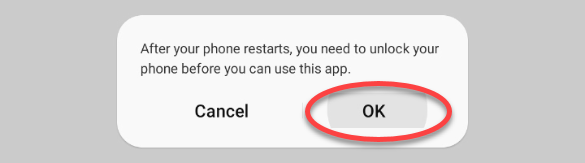
- A second message appears at the bottom of this screen letting you know that if you restart your device you will need to unlock it before you can use nVoq Voice. Tap OK.
- On the Step 2 screen of the wizard tap SELECT INPUT METHOD.
- A message appears at the bottom of the screen on which you can choose your input method. Tap the radio button next to nVoq Voice.
- On the Installation Successful screen, a message appears at the bottom of the screen asking if you want nVoq Voice to be able to access your contacts so it can automatically suggest contact information when you begin typing a name. If you want to allow this, tap Allow. If you do NOT want to allow the keyboard to access your device contacts, tap Don't Allow.
This feature as valuable as your contacts list! If you add the names of patients, colleagues, doctors, or specialists in your area to your contacts list, then those names can appear in the suggestion bar above the keyboard when you are typing. - Another message appears at the bottom of this screen asking if you want to allow nVoq Voice to send you notifications. Tap Allow.
It is important that you allow this to enable features such as the Words per Minute message, or to receive error messages from nVoq Voice. - On the Installation Successful screen, tap the LOGIN button. If you have followed the directions above, this takes you directly to the screen where you can select your system and sign in method.
Next Step... Sign In- If you didn't allow nVoq Voice to send you notifications (step 9), the message will appear a second time. Tap Allow.
It is important that you allow this to enable certain features in nVoq Voice. - Next tap the LOGIN button. If you have followed the directions above, this takes you directly to the screen where you can select your system and sign in method. See Sign In.
- It you still didn't allow notifications, a Grant In-App Messaging message will appear on top of the screen at this point. See nVoq Voice Grant In-App Messaging for more information.
- If you didn't allow nVoq Voice to send you notifications (step 9), the message will appear a second time. Tap Allow.