View Settings
Tap the options menu button on the keyboard to bring up the nVoq Voice menu, then tap Settings.
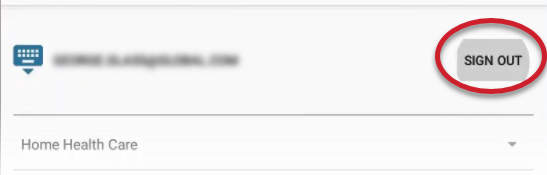
Sign Out
If you signed in with an nVoq username and password, you can sign out in just a few clicks (steps 1-3 below). However, if you signed in using a Microsoft SSO account there are a few extra steps you need to follow in order to completely sign out so that your credentials must be re-entered. See instructions below:
- Tap the options menu buttonon the keyboard to bring up the Voice menu, then tap Settings.
- Tap the SIGN OUT link near the top of the screen to the right of your username.
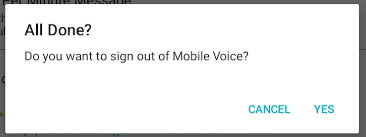
- You'll be asked if you want to sign out. Tap YES. If you signed in using an nVoq username and password, you're done.
IF YOU SIGNED IN TO THE KEYBOARD USING A MICROSOFT SSO ACCOUNT, YOU'RE NOT DONE.
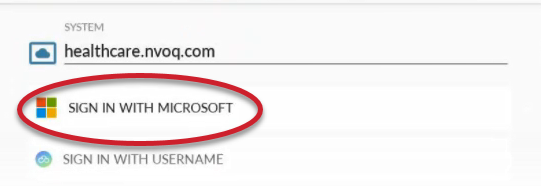
Your Microsoft Entra ID Single Sign On account credentials are automatically saved by the Chrome browser in which the Microsoft Sign In screen opens and do not need to be re-entered to log in to the keyboard. To completely sign out of the keyboard so that your credentials are not saved, follow these additional steps: - On the Settings screen, tap SIGN IN TO USE DICTATION.

- On the Voice Sign In screen tap SIGN IN WITH MICROSOFT.
- On the Pick an Account screen, tap the three-dots menu next to the account that needs to be completely logged out.
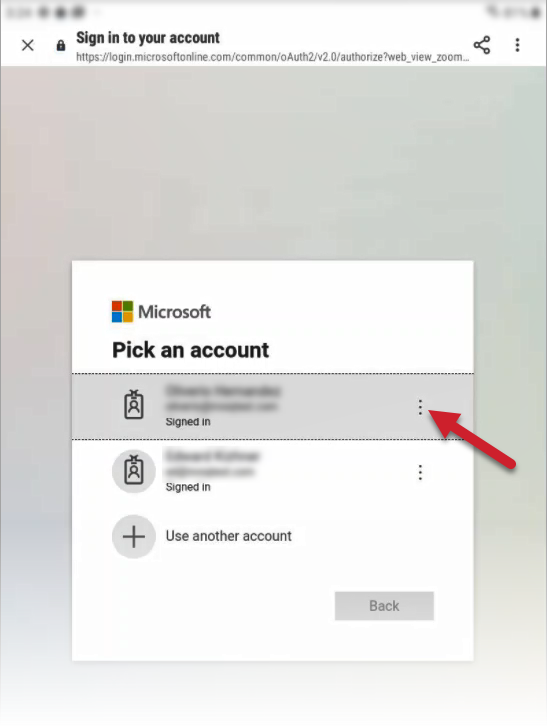
- A menu will open with two options: Sign Out and Sign Out and Forget
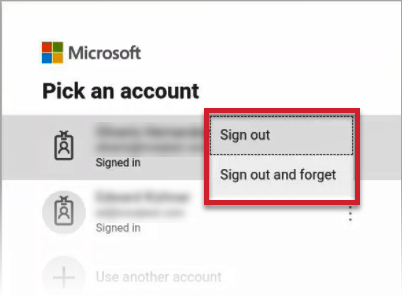
- If you select Sign Out, your credentials are removed from the device, but your account still remembered.
- If you select Sign Out and Forget, your credentials are removed from the device and your account is also removed from this the account list on the Pick an Account screen.
Change Dictation Topic
Use this menu to change the topic for your dictations.
- Tap the options menu buttonon the keyboard to bring up the Voice menu, then tap Settings.
- On the Settings screen, the dictation topic drop-down menu shows the name of your current topic. The topic be changed by tapping the menu and selecting a different one.
- Only topics available on your system (e.g. healthcare.nvoq.com or canada.nvoq.com) are listed in the menu.
- Your default dictation topic is the one that is configured for your group in nVoq Administrator.
- When you select a different topic on this menu is appears your Account Properties under "Selected Topic".
- Changing the dictation topic in Voice for Android will also change the dictation topic in Voice for Windows and iOS.

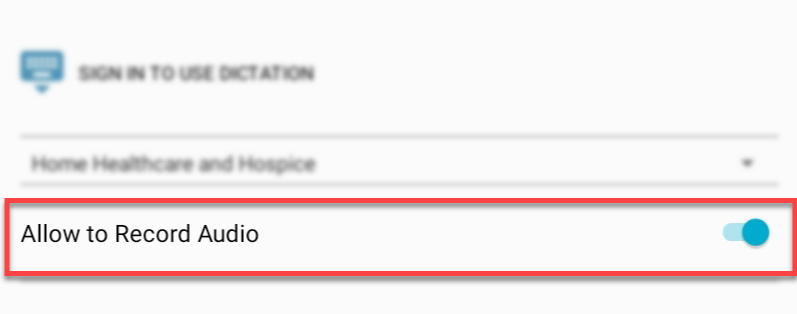
Allow to Record Audio
Recording audio is required for you to use dictation. If you did not allow nVoq Voice to record audio during the initial setup, you can allow it here. This setting is grayed out if you allowed this during initial setup.
- Tap the options menu buttonon the keyboard to bring up the Mobile Voice menu, then tap Settings.
- On the Setting screen, tap the Allow to Record Audio toggle to enable the ability to record dictation with nVoq Voice on your device.
Change Password
- Tap the options menu buttonon the keyboard to bring up the Voice menu, then tap Settings.
- On the Setting screen, tap Change Password to change your nVoq password.
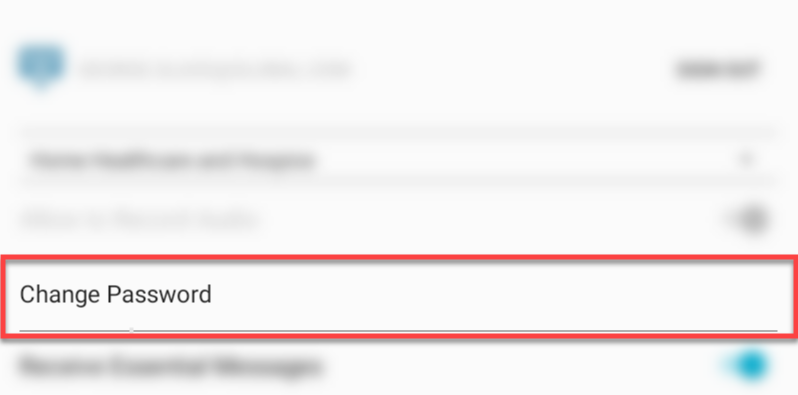
- Changing your password here resets your password for the nVoq Voice keyboard and all other nVoq products.
- The password strength requirements for your account are listed under the New Password field. A checkmark appears to the right of the New Password field when the strength requirements have been met.
- You may not be able to use a certain number of previous passwords when you change your password. If you enter a password that has been used too recently, a message appears at the bottom of the page letting you know that the "password has been used previously."
- The number of previous passwords that cannot be reused is configured at the division level for your organization.
- Note that if your account has an Administrator Role you cannot reuse the last five (5) passwords, regardless of what is configured for your division.
- Click the eye icon on the right side of the password field to see the characters you type.
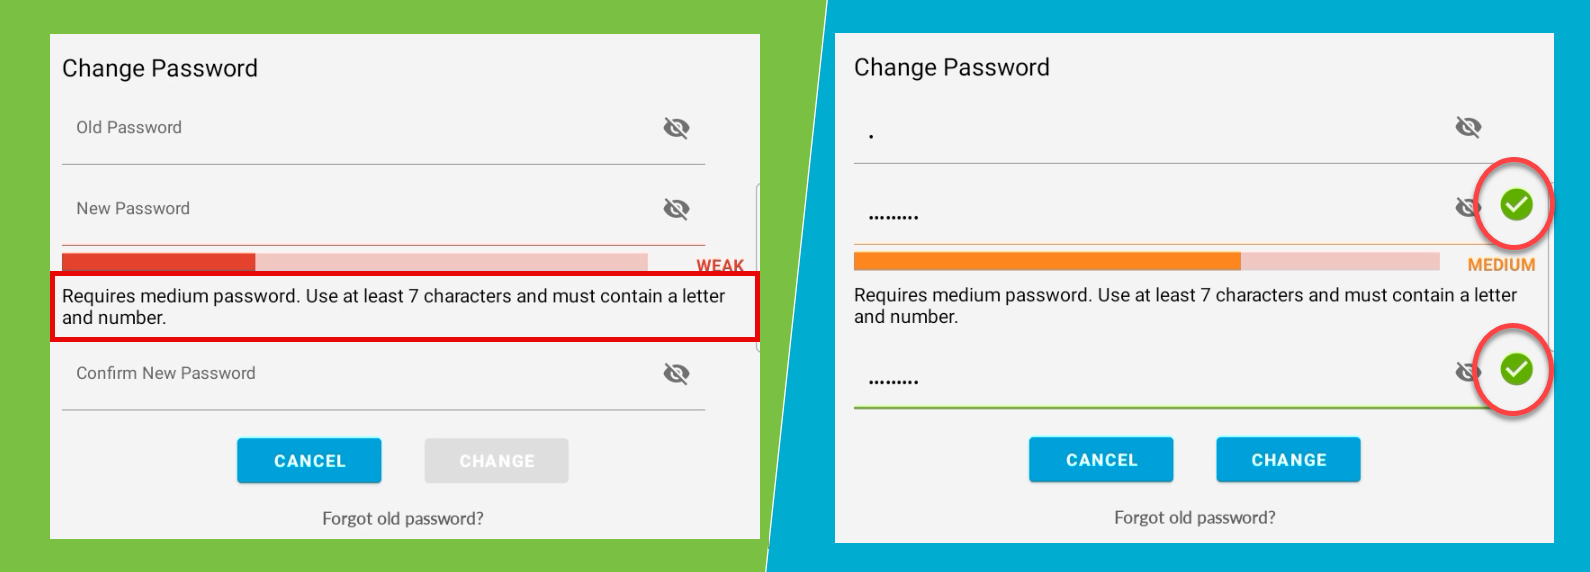 When you enter a password in the New Password field that meets the requirements, a green checkmark appears.
 When you enter the same password in the Confirm New Password field, another checkmark appears.
Launch Voice Assistant
This link provides an alternative path to Voice Assistant when the keyboard is not available.
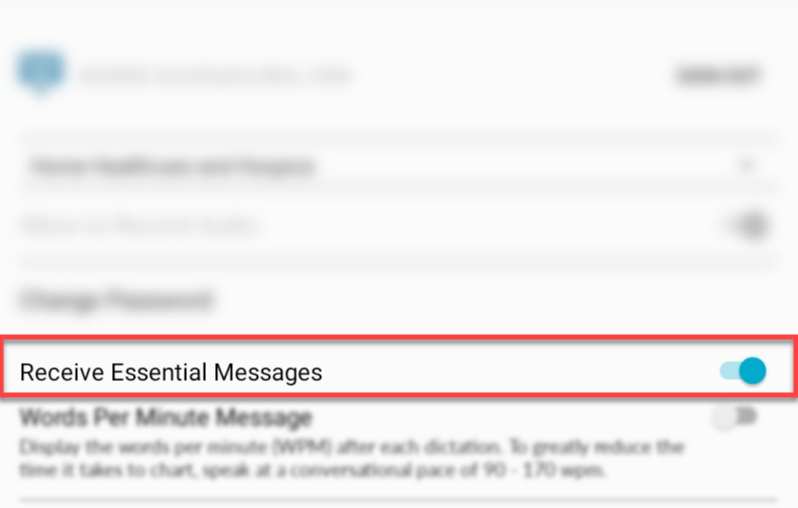
Receive Essential Messages
This setting must be enabled to allow you to see the Words Per Minute message (below) and other important messages or errors from nVoq Voice. If you neglected to allow this during the initial setup, you can allow it here. This setting is grayed out if you allowed this during initial setup.
- Tap the options menu buttonon the keyboard to bring up the Voice menu, then tap Settings.
- On the Setting screen, tap the Receive Essential Messages toggle to enable notifications, such as the Words Per Minute message and error messages, from nVoq Voice.
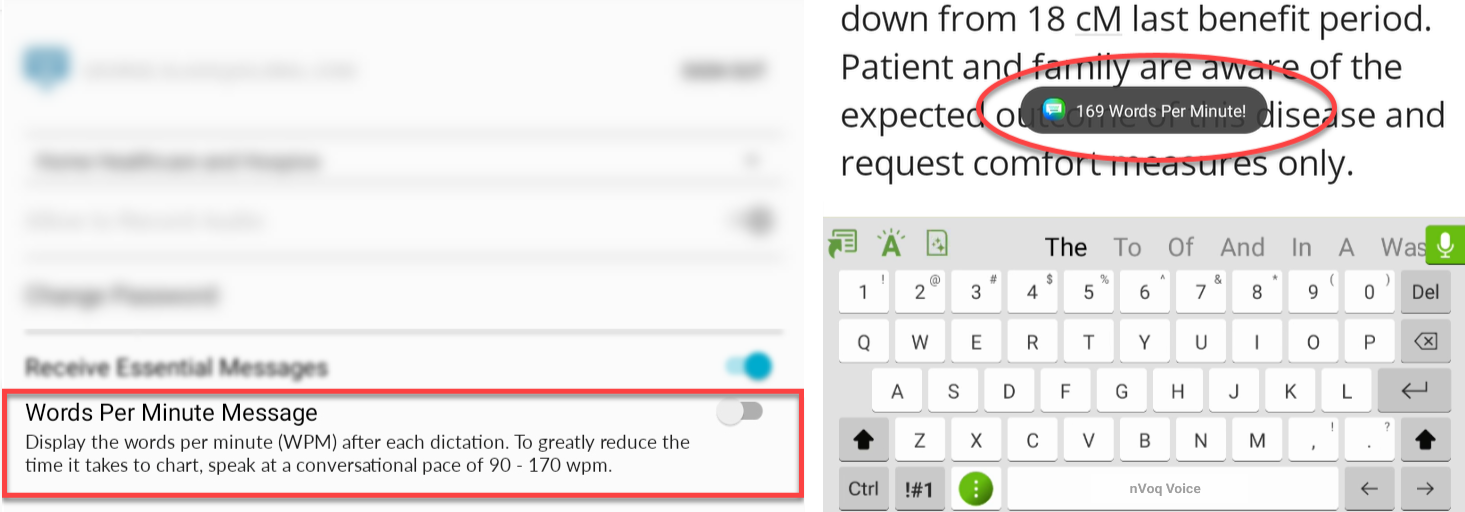
Words Per Minute Message
You can enable (or disable) a Words Per Minute message that will tell you approximately how fast you are speaking. This setting is enabled by default for new users, however it is disabled and grayed out unless the Receive Essential Messages setting (above) is enabled, or unless it is enabled via nVoq Administrator.
When the Words Per Minute Message is enabled, a popup message briefly displays dictation rate when you submit a dictation that is longer than two seconds and includes more than five words.
- This feature can be enabled or disabled by your administrator in nVoq Administrator. If the setting is changed there it will be updated in Mobile Voice within 30 minutes, or when you sign out and sign back in to Voice for Android.
- If you update the setting in Mobile Voice, the property is updated in nVoq Administrator immediately.
- Tap the options menu buttonon the keyboard to bring up the Mobile Voice menu, then tap Settings.
- On the Setting screen, tap the Words Per Minute Message toggle to the right (blue) to enable the words per minute message that appears after stopping dictations.
- If you are unable to connect to the server for any reason (such as poor Wi-Fi or cell connection) a red message will display at the bottom of the screen stating, "Unable to connect. Please try again later." and the setting will remain unchanged.
- If you are unable to connect to the server for any reason (such as poor Wi-Fi or cell connection) a red message will display at the bottom of the screen stating, "Unable to connect. Please try again later." and the setting will remain unchanged.
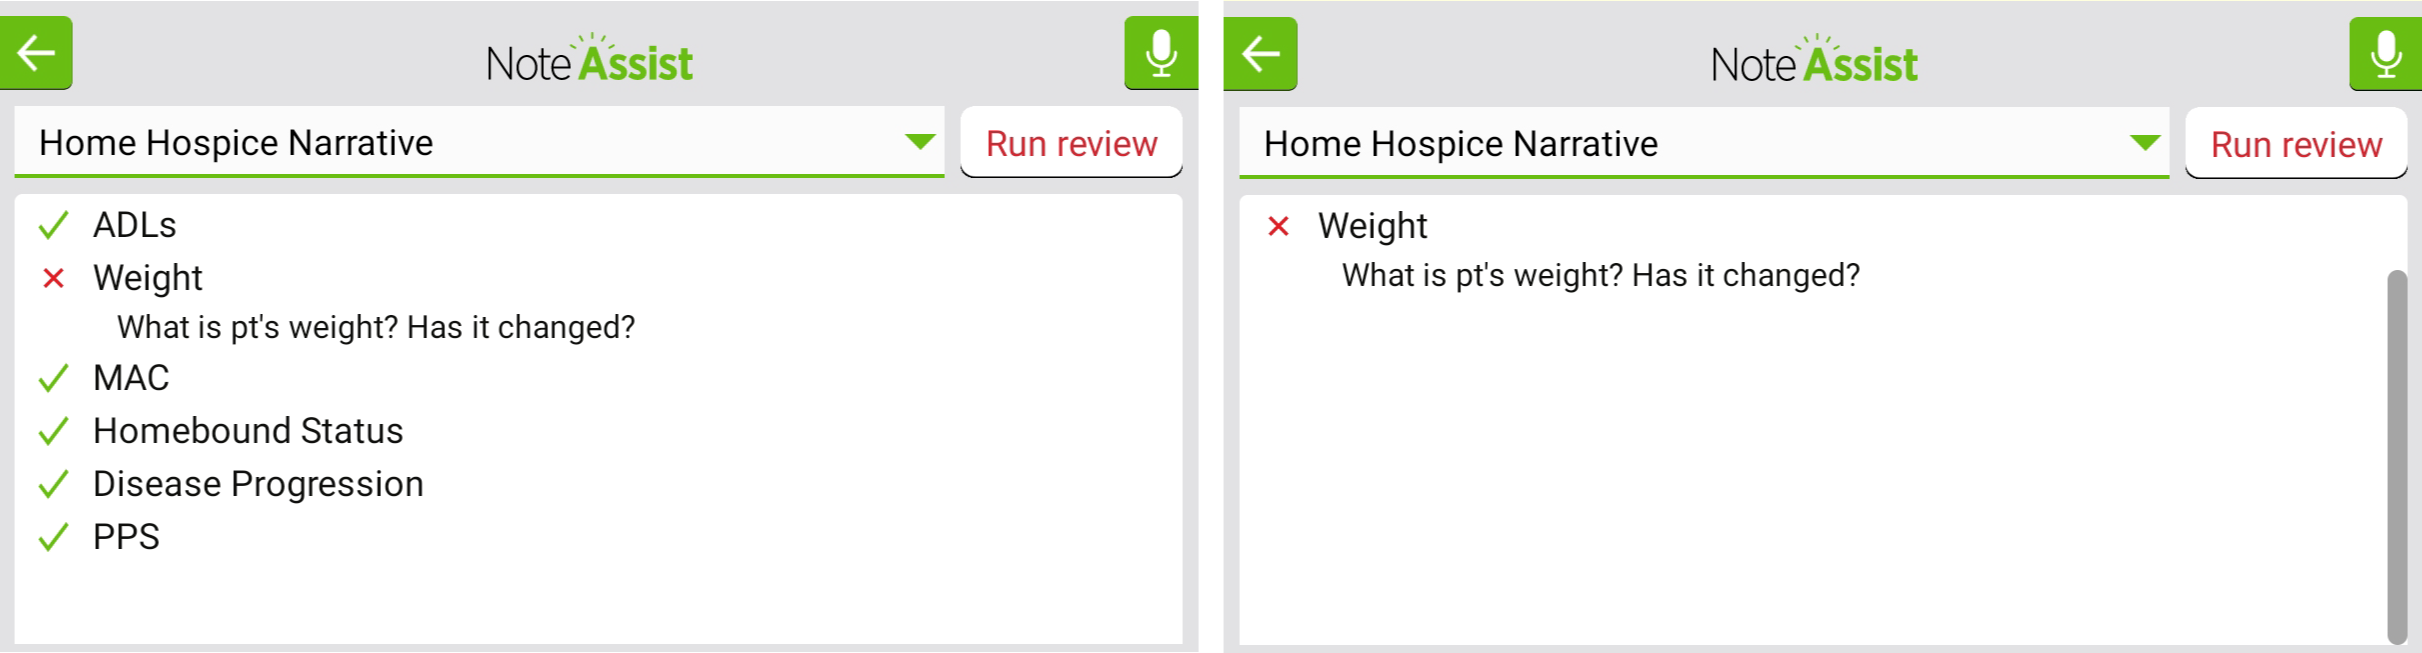
(words transcribed/minutes of audio = dictation words per minute)Show Note Assist Passing Review Categories
When this setting is enabled (blue), all Note Assist review categories (passing ones with a green checkmark, and failing one with a red X) appear in Note Assist after running a review. Disable this setting to only see failing categories in the list.
When all necessary information has been added to your clinical note based on the review selected, the Note Assist list of categories will be empty.
- Tap the options menu buttonon the keyboard to bring up the Voice menu, then tap Settings.
- On the Setting screen, tap the Show Note Assist Passing Review Categories toggle to disable (gray) or enable (blue) passing Note Assist categories.
Terms of Use
Tap the Terms of Use link to open nVoq's Legal page in your default browser. Tap the back arrow button at the bottom of your device to go back to the Voice Settings page.
Training
Tap the blue button that says TAP HERE TO START TRAINING to open the online training in your default browser. The training begins with an instructional video and is followed by training exercises to help you practice using nVoq dictation.
How to Format with Voice
Tap the How to Format with Voice link to open the nVoq Dictation documentation in your default browser. Under the How to Say... heading are links to instructions for how to add formatting commands, punctuation and symbols, dates and times, and monetary values to your dictation transcript. The documentation also includes best practices for better dictation accuracy, and tips for accented speakers.
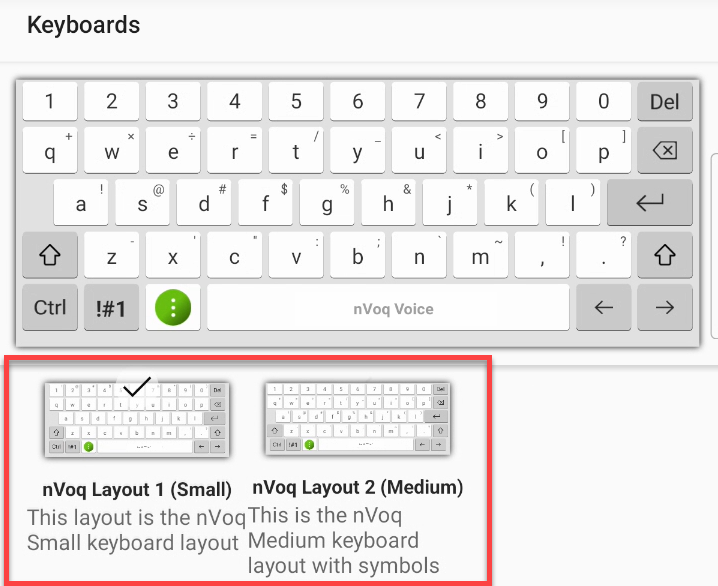
Change Keyboard Layout Size
If you prefer typing on the Samsung keyboard on your Galaxy Active3 tablet and would like to have an nVoq Voice keyboard that is similar, change the Keyboard and Theme to "nVoq Layout 1 (Small)." If you already have the small layout and prefer a larger keyboard, change to "nVoq Layout 2 (Medium)."
- Tap the options menu buttonon the keyboard to bring up the Voice menu, then tap Settings.
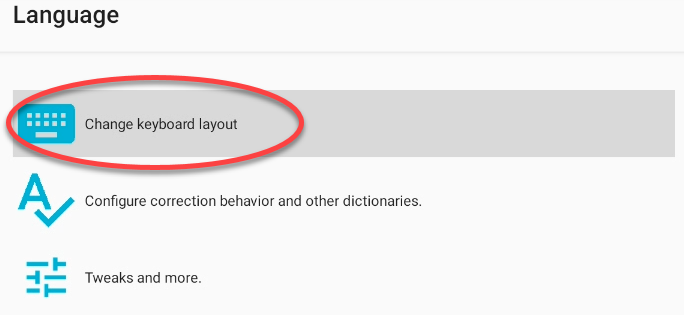
- Tap the Language icon
 at the bottom of the screen.
 - On the Language screen tap Change keyboard layout. (This setting displays on tablet devices only, not phones.)
- On the Keyboards screen tap the keyboard layout that you want: nVoq Layout 1 (Small) or nVoq Layout 2 (Medium).
- Layout 1 (Small) is similar to the Samsung keyboard on the Galaxy Active3 tablet.
- Layout 2 (Medium) is a bit larger.
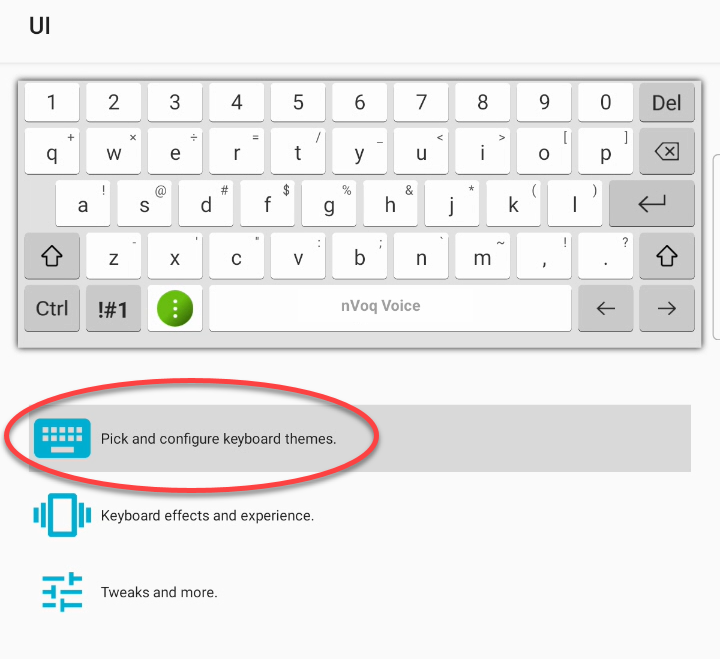
- Tap the UI icon
.png) at the bottom of the screen.
at the bottom of the screen. - On the UI screen tap Pick and configure keyboard themes. (This setting displays on tablet devices only, not phones.)
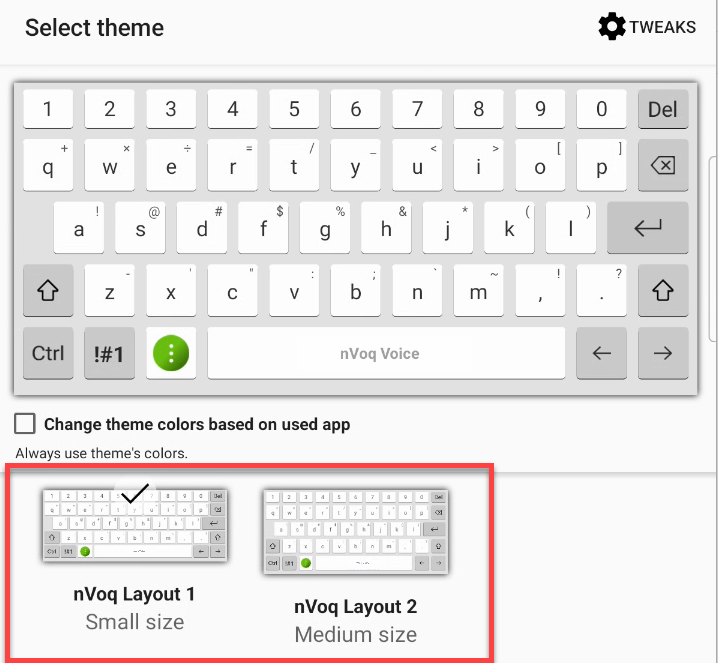
- On the Select Theme screen tap the theme that matches your Keyboard selection, either nVoq Layout 1 (Small) or nVoq Layout 2 (Medium).
Disable Poor Network Notifications
If you are in a location with a weak Wi-Fi or cellular data connection, a notification will appear at the top of the screen stating, "Poor network connection. This may affect your dictation."

This notification will appear every 10 seconds as long as your device has a weak data connection, and they cause a notification indicator to appear![]() next to the app icon (see right). You can view these notifications by swiping down on the home screen. From there you can clear them using the Clear Notification button to remove the notification indicator from the app icon. If you are frequently in an area with Wi-Fi or cellular connection and the notifications appear too often, you can turn them off.
next to the app icon (see right). You can view these notifications by swiping down on the home screen. From there you can clear them using the Clear Notification button to remove the notification indicator from the app icon. If you are frequently in an area with Wi-Fi or cellular connection and the notifications appear too often, you can turn them off.
To turn off Poor Network Notifications:
- Tap the options menu buttonon the keyboard to bring up the Voice menu, then tap Settings.
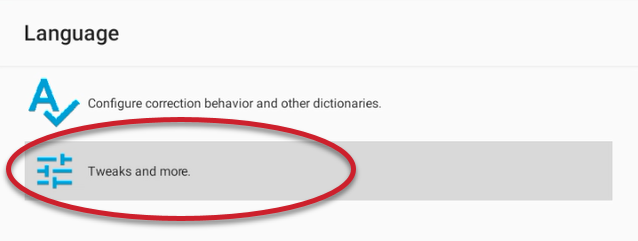
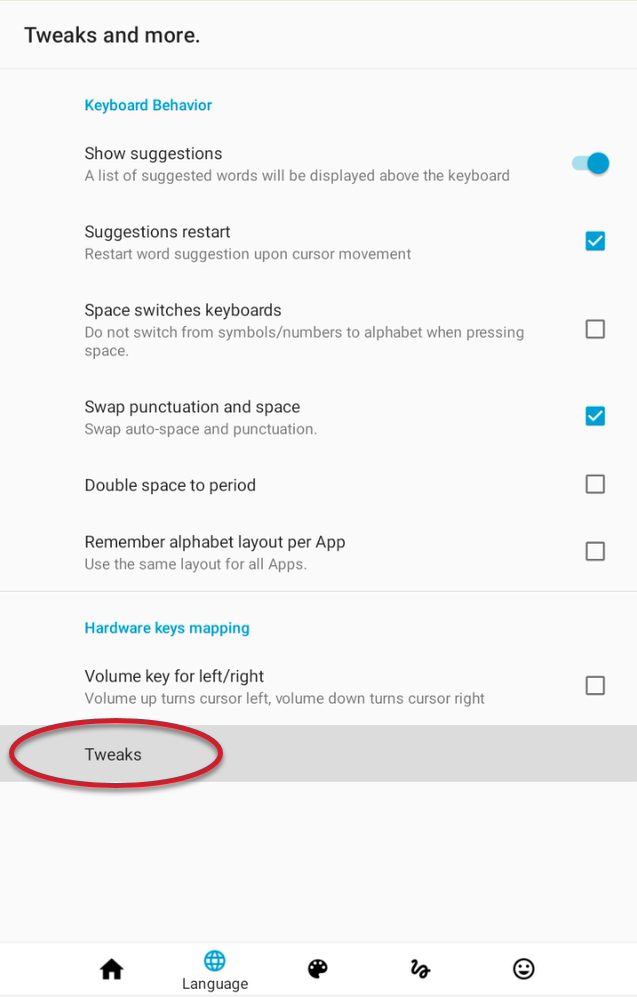
- Tap the Language iconat the bottom of the screen.
- Tap Tweaks and more.
- Tap Tweaks.
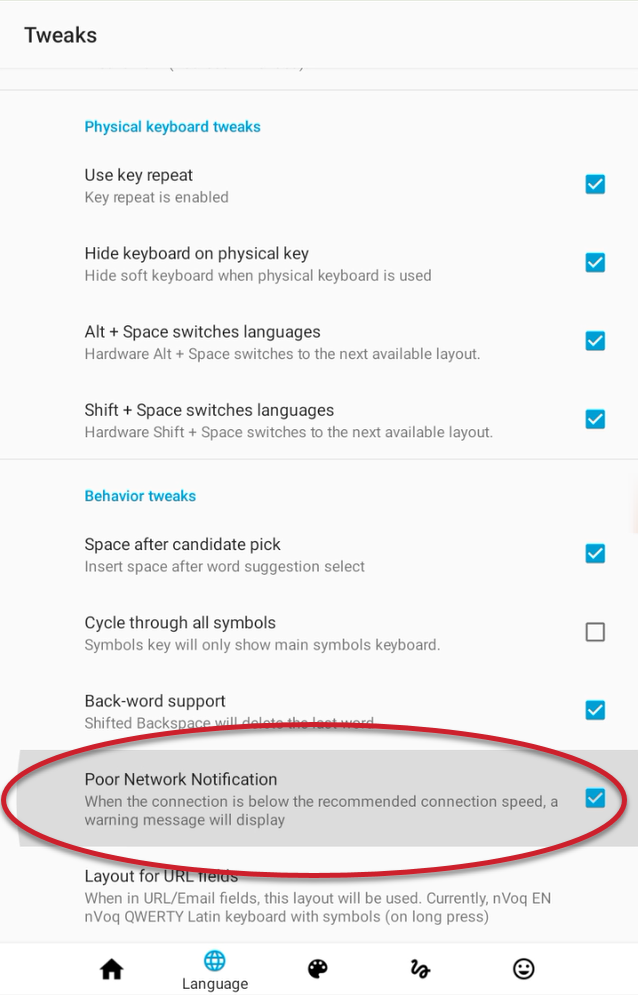
- On the Tweaks screen, scroll down to the Behavior Tweaks section and remove the checkmark next to Poor Network Notification.
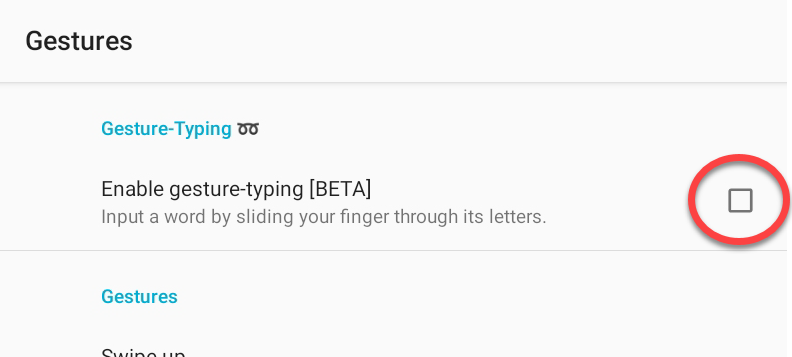
Enable Gesture Typing
This is an experimental feature.
Gesture typing (a.k.a. swipe) allows you to drag your fingers around keys to write out a complete word.
- Tap the options menu buttonon the keyboard to bring up the Voice menu, then tap Settings.
- Tap the Gestures icon
 at the bottom of the Settings screen.
 - To turn it on, put a checkmark in the Enable gesture-typing checkbox.
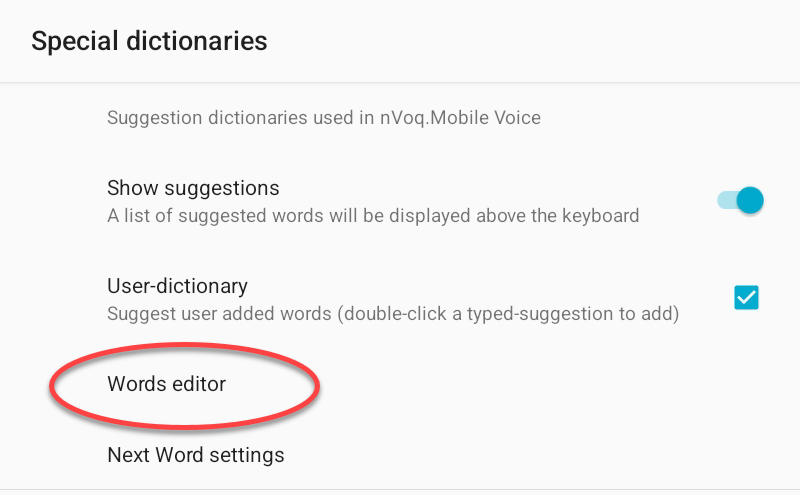
Words Editor
Add terms to your dictionary that the dictation engine does not already know so that they can appear as next word suggestions while you type.
Words added here are NOT added to your nVoq account vocabulary for dictation.
You can add words to or remove words from the Words Editor dictionary by following the instructions below:
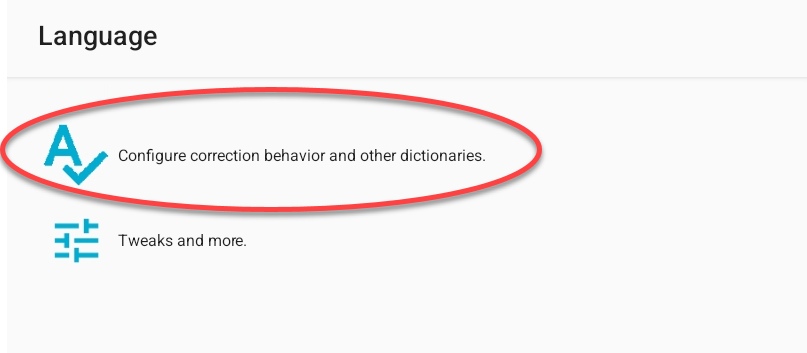
- Tap the options menu buttonon the keyboard to bring up the Voice menu, then tap Settings.
- Tap the Language iconat the bottom of the screen.
- Tap Configure correction behavior and other dictionaries.
- Tap Words editor.
- Add or remove a word from the Words Editor:
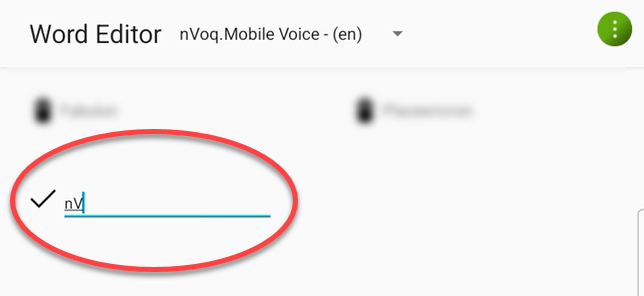
- ADD A WORD:
- Tap + Add a new word (to add a word to the end of the list) -OR- tap the menu button
 in the upper-right corner of the screen then tap Add word (to add a word to the beginning of the list).
.png)
- Place your cursor on the blue line and type the word.
- Tap the checkmark
 next to the word to add the word to the dictionary.
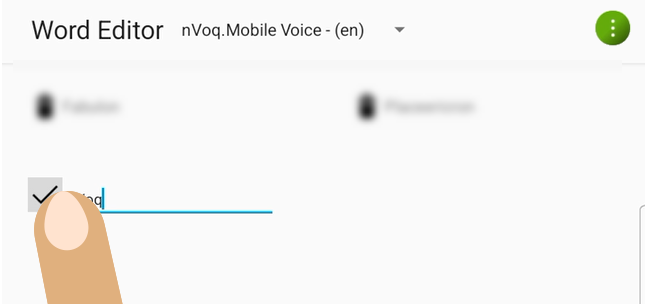
- Tap + Add a new word (to add a word to the end of the list) -OR- tap the menu button
- REMOVE A WORD:
- Tap the trash can icon
 next to a word to remove it from the dictionary.
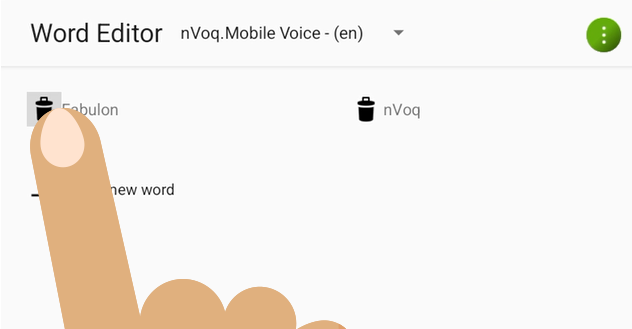
- Tap the trash can icon
- ADD A WORD:
Offline Mode
You can get to the Offline Mode Settings from the bottom of the Voice Settings.
- Tap the options menu buttonon the keyboard to bring up the Voice menu, then tap Settings.
- Tap the Offline Mode icon
 at the bottom of the screen.
 - This takes you to the Offline Mode Settings. See Use Offline Dictation for more information.