View or change settings and upload logs for nVoq Voice on the Settings window.
If you accidentally make this window full screen, get it back to the previous size by double-clicking in the header area above the purple line.
View Your Settings
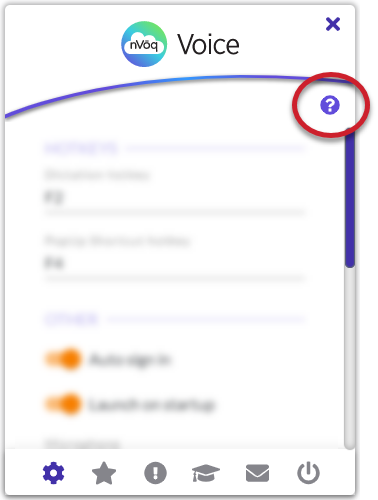
Click the gear icon on the lower-left side of the dictation button to open the Settings window.
![]()
- For information about each setting on this window, see About Each Setting.
- The question mark icon near the upper-right of the Settings window takes you to the online documentation for Voice Settings page (that's this page).
- Icons at the bottom of the Settings window navigate to other features and information about nVoq Voice:
 Settings - Clicking on this icon takes you back to the Settings information. When already open to Settings, the icon is purple. See About Each Setting for information on each setting.
 Shortcuts - Clicking on this icon opens the Popup Shortcut menu on top of the Settings screen. See Use Shortcuts for more information.
 About - Clicking on this icon takes you to information about the version of Voice that is running, and terms of use. You can also install updates to Voice from this screen. If an update is available, this icon displays with an orange badge next to it. A link to updates takes you to the version history for Voice.
 Training - Clicking on this icon takes you to training information.
 Feedback - Clicking on this icon opens a form from which you can send feedback to nVoq support. You must complete all fields on the form (email address, subject, message body, and your company) before you can click the Send button. After you click Send a green success notification message lets you know that your feedback was received and the form is cleared. To clear your message without sending, click the Clear button.
 Sign Out - Clicking on this icon will log you out of Voice and open the Sign In window where you can manually enter credentials.
About Each Setting
Dictation Hotkey
This setting lets you change the keyboard hotkey used for dictation. By default, the hotkey is F2, but you may want to change it if it conflicts with another program.
Click the gear icon next to the dictation button to open Settings, then go to Dictation Hotkey.
To change the hotkey:
- Click inside the Dictation Hotkey field.
- Press the key (or key combination) you want to use. Voice will automatically display your selection in the field.
- Click your mouse outside of the hotkey field to save your changes.
- A green confirmation message will appear briefly: “Successfully saved Dictation Hotkey.”
- The new hotkey is saved to your account under Record Hotkey and, if applicable, PTT Hot Key Modifiers.
⚠️ Hotkeys must be unique. If you try to assign a hotkey that’s already used for Note Compose, Note Assist, or Popup Shortcuts, you’ll see a message reminding you that “Hotkeys must be unique.”
Good Choices for Hotkey:
- function keys (like F6)
- combination of two keys, one of which is a modifier key like Ctrl, Alt, or Shift (for example, the Alt key with the A key)
- standard keys you do not use (like ^)
Poor Choices for Hotkey:
- standard keys (like a-z or 1-9)
- combinations of keys that are hard to type (like the a key with the F6 key with the 9 key)
Note Compose Hotkey
This setting lets you change the keyboard hotkey used to open the Note Compose window. By default, the hotkey is F9, but you may want to change it if it conflicts with another program.
Click the gear icon next to the dictation button to open Settings, then go to Note Compose Hotkey.
To change the hotkey:
- Click inside the Note Compose Hotkey field.
- Press the key (or key combination) you want to use. Voice will automatically display your selection in the field.
- Click your mouse outside of the hotkey field to save your changes.
- A green confirmation message will appear briefly: “Successfully saved Note Compose Hotkey.”
- The new hotkey is saved to your account under Note Generation Shortcut Hot Key and, if applicable, Note Generation Shortcut Hot Key Modifiers.
⚠️ Hotkeys must be unique. If you try to assign a hotkey that’s already used for Dictation, Popup Shortcuts, or Note Assist, you’ll see a message reminding you that “Hotkeys must be unique.”
Good Hotkey Choices:
- Function keys (e.g., F6)
- Modifier + letter/number (e.g., Alt + A, Ctrl + Shift + S)
- Rarely used symbols (e.g., ^)
Poor Hotkey Choices:
- Single letters/numbers (A–Z, 0–9)
- Awkward multi-key combos (e.g., A + F6 + 9)
Note Assist Hotkey
This feature is only available if Note Assist was enabled for your account in nVoq Administrator.
This setting lets you change the keyboard hotkey used to open the Note Assist window. By default, the hotkey is BACK_QUOTE, but you may want to change it if it conflicts with another program.
Click the gear icon next to the dictation button to open Settings, then go to Note Assist Hotkey.
To change the hotkey:
- Click inside the Note Assist Hotkey field.
- Press the key (or key combination) you want to use. Voice will automatically display your selection in the field.
- Click your mouse outside of the hotkey field to save your changes.
- A green confirmation message will appear briefly: “Successfully saved Note Assist Hotkey.”
- The new hotkey is saved to your account under Note Assist Shortcut Hot Key and, if applicable, Note Assist Shortcut Hot Key Modifiers.
⚠️ Hotkeys must be unique. If you try to assign a hotkey that’s already used for Dictation, Note Compose, Note Assist, or Popup Shortcuts, you’ll see a message reminding you that “Hotkeys must be unique.”
Good Hotkey Choices:
- Function keys (e.g., F6)
- Modifier + letter/number (e.g., Alt + A, Ctrl + Shift + S)
- Rarely used symbols (e.g., ^)
Poor Hotkey Choices:
- Single letters/numbers (A–Z, 0–9)
- Awkward multi-key combos (e.g., A + F6 + 9)
Popup Shortcut Hotkey
This setting lets you change the keyboard hotkey used to open the Popup Shortcut menu. By default, the hotkey is F4, but you may want to change it if it conflicts with another program.
Click the gear icon next to the dictation button to open Settings, then go to Popup Shortcut Hotkey.
To change the hotkey:
- Click into the Popup Shortcut Hotkey field.
- Press the key (or key combination) you want to use. Voice will automatically display the key(s) in the field.
- Click your mouse outside of the hotkey field to save your changes.
- A green success message will briefly appear: “Successfully saved Popup Shortcut Hotkey.”
- The new hotkey is saved to your account under Voiceless Shortcut Hotkey and, if applicable, Voiceless Shortcut Hot Key Modifiers.
⚠️ Hotkeys must be unique. If you try to assign a hotkey that’s already used for Dictation, Note Compose, or Note Assist, you’ll see a message reminding you that “Hotkeys must be unique.”
Good Hotkey Choices:
- Function keys (e.g., F6)
- Modifier + letter/number (e.g., Alt + A, Ctrl + Shift + S)
- Rarely used symbols (e.g., ^)
Poor Hotkey Choices:
- Single letters/numbers (A–Z, 0–9)
- Awkward multi-key combos (e.g., A + F6 + 9)
Auto Sign In
This setting allows Voice to automatically sign in at startup using the most recent system and account credentials—whether that’s an nVoq account, Microsoft Entra ID (formerly Azure Active Directory), or Okta.
To enable or disable it, click the gear icon next to the dictation button, then go to Auto Sign In in the Settings menu.
It’s enabled by default for new users, but you must sign in manually once with a password to activate it. The setting is saved to your account properties as Auto Sign In.
When enabled, Voice will sign in automatically using the same account type, system (e.g., Healthcare or Canada), and credentials used during your last login.
If Launch on Startup is also enabled, Voice will both launch and authenticate automatically when Windows starts.
If this setting is disabled, Voice will open to the Sign In screen on launch, and you’ll choose how to log in (nVoq, Microsoft, or Okta) each time.
Launch On Startup
This setting controls whether Voice automatically launches when Windows starts.
To access it, click the gear icon next to the dictation button, then go to Launch on Startup in the Settings menu.
When enabled (orange), Voice will launch automatically each time you start Windows. This setting is on by default and is saved to your account properties as Launch on Startup.
Speech Bubble
This setting controls whether a speech bubble appears above the dictation button during regular dictation to show your transcript in real time.
To change this setting, click the gear icon next to the dictation button, then go to Speech Bubble in the Settings menu.
When enabled (orange, and on by default), the speech bubble displays your dictated text as you speak.
When disabled, the speech bubble won’t appear—your transcript will only show in the target application after you stop recording.
- If you have Conversations mode enabled for your account you will also see a message here that the speech bubble is not available when in Conversations mode. Your Conversations transcript will appear when you stop the recording.
Microphone
This setting lets you see which microphone Voice is using for dictation, and switch to another connected mic if needed.
To view or change your microphone, click the gear icon next to the dictation button, then go to Microphone in the Settings menu. By default, Voice uses your computer’s default microphone for dictation. You’ll see this listed as:
Default – Microphone (Device Name)
(e.g., Default – Microphone (Plantronics Blackwire C210))
You can select a different microphone from the drop-down if you have more than one connected. Your selection takes effect immediately and will remain active as long as the chosen microphone stays connected and enabled. If it's unavailable, Voice automatically falls back to the default mic.
Helpful Notes:
Voice performs automatic gain control (AGC) to keep recording volume consistent.
The mic used for each dictation is logged in nVoq Administrator (under the Timeline on the Detail Review & Correct page) and saved to your account properties as Last Mic Mixer Name.
If no mic is connected, the menu will show No Microphone, the dictation button will be grayed out, and you won’t be able to dictate, unless you're using the nVoq Wireless Microphone, which works independently. [See: Wireless Microphone]
Warnings and Recommendations:
If your default mic is a built-in or array mic (often lower quality), a warning will appear in the Settings screen. This message links to a list of nVoq-recommended microphones to improve your dictation accuracy.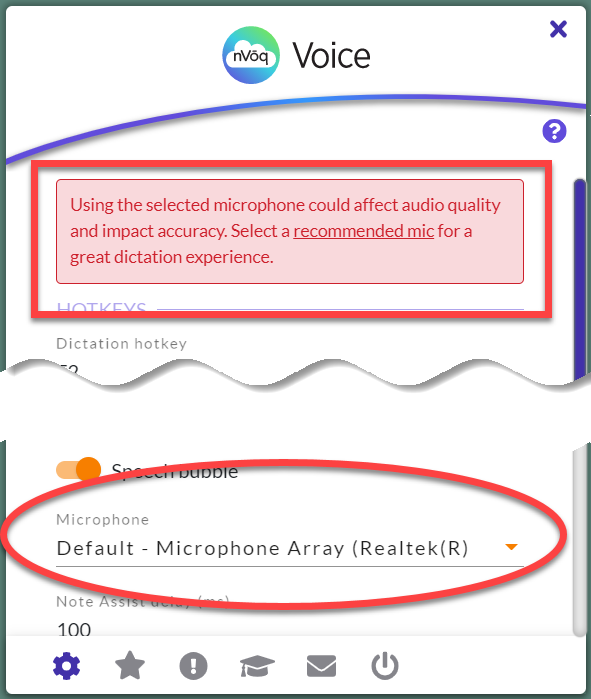
Plug-and-Play Support:
The Microphone menu updates automatically when you plug in or disconnect a mic (via jack or Bluetooth). If Default is selected, Voice will switch to any new mic set as the system default without manual input.
Note Assist Delay (ms)
This setting configures delay between certain actions in Note Assist:
First, between capturing text and pasting it into the Note Assist window.
Then, between switching focus back to your EMR (or system of record) and pasting the updated text from Note Assist.
This delay can help ensure smoother performance—especially for users running Voice and Note Assist in virtual desktop environments like Citrix.
Click the gear icon next to the dictation button to open the settings then go to Note Assist Delay to change this setting. The Note Assist Delay setting, set to 30 milliseconds by default (which is .03 seconds), If your note does not open in the Note Assist window, or if Note Assist does not paste your completed note back into your application, try increasing this number. You may need to try incremental changes in the number to get the setting just right.
Paste Delay (ms)
This setting configures a delay for text to paste into your application, which can be especially helpful when pasting text into a remote or virtual desktop application where Voice might respond too quickly for the text to be pasted in the correct location
Click the gear icon next to the dictation button to open the settings then go to Paste Delay to change this setting. The Paste Delay setting, set to 30 milliseconds by default (which is .03 seconds). Increase or decrease this number by either typing in a new number or using the up and down arrows that appear when you place your cursor on the field. Once you move your cursor off of that field you will see a green message appear for a few seconds stating, "Successfully saved setting." The setting is then saved to your account properties under Voice Paste Delay.
Topic
This allows you to change the topic that you use for dictation.
Click the gear icon next to the dictation button to open the settings then go to Topic to change the topic for your dictations. Once you change the topic you will see a green message appear stating, "Successfully saved Topic".
- Only topics available on your system (e.g. healthcare.nvoq.com or canada.nvoq.com) are listed in the menu.
- The default topic will be the one that is configured for your group in the administrator console.
- The topic selected on this menu appears in Account Properties under "Selected Topic".
- Changing the dictation topic in Voice will also change the dictation topic in nVoq Mobile Voice.
Troubleshoot Mode
Troubleshoot mode automatically sets the logging level on your client to "DEBUG" (the highest logging level for Voice).
Click the gear icon next to the dictation button to open the settings then go to Troubleshoot Mode to change this setting. This setting is off by default, but when enabled (orange) the logging level for the client is set to "DEBUG" (which is the highest logging level for Voice).
- If you close Voice, log data is collected immediately on relaunch (as opposed to starting once you sign in in to the client). This allows the log files to include activity prior to being signed in.
- This setting can also be enabled in the administrator console (on the Logging page) and when that happens, the toggle on the Settings screen in Voice will change to enabled (orange) the next time you close Voice and relaunch it.
- If this feature is enabled in the administrator console, in addition to increasing the logging level, logs are also automatically uploaded to the administrator console when you log out or sign out of Voice.
- You can manually send logs to the Administrator console anytime by clicking the Upload Logs button (also on the Settings window) or an administrator can also manually pull the log file from the Logging page in the administrator console.
- Disabling Troubleshooting Mode in Voice does NOT disable logging that was enabled for the account in the administrator console.
- When you enable Troubleshoot Mode from Voice the user account does NOT show that logging is enabled on the Logging page in nVoq Administrator, nor are logs automatically uploaded to the administrator console. In order to have logs automatically uploaded to the administrator console, logging must be enabled in the administrator console.
- For more information about logging and logs collected in the administrator console, see Logging in the nVoq Administrator help.
Wireless Microphone
This setting lets you use the nVoq Wireless Microphone app (on Android or iOS) as your microphone for dictation.
Click the gear icon next to the Dictation button to open the settings screen, go to Wireless Microphone, and toggle the setting on or off.
⚠️ If this setting is disabled, the Wireless Microphone Computer will not appear in the Wireless Microphone app’s client list.
No admin console setup is required to use the Wireless Microphone app with Voice. Just enable the toggle, optionally customize the Wireless Microphone Computer name, and pair your device with the app.
Sign in to the Wireless Microphone app using your nVoq account username and password. The Wireless Microphone will connect to the Voice application (even if you sign in to Voice using SSO) as long as you use the same username for both and are signed in on the same system.
Click HERE to watch a video!
For pairing instructions, see:
Connection Notes:
- Voice dictations use WebSocket connections by default.
- Dictations recorded using the Android Wireless Mic use HTTP automatically.
- On iOS, the Wireless Mic uses WebSocket, unless otherwise specified via API.
Note: Wireless Microphone app functionality in Voice is limited to dictation only. Shortcut features in the app are not supported.
Wireless Microphone Computer
This is the name of the computer running Voice.
To view or change it, click the gear icon next to the dictation button, then go to Wireless Microphone Computer in the settings.
By default, this field displays your Windows device name followed by -voice (e.g., GGLASS-voice). You can update the name by simply typing a new one into the field.
In the Wireless Microphone app (on Android or iOS), tap the computer name shown here to connect to Voice on that machine.
For pairing instructions, see:
If you change the computer name in Voice while already signed in to the Wireless Microphone app, you'll need to re-link it on your mobile device to see the updated name. Don’t worry—dictation will continue to work either way.
Upload Logs
This feature lets you send Voice client log files to the nVoq Administrator console for troubleshooting.
To access it, click the gear icon next to the dictation button, then go to Upload Logs in the settings. If you're experiencing issues with Voice, click the Upload Logs button at the bottom of the Settings screen. This sends diagnostic log files directly to the Logging page in the administrator console, where your admin or nVoq Support can review them.
Note: Administrators can also pull log files from Voice directly within the console.
For more information, see Logging in the nVoq Administrator help.
Move or Resize the Settings Window
- You can move the Settings window by selecting the top part of the window with your mouse and dragging.
- You can resize the Settings window by selecting an edge. When your mouse changes to a double-sided arrow, you can drag the edges of the window in the direction of the arrows.