On the Accounts page, you can create, edit, and enable or disable user accounts. You can also send username and password recovery emails, choose or update subscription plans, purchase the Accuracy Optimization Service, and manage select client settings for individual users.
Accounts Page Toolbar

Mass Update
This icon will appears in the toolbar when one or more accounts is selected using the checkmark to the left of the list. Click the icon to open the Update Accounts page where you can select one or more changes to make on the selected accounts.

You can update the list view to display the information that you want to change. For example, if you are planning to change the Enabled Through date, select Enabled Through on the Customize Columns menu as one of the columns to display. The columns you select here will also be listed on the Update Accounts page.
Delete
When one or more accounts is selected using the checkmark to the left of the list, the trash can icon will appear in the toolbar. Click the trash can icon to delete the selected accounts.
- A selected account will fail to be deleted if...
- It has a higher Administrator Organization than your own. (You can tell if someone has a higher Administrator Level than yours by looking at the Access column. Accounts listed with the word "Organization" [e.g. "Organization Customer Admin"] have a higher level than yours.)
- It was auto provisioned, UNLESS the account is disabled. Auto provisioned accounts can only be disabled via the SSO provider or by disabling one or more of the user's organizations.
Email Account
When one or more accounts is selected using the checkmark to the left of the list, the envelope can icon will appear in the toolbar. Click on the envelope icon to send a username reminder email or a password reset email to the selected accounts.
New
Click on the plus symbol to create a new user account. See Add Account.
Upload
Click on the upload icon to upload a spreadsheet that will add multiple user accounts at once. See Upload Accounts.
Download
Click on the download icon to download a .csv file that includes selected accounts or all user accounts in the organization. See Download Accounts.
Note: If on the Edit Account page, the Download option will download a .csv file that includes just the one account shown on the page.
Support Center
Click on the question mark icon in the blue bar to go directly to the online documentation for the Accounts page. (The black question mark icon at the top right goes to the nVoq Administrator main help page.)
Search
Use the Search field near the top-right to find accounts using information in columns visible on the page (except First Login and Last Login).
- A minimum of two (2) characters must be entered to initiate a search.
- The search field is case insensitive.
- Each search initiates a new request to the server to look through all accounts in the selected organization, and the total number of matching items found displays in the upper-left corner below the toolbar. Results may be spread across multiple pages.
- The search text you entered, matching results, and the page of results you were viewing persist on the Accounts page even if you go to another page and then return, or sign out and sign back in.
- If columns on the page change (using Customize Columns) after you have entered search criteria, a new request is sent to the server to search through all accounts in the selected organization.

Customize Columns
Click on the tool icon to open the Customize Columns window where you can select which columns you want to display in the list view, as well as customize the order in which they appear.

In the Customize Columns window:
- Columns appear in this window in the order that they appear in the list view.
- Use the checkbox next to the column name to add or remove columns from the Accounts page list view and on the Update Accounts page. At least one column must be selected in order to save your changes.
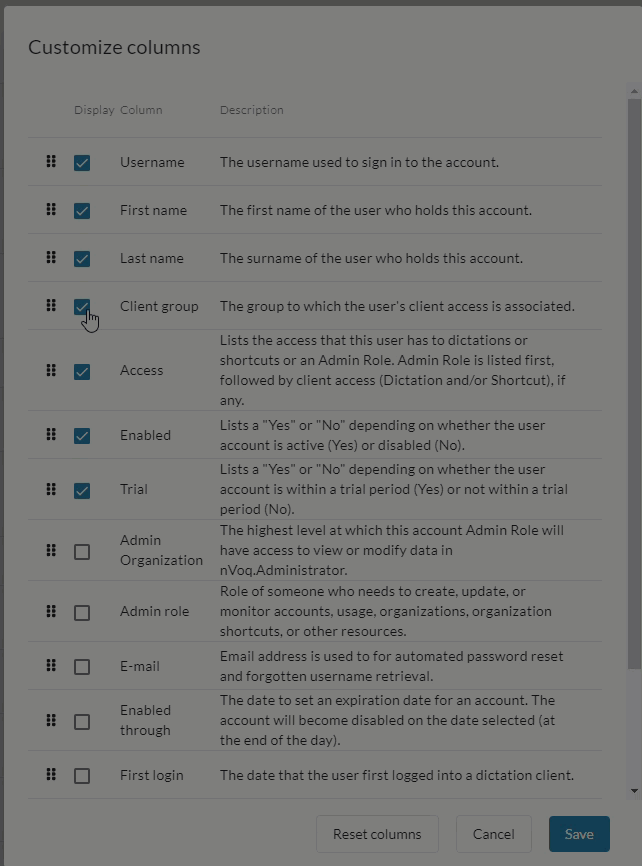
- Use the grab icon
 to drag and drop columns into the order in which you want them to appear in the list view.
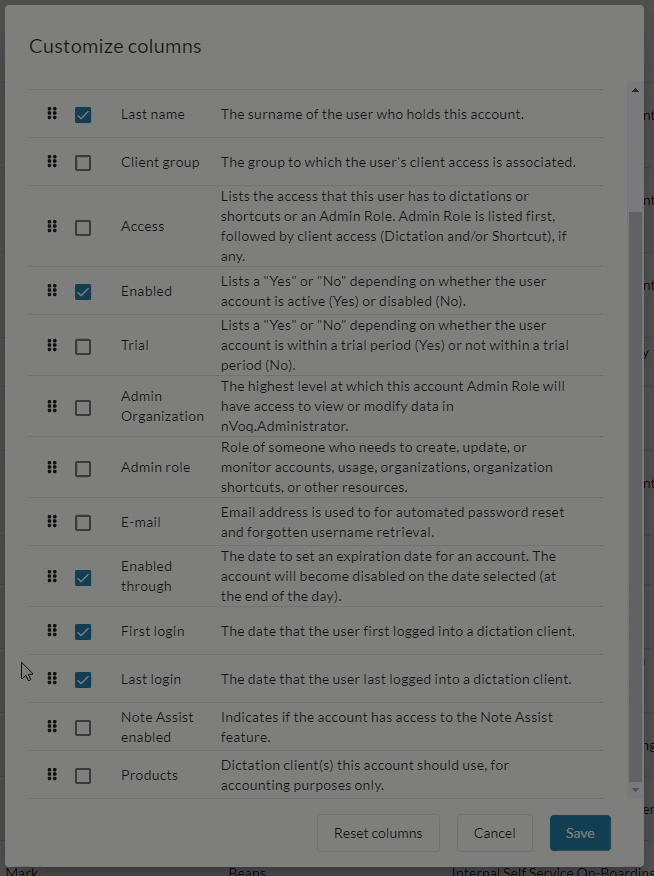
- Use the Reset Columns button to reset columns back to the default columns and order. When this button is clicked, the Customize Columns window closes automatically and the default columns are displayed in the list view.
- Use the Cancel button to close the Customize Columns window without saving changes.
- Use the Save button to save any changes you made to the columns that display and/or their order in the list view. Saved changes are immediately visible in the list (you do not need to click the refresh icon). The column selection and order is remembered when you navigate to other pages in nVoq Administrator, and when you log out and log back in.
- Once columns have been customized and saved, the Customize Columns window lists the columns that display on the page at the top of the list, and the columns that are not displayed are listed alphabetically below.
Items per Page
The number of accounts in the organization selected or that meet search criteria may display on multiple pages. You can configure the number of accounts that display on each page using the Items per Page menu, and navigate through the pages using arrows at the bottom of the page.
- The number of accounts that display in the list view can be configured on the Items per Page drop-down menu at the bottom-right of the page.
- Options are 25, 50, 100 (default), 150, or 200.
- The number selected here is retained when you navigate to different pages in nVoq Administrator and when you sign out and sign back in.
- This selection will also be used on all other pages in nVoq Administrator that have pagination.
- To the right of the Items per Page menu is the number of accounts currently displayed on the page next to the total number of accounts in the selected organization or that meet search criteria (e.g. 1-100 of 4227).
- You can navigate through the pages of accounts by using the arrows at the bottom-right of the page:
|⟨ (go to first page), ⟨ (go to previous page), ⟩ (go to next page), ⟩| (go to last page).
- You can navigate through the pages of accounts by using the arrows at the bottom-right of the page:
Accounts Page Columns
The columns that display in the list view by default are: Username, First Name, Last Name, Client Group, Access, Enabled, Trial, and the Actions menu. You can view additional columns and change the order in which they display in Customize Columns window. Additional columns include: Admin Organization, Admin Role, E-mail, Enabled Through, First Login, Last Login, Note Assist Enabled, and Products. See an explanation of each column below.
- Data in the list view can be sorted on any column by clicking on a column header. An arrow displays next to the column header currently used for sorting. By default accounts are sorted by Last Name.
- Sorting of data in the list view is updated when a new column is selected or when a different organization is selected from the organization menu. These actions make a webservice call to the server to return data for all accounts in the selected organization.
Account Icon / Checkbox
Hover your mouse over the account icon ![]() and click to put a checkmark in the box to select the account in order to perform an action on it from the blue toolbar. Once selected, the row turns green and has a checkmark on the left. Row selection is cleared when viewing a new page of data, selecting a different organization from the organization menu, or when the sorting is changed.
and click to put a checkmark in the box to select the account in order to perform an action on it from the blue toolbar. Once selected, the row turns green and has a checkmark on the left. Row selection is cleared when viewing a new page of data, selecting a different organization from the organization menu, or when the sorting is changed.
- You can select multiple accounts by clicking on each icon and then perform actions available from the icons in the blue toolbar on all selected accounts.
- You can select all accounts in the list by putting a checkmark in the box on the left side of the column headers (above the account icons).
- When you select this box, if there are more items in the organization or that meet current search criteria than are displayed on one page, a message appears near the top of the page letting you know that all the items displaying on the page have been selected, and giving you the option to select all items on all pages instead. (This message does not display if the total number of items is less than or equal to the number of items selected.)

- Click the text that says, "Select all # items" to select all items in the organization or that meet current search criteria.

- Once all items on all pages have been selected, you can click "Clear selection" to clear all selected items.

- Click the text that says, "Select all # items" to select all items in the organization or that meet current search criteria.
- When you select this box, if there are more items in the organization or that meet current search criteria than are displayed on one page, a message appears near the top of the page letting you know that all the items displaying on the page have been selected, and giving you the option to select all items on all pages instead. (This message does not display if the total number of items is less than or equal to the number of items selected.)
- If a selected account has access at a higher Administrator Organization than your own, you can still send a username or password email but you cannot make changes to the account.
- If a selected account was auto provisioned, you can make some changes (like sending username or password emails or updating Note Assist or Products), but not others (like enabling or disabling the account, updating the Client Group, etc.).
- If you select multiple accounts to enable, disable, or delete and any of them cannot be changed by the option you select, those accounts will be skipped and you will see a notification letting you know which accounts were successfully changed and which accounts could not be.

- If you select multiple accounts to enable, disable, or delete and any of them cannot be changed by the option you select, those accounts will be skipped and you will see a notification letting you know which accounts were successfully changed and which accounts could not be.
- You cannot select accounts created on the Provisioning page.
Username
This is the username for the account that is used to sign in to nVoq products.
- Usernames for accounts created on the Provisioning page start with
provision_.
First Name
This is the given name of the user who holds this account.
- The first name for accounts created on the Provisioning page is listed as
Provisioning.
Last Name
This is the surname or family name of the user who holds this account.
- The last name for accounts created on the Provisioning page is listed as
User.
Client Group
This column lists the organization(s) in which this user has Client Access. The organizations you can see here depend on your account access. For example, if you have a tenant-level account, you will see the user's company, division, and group in this column. If you have group-level access, you will only see the user's group. If no group is listed, the user does not have Client Access (cannot use dictation or shortcuts).
Access
This lists the access that this user has to dictation, shortcuts, or an Administrator Role.
- Dictation - User has a subscription Plan that grants the ability to use dictation when logged in to a dictation client.
- Shortcut - User has a subscription Plan that grants the ability to use shortcuts when logged in to a shortcut client.
- [Organization] Customer Admin - User has an Administrator Role of Customer Administrator at the organization level listed (e.g. Tenant Customer Admin, Division Customer Admin). If the account has a higher Administrator Organization than your own account, you will just see the word "Organization" before the Customer Admin title.
- [Organization] Shortcut Designer - User has an Administrator Role of Shortcut Designer at the organization level listed (e.g. Tenant Shortcut Designer, Group Shortcut Designer). If the account has a higher Administrator Organization than your own account, you will just see the word "Organization" before the Shortcut Designer title.
- [Organization] Read Only - User has an Administrator Role of Read Only at the organization level listed (e.g. Company Read Only, Division Read Only). If the account has a higher Administrator Organization than your own account, you will just see the word "Organization" before the Read Only title.
- Tenant Provisioning Admin - This account was created on the Provisioning page for use with an identity provider and does not have the ability to sign in to any nVoq product.
Enabled
This column displays a "Yes" if the user account is active. A "No" means the account is disabled. A disabled user cannot sign in to any nVoq product.
- Accounts auto provisioned via Okta that are "suspended" in Okta will still be "enabled" in nVoq Administrator. Suspended Okta accounts cannot sign in to any nVoq product using the Okta sign on method. They could still sign in to nVoq products using their nVoq username and password, however.
- Accounts auto provisioned via Okta that are "disabled" in Okta are automatically disabled in nVoq Administrator.
Trial
This column displays a "Yes" if the user account is within a trial period. A "No" means the account is not within a trial period and may be billable.
Admin Organization
This column can be displayed in the list by selecting it in the Customize Columns window.
This column lists the organization to which this account Administrator Role (if any) has access. The lowest level organization listed is the highest level that the user's role can access. For example, if there is a group organization included in this column, the user's Administrator Role can only access that group and no higher.
The column will only list organizations (up to tenant) to which your account has access. For example, if you have a tenant-level account, you may see the company, division, and group. If you have a system-level account, you may see the tenant, company, division, and group. If you have group-level access, you may only see the group. If the user has access at a higher organization level than you do, you will only see the word "Organization" in this column.
Admin Role
This column can be displayed in the list by selecting it in the Customize Columns window.
This is this account's role in nVoq Administrator (if any) and the organization level to which the role has access (e.g. "Division Customer Admin"). If the user has access at a higher level than you do, you will only see the word "Organization" instead of the level (e.g. "Organization Customer Admin").
Form Completion
This column can be displayed in the list by selecting it in the Customize Columns window.
This column indicates whether or not a new feature (currently called "Voice Assistant") is enabled for the user (Yes or No).
Auto Provisioned
This column displays a "Yes" if the user account was created via an SSO provider. An existing account may be updated via SSO provider and will be marked as "auto provisioned" in that case as well. These accounts cannot be updated using mass edit options Enable/Disable, Update Client Group, or Update Enabled Through. These accounts cannot be deleted unless they are disabled (which must be done either via the SSO provider or by disabling their entire organization). The following settings for auto provisioned accounts are managed via SSO provider and cannot be updated in nVoq Administrator: Username, First Name, Last Name, Email Address, Enabled status, Enabled Through date, Client Access, and Client Group.
Conversation Capture
This column can be displayed in the list by selecting it in the Customize Columns window.
This column indicates whether or not the Conversation Capture feature is enabled for the user (Yes or No).
This column can be displayed in the list by selecting it in the Customize Columns window.
This is the email address that is configured on the Add/Edit Account page for the account. This is the email address used for automated password reset and forgotten username retrieval.
- The e-mail for accounts created on the Provisioning page is listed as
not-real@nvoq.com.
Enabled Through
This column can be displayed in the list by selecting it in the Customize Columns window.
This is the expiration date for the account (if any). The account will become disabled on the date listed (at the end of the day).
First Login
This column can be displayed in the list by selecting it in the Customize Columns window.
This is the first date this user logged in to a dictation or shortcut client with this account.
Form Completion
This column can be displayed in the list by selecting it in the Customize Columns window.
This column indicates whether or not the Form Completion (Voice Assistant) feature is enabled for the user (Yes or No).
Note Compose
This column can be displayed in the list by selecting it in the Customize Columns window.
This column indicates whether or not Note Compose for structured notes is enabled for the user (Yes or No).
Patient Visit Retrieval
This column can be displayed in the list by selecting it in the Customize Columns window.
This column indicates whether or not the Patient Visit feature is enabled for the user (Yes or No).
Last Login
This column can be displayed in the list by selecting it in the Customize Columns window.
This is the last date the user logged in to a dictation or shortcut client with this account.
Mobile Voice Account Shortcuts
This column can be displayed in the list by selecting it in the Customize Columns window.
This column indicates whether or not the account has the ability to run, add, edit, and delete account (user) shortcuts in Voice for Android (Yes or No).
Note: This setting is not applicable to Voice for iOS.
Mobile Voice Words Per Minute
This column can be displayed in the list by selecting it in the Customize Columns window.
This column indicates whether or not the account has the Words Per Minute setting enabled in Voice for Android (Yes or No).
Note: This setting is not applicable to Voice for iOS.
Note Assist enabled
This column can be displayed in the list by selecting it in the Customize Columns window.
This column indicates whether or not the premium Note Assist feature is enabled for the user (Yes or No).
Products
This column can be displayed in the list by selecting it in the Customize Columns window.
This column lists the dictation or shortcut client(s) that this account is assigned to use.
- Voice-Android - nVoq Voice for Android
- Voice-iOS - nVoq Voice for iOS
- Voice-Windows - nVoq Voice for Windows
- nVoq SPS (APIs) - Non-nVoq dictation/shortcut clients that use nVoq APIs
Actions
Click on the actions icon![]() next to an account in the list to open a menu and select an action to take with the account listed on that specific row. Possible actions may include:
next to an account in the list to open a menu and select an action to take with the account listed on that specific row. Possible actions may include:
- View Account: Open the account to see details, but not make changes. If your account has an Administrator Role of "Read Only" you will only see this option on the Actions menu. This is the only option for accounts created on the Provisioning page.
- Edit Account: Open the account to see details and make changes. See Edit Account. You will not be able to edit an account with a higher Administrator Organization than your own. If you click on the Edit Account option for an account with a higher Administrator Organization than your own, all of the options on the Edit Account page will be grayed out.
- Send Username Email: Send a username retrieval email to the user's email address that is associated with the account. See Send Username Recovery Emails.
- Send Password Email: Send a password reset email to the user's email address that is associated with the account. See Send Password Recovery Emails.
- Delete: You will not be able to delete an account with a higher level Administrator Organization than your own. Accounts that were auto provisioned cannot be deleted unless they are disabled. (Auto provisioned accounts must be disabled via the SSO provider.) The Delete option is grayed out in those instances. See Delete Account.