On the Review & Correct page you can listen to dictation and voice shortcut recordings, review dictation and shortcut transcripts, and correct dictation transcripts to get an accuracy score and help improve accuracy. You can also view dictation event details to troubleshoot dictation issues.
Review & Correct Page Toolbar

Refresh 
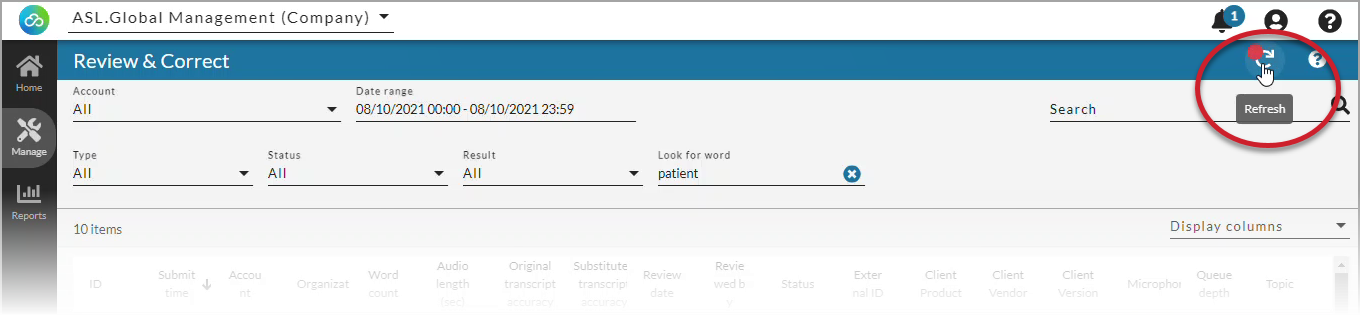
When a change to a filter is detected, refresh icon is displayed with a red dot next to it![]() indicating that the page information is stale and needs to be refreshed. Each change to a filter (in the gray area below the blue toolbar) causes the icon to pulsate once with a red dot. Click on the refresh icon to update the list of items on the page. A retrieval of items within the selected filters starts when the icon is clicked. Once this retrieval starts, it cannot be stopped. If you navigate to a new page the page will automatically be refreshed with the configured filter settings. (You do not have to click refresh when using the Search field, which is also in the gray area.)
indicating that the page information is stale and needs to be refreshed. Each change to a filter (in the gray area below the blue toolbar) causes the icon to pulsate once with a red dot. Click on the refresh icon to update the list of items on the page. A retrieval of items within the selected filters starts when the icon is clicked. Once this retrieval starts, it cannot be stopped. If you navigate to a new page the page will automatically be refreshed with the configured filter settings. (You do not have to click refresh when using the Search field, which is also in the gray area.)
Download 
Click on the download icon to download a Comma Separated Values (CSV) file that includes all transactions (not just the ones visible on the page) or selected transactions. If transactions are selected when you click the icon, a dialog appears asking if you want to download all transactions or selected transactions. The time zone on the CSV file matches what is displayed in the list view, which is based on the settings configured in the nVoq Administrator Settings.
- The downloaded file (
ReviewAndCorrectItems.csv) includes the same columns that are visible on the screen. Use the Customize Columns feature to select which columns are included or excluded from the file. - The Status column displays words for each status in the file instead of the symbols that are presented in the list view.
Support Center 
Click on the question mark icon in the blue bar to go directly to the online documentation for the Review & Correct page. (The black question mark icon at the top right goes to the nVoq Administrator main help page.)
Account Filter

Use this filter to see only activity for a single user account within the selected organization.
To view activity for a specific Account:
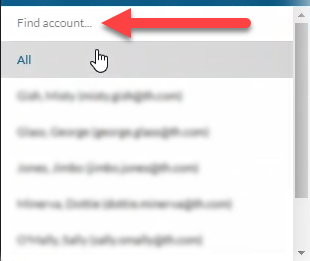
- From the Account drop-down menu, select an account to view activity.
- The menu will display a maximum of 250 accounts. If there are more than 250 accounts in the selected organization, the bottom of the menu will say, "Showing 250 out of [#] possible accounts."
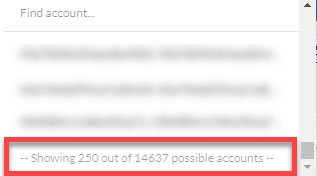
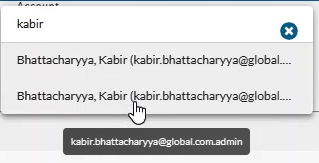
- Use the Find Account field at the top of the menu to find any account that exists in the selected organization, even if it is not displayed in the menu.
- Hover your mouse over the account in the list to see the username in a tooltip if it's cut off on the menu.
- The menu will display a maximum of 250 accounts. If there are more than 250 accounts in the selected organization, the bottom of the menu will say, "Showing 250 out of [#] possible accounts."
- Click the refresh icon in the blue bar
 to update the items in the list to include the selected filtered results.
Date Range Filter
Use this filter to view activity that occurred on a specific date or during a specified date range or time period.
To view activity for a specific date range:
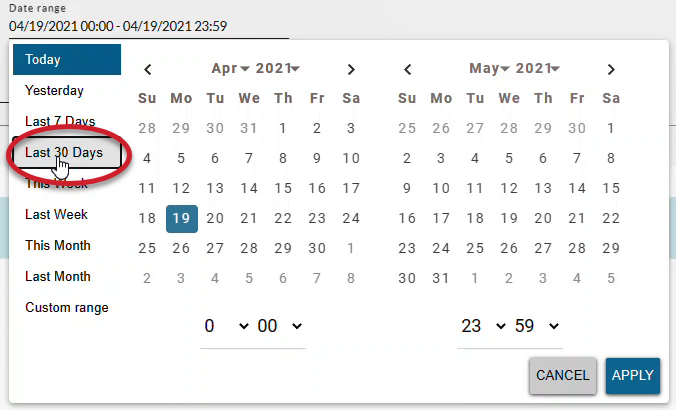
- Click on the date range to open a calendar. The current date is selected by default.
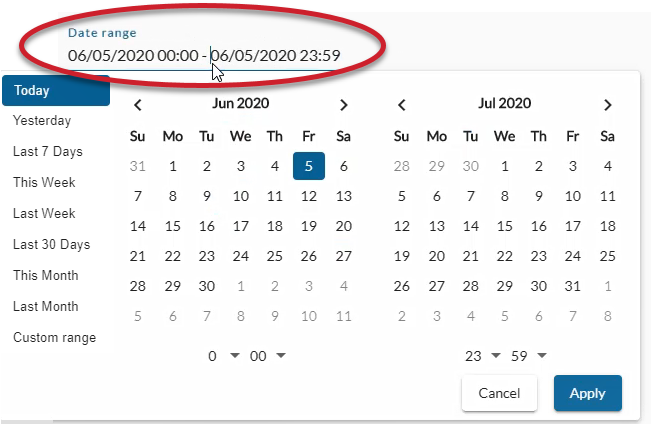
- Select a start date on the calendar that is the earliest date for which you want to see activity. Click on the start date so that you see a semicircle on the number
 (instead of a square) and then select the end date.
 - Optionally select one of the pre-defined shortcuts on the left side of the calendar (e.g. "Last 30 Days").
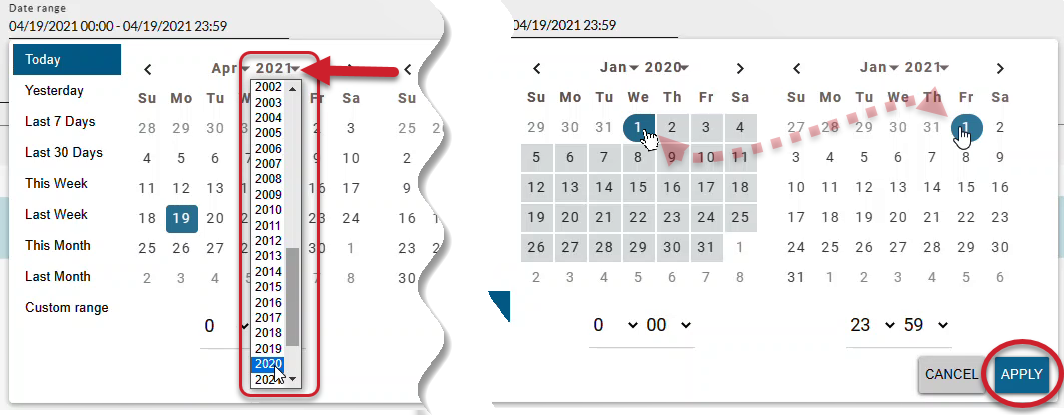
- Optionally you can use the drop-down menus for month and year to quickly go back farther in time. You still need to select a start and end date on the calendar and manually click the Apply button.
- Optionally you can type a date into the Date Range field. You still need to click the Apply button when type the date range manually into the field.
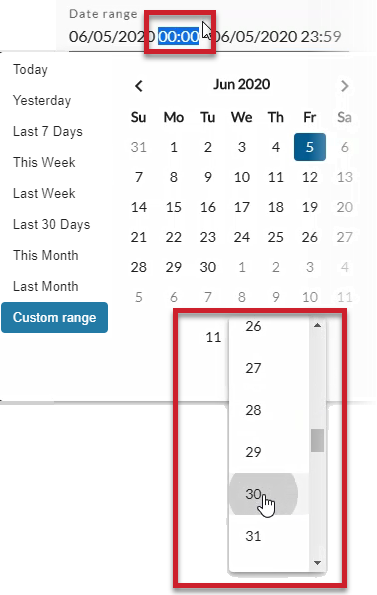
- Optionally you can also set a start time from the menu on the calendar OR by typing over the time in the Date Range field.
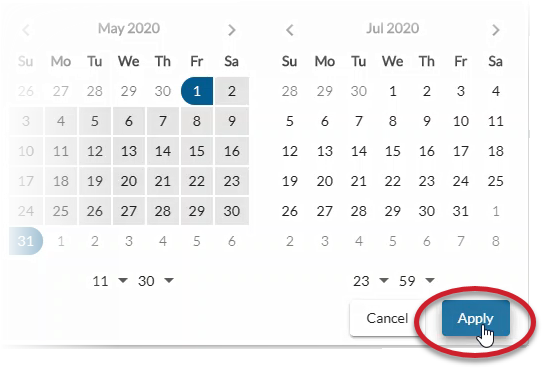
- Select an end date that is the most recent date you want to search.
- Optionally, you can also set an end time from the menu on the calendar OR by typing over the time in the Date Range field. You still need to click the Apply button when type the date range manually into the field.
- You must click Apply to set the date range.
- If you're done selecting filters, click the refresh icon in the blue bar to update the items in the list to include the selected filtered results.
Type Filter
Use this filter to view transactions for a specific type of activity (dictations, for example). All activities that can be performed on the client are included in this list by default.
Filter results by Type of activity:
- From the Type drop-down menu select an item on the list (see below).
- All - View all activity regardless of type (default)
- Conversation - Select this option to see only multi-speaker dictations recorded using Conversations. Corrections cannot be applied to these recordings.
- Dictation - Select this option to see only single-speaker dictation recordings. This allows you to review and correct dictation transcripts to help improve dictation accuracy.
- Hands Free Keyword - Select this option to see the keyword(s) that started or stopped a hands-free dictation. (Hands-free is only available using our API.)
- Shortcut - Select this option to see only recordings made by a user to run a voice shortcut. This allows you to see the name of the shortcut that was deployed on the user's computer. If the transcript text does not match the audio recording, there was a mismatch.
Corrections cannot be applied to these recordings. While the option is available to save a correction, they will have no effect. - Popup Shortcut - Select Popup Shortcut to see only popup shortcuts. This allows you to see the shortcut command for a Popup shortcut run by a user. No audio is recorded for Popup shortcuts.
- Note: Microphone Setup Result and Sub-Shortcut have been removed from the Type menu, but if these activities exist in the selected date range they will still appear in the list view when "All" is selected from this menu.
- If you're done selecting filters, click the refresh icon in the blue bar to update the items in the list to include the selected filtered results.
Status Filter
The Status filter generally applies to dictations and is used to see which dictations need to be corrected, which have already been corrected, or which have been marked as poor quality and should not be used for accuracy scoring.
Filter results by Status:
- From the Status drop-down menu select an item on the list (see below).
- All - View all activity regardless of status (default)
- New - All events that have not been corrected or marked as poor quality.
- Corrected - Dictation recording/transcripts that have been corrected and saved and show an accuracy score. (This option is only relevant for single-speaker dictations.)
- Poor Quality - Recordings or transcripts that have been deemed to be poor quality. For dictations this means the recording is unsuitable for accuracy scoring (usually because of poor audio, words cut off due to ill-timed button press or release, or some other type of problem). For Conversations this could mean either there was poor audio or the transcript was poor quality.
- N/A - This option appears if status is not relevant for the type of activity selected on the Type menu.
- If you're done selecting filters, click the refresh icon in the blue bar to update the items in the list to include the selected filtered results.
Result Filter
The Result filter lets you quickly find events that were successful, canceled, or received some type of error.
Filter results by Result:
- From the Result drop-down menu select an item on the list (see below).
- All - View all activity regardless of result (default)
- Success - View dictation or voice shortcut events for which the user received a response.
- Canceled - View events that were stopped by the user before they could finish processing. Dictations that were too short or too quiet are also reported as a canceled. In some cases, audio may not be available because the server received the cancel request before the client uploaded any audio.
- Error - View events for which the server returned an error. Click on the icon in the Status column to see a brief description of the error.
- No Input - View voice shortcuts for which the matching server failed to detect any speech in the recording. Filtering on this result will automatically set the Type filter to "Shortcut".
- No Match - View voice shortcuts for which the matching server failed to match the the words heard in the recording to an existing shortcut name. Filtering on this result will automatically set the Type filter to "Shortcut".
- If you're done selecting filters, click the refresh icon in the blue bar to update the items in the list to include the selected filtered results.
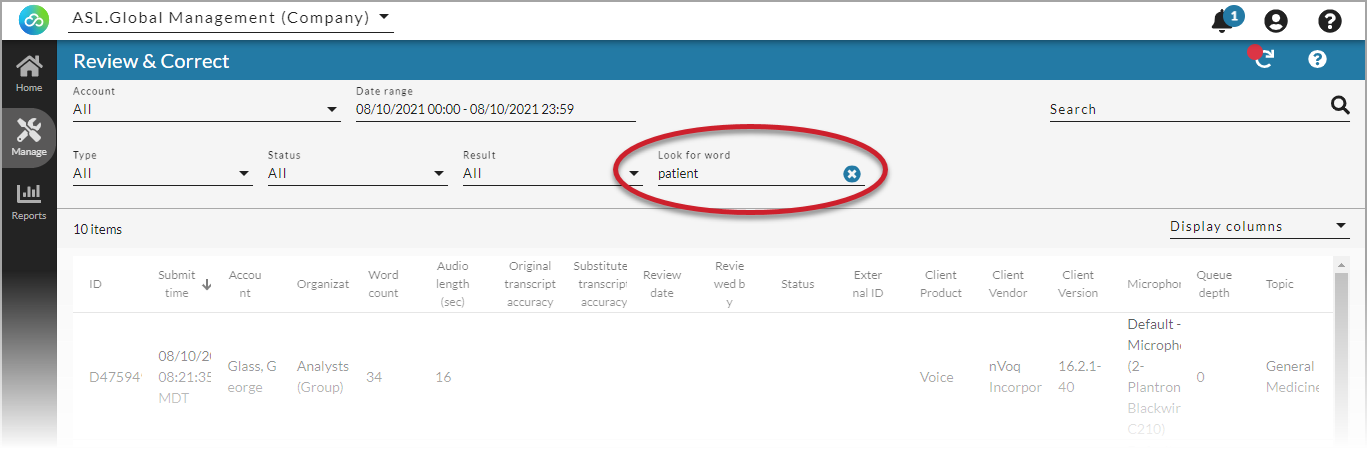
Look for Word Filter

The Look for Word feature lets you search transcripts on the "Original" tab of single-speaker dictations for specific words or phrases. It does not search the Substitution transcript or corrected text. It also performs a limited search of multi-speaker Conversations.
You can use this filter to search Conversation transcripts for specific words or phrases. However, because Conversations are processed differently from standard dictations, search results may vary.
- To find information in columns on the Review & Correct list view, use Search instead.
- Look for Word can only search through displayed transactions.
To filter results by Look for Word:
- Enter the dictated words that you would like to find into the Look for Word field.
- The query will match multiple words in a search string
- You can enter special characters (e.g. -, #, $, %) into the field
- Click the refresh icon in the blue bar to update the items in the list view to only include selected filters.
- Open an item in the resulting list view to see the word or phrase for which you searched highlighted in the dictation transcript on the Detail Review & Correct page.
Note: The search is case insensitive and will match all words that include the term for which you searched. For example, a search for "patient" will also return dictations that include “Patient” or “outpatient".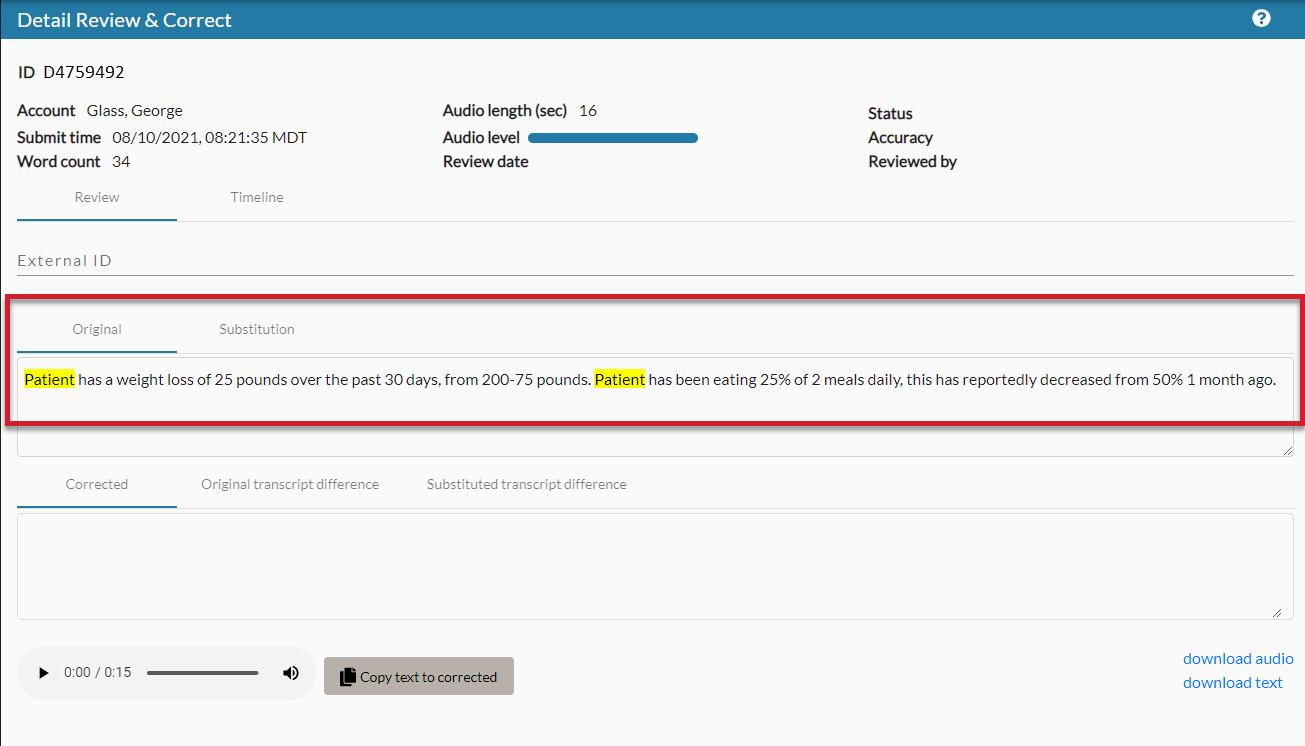
Search

Use the Search field to look for for information in any column visible on the page, including ID or External ID. Columns that are hidden (using Customize Columns) are not included in the search.
- The search happens automatically; you do not have to click the Refresh icon in the blue toolbar. A minimum of two (2) characters must be entered to initiate a search.
- The search field is case insensitive.
- Each search initiates a new request to the server to look through all transactions in the selected organization, and the total number of matching items found displays in the upper-left corner below the toolbar. Results may be spread across multiple pages.
- If columns on the page change (using Customize Columns) after you have entered search criteria, a new request is sent to the server to search through all accounts in the selected organization.
- To find words in a dictation transcript, use Look for Word.
Customize Columns
Click on the tool icon to open the Customize Columns window where you can select which columns you want to display in the Review & Correct list view, as well as customize the order in which they appear.
![]()
In the Customize Columns window:
- Columns appear in this window in the order that they appear in the list view.
- Use the checkbox next to the column name to add or remove columns from the list view. At least one column must be selected in order to save your changes.

- Use the grab icon
 to drag and drop columns into the order in which you want them to appear in the list view.
- Use the Reset Columns button to reset columns back to the default columns and order (ID, Submit Time, Account, Organization, Word Count, Audio Length, Original Transcript Accuracy, Substituted Transcript Accuracy, Review Date, Reviewed By, Status, and External ID). When this button is clicked, the Customize Columns window closes automatically and the default columns are displayed in the list view.
- Use the Cancel button to close the Customize Columns window without saving changes.
- Use the Save button to save any changes you made to the columns that display and/or their order in the list view. Saved changes are immediately visible in the list (you do not need to click the refresh icon). The column selection and order is remembered when you navigate to other pages in nVoq Administrator, and when you log out and log back in.
- Once columns have been customized and saved, the Customize Columns window lists the columns that are selected (displayed) at the top of the list, and the columns that are not selected (not displayed) are listed alphabetically below.
Items per Page
The number of transactions in the organization selected or that meet search criteria may display on multiple pages. You can configure the number of transactions that display on each page using the Items per Page menu, and navigate through the pages using arrows at the bottom of the page.
- The number of transactions that display in the list view can be configured on the Items per Page drop-down menu at the bottom-right of the page.
- Options are 25, 50, 100 (default), 150, or 200.
- The number of transactions that you can scroll through on the Detail Review & Correct page using Previous and Next buttons is determined by this setting.
- You can only use Next and Previous buttons to view items on one page at a time. If you select 25, you will only be able to scroll through 25 transactions using Next/Previous buttons. To view the next 25 transactions you will need to return to the list view and select a new page.
- The number selected here is retained when you navigate to different pages in nVoq Administrator and when you sign out and sign back in.
- This selection will also be used on all other pages in nVoq Administrator that have pagination.
- To the right of the Items per Page menu is the number of transactions currently displayed on the page next to the total number of transactions in the selected organization or that meet search criteria (e.g. 1-100 of 4227).
- You can navigate through the pages of transactions by using the arrows at the bottom-right of the page:
|⟨ (go to first page), ⟨ (go to previous page), ⟩ (go to next page), ⟩| (go to last page).
- You can navigate through the pages of transactions by using the arrows at the bottom-right of the page:
Review & Correct Page Columns
The columns that display on the page by default are: ID, Submit Time, Account, Organization, Word Count, Audio Length, Original Transcript Accuracy, Substituted Transcript Accuracy, Review Date, Reviewed By, Status, External ID, and the Actions menu. You can view additional columns and change the order in which they display in Customize Columns window (see below). Additional columns include: Audio Observations, client Product, Client Vendor, Client Version, Microphone, Queue Depth, Topic, Total Time, Upload Delay, and Username, each of which apply to dictation transactions only. See Available Columns for an explanation of information in all columns.
- Data in the list view can be sorted on any column by clicking on a column header. An arrow displays next to the column header currently used for sorting. By default accounts are sorted by Submit Time.
- Sorting of data in the list view is updated when a new column is selected or when a different organization is selected from the organization menu. These actions make a webservice call to the server to return data for all transactions in the selected organization.
- Page and scroll location in the list view is remembered and restored when going back to the Review & Correct page after viewing another page in nVoq Administrator.
Headset Icon / Checkbox
Hover your mouse over the headset icon![]() and click to put a checkmark in the box to select the transaction in order to download it using the download icon in the blue toolbar. Once selected, the row turns green and has a checkmark on the left.
and click to put a checkmark in the box to select the transaction in order to download it using the download icon in the blue toolbar. Once selected, the row turns green and has a checkmark on the left.
- You can select multiple transactions by clicking on the headset icon next to each one.
- You can select all transactions on the page by putting a checkmark in the box on the left side of the column headers (above the headset icons).
ID
The Item ID is a unique identifier assigned to each item, and it is a hyperlink that you can click to open the item detail screen. The first letter of the ID tells you what kind of activity it is:
C = Conversation dictation (multi-speaker)
D = Dictation (single-speaker)
S = Voice Shortcut
U = Popup shortcut
B = Sub-shortcut, a shortcut run by another shortcut
K = Keyword used to start or stop a hands free dictation or shortcut
Submit Time
The time when the transaction was submitted. This time stamp is based on the Time Zone that you selected on the nVoq Administrator Settings screen.
Account
The user's first and last name.
Organization
The user's group organization. (All users must belong to a group in order to use dictation and/or shortcuts.)
- Dictations submitted after the 18.1.0/18.1.1 deployment on your system (7/10/23 for Canada, 7/20/23 for Healthcare) are found under group to which the user belonged at the time of the dictation submittal.
- Dictations submitted prior to the 18.1.0/18.1.1 deployment on your system are all found under group to which the user belonged at the time of deployment. See Find an Item for more information.
Word Count
The number of words in the original audio that was sent to the dictation or matching servers.
"Words" for the sake of the word count is text separated by white spaces, not counting built-in formatting commands (like "new line"). Punctuation is not counted as a word either UNLESS the punctuation is the ONLY thing in the dictation (e.g. "question mark"), then that counts as one word. Substitutions are counted as the word or words that elicit the substitution and not the substituted text (e.g. "signature" would be counted as one word even if the substituted text was, "George Glass, Hospice RN").
- For dictations, the word count is calculated before substitutions are applied.
- For voice shortcuts, the word count is the number of words in the shortcut command.
- This field is not applicable to popup shortcuts or sub-shortcuts, which do not record any audio.
- Conversation dictations are processed through a different path than standard dictations. Because of this, the data shown regarding number of words is inaccurate.
Audio Length (sec)
Audio Length is the length in seconds of each recording. It is returned with two significant digits rather than rounding to a whole number (e.g. 5.73 instead of 6). This number is part of the calculation for Upload Delay on the dictation event Timeline .
- Audio length for a hands free keyword may be longer than just for the audio for the actual keyword phrase, if the user does not pause.
- Voice shortcut audio is shown as 0.
- This field is not applicable to popup shortcuts or sub-shortcuts, which do not record any audio.
Original Transcript Accuracy
After you correct and save a transcript, this column will include the accuracy score based on any corrections that were made. Open the item to view the corrections that were made.
The accuracy score in this column is calculated based on comparing text from the Original box to text in the the Corrected box on the item detail screen.
- The formula that is used to give the accuracy percentage is
(corrected length – number of errors)/corrected length = accuracy percentage - The calculation is word-based.
- Punctuation is considered part of a word.
- The comparison is case sensitive. Correcting the capitalization of a word negatively affects recognition accuracy.
- No value in this field indicates that no corrections were saved for the dictation.
Substituted Transcript Accuracy
After you correct and save a transcript, this column will include the accuracy score based on any corrections that were made. Open the item to view the corrections that were made.
The accuracy score in this column is calculated based on comparing text from the Substitution box to text in the the Corrected box on the item detail screen.
- The formula that is used to give the accuracy percentage is
(corrected length – number of errors)/corrected length = % - The substitution text is the transcript as it was returned to the user unless the user had substitutions turned off.
- Using acronyms and abbreviations as substitutions may reduce this score, where as using substitutions to remove disfluencies (such as "um", "uh", "er", etc.) may increase this score.
- Punctuation is considered part of a word.
- The comparison is case sensitive. Correcting the capitalization of a word negatively affects recognition accuracy.
- No value in this field indicates that no corrections were saved for the dictation
Review Date
This is the date when the transcript was corrected and then saved, or marked as poor quality. This time stamp is based on the Time Zone that you selected on the nVoq Administrator Settings screen.
Reviewed By
This field shows the username of the reviewer who either made corrections and then saved the item, or marked the item as poor quality.
Status
This field shows a graphical representation of the item's status or result. Hover the mouse over the icon to see a brief description of the status description.
![]() - These are dictation events that have a status of Corrected. (Note: A voice shortcut event could be given a status of corrected, but these recordings/transcripts are not used for accuracy improvement or scoring.)
- These are dictation events that have a status of Corrected. (Note: A voice shortcut event could be given a status of corrected, but these recordings/transcripts are not used for accuracy improvement or scoring.)
![]() - These are dictation events that have a status of Poor Quality. (Note: A voice shortcut event could be given a status of poor quality, but these recordings/transcripts are not used for accuracy improvement or scoring.)
- These are dictation events that have a status of Poor Quality. (Note: A voice shortcut event could be given a status of poor quality, but these recordings/transcripts are not used for accuracy improvement or scoring.)
![]() - These are voice shortcut events that have a result of No Match (words spoken/heard by the matching server did not match a shortcut name).
- These are voice shortcut events that have a result of No Match (words spoken/heard by the matching server did not match a shortcut name).
![]() - These are voice shortcut events that have a result of No Input (no audio detected).
- These are voice shortcut events that have a result of No Input (no audio detected).
![]() - These are events that have a result of Canceled. Dictations that were too short or too quiet are reported as a canceled. In some cases, audio may not be available because the server received the cancel request before the client uploaded any audio.
- These are events that have a result of Canceled. Dictations that were too short or too quiet are reported as a canceled. In some cases, audio may not be available because the server received the cancel request before the client uploaded any audio.
![]() - This icon appears when there is no audio for the item. It will appear for popup shortcut events (which have no recorded audio) as well as dictation events for which no audio was received. It could also appear if the audio was removed from the system because it is old, or if audio is not being saved for the group at all.
- This icon appears when there is no audio for the item. It will appear for popup shortcut events (which have no recorded audio) as well as dictation events for which no audio was received. It could also appear if the audio was removed from the system because it is old, or if audio is not being saved for the group at all.
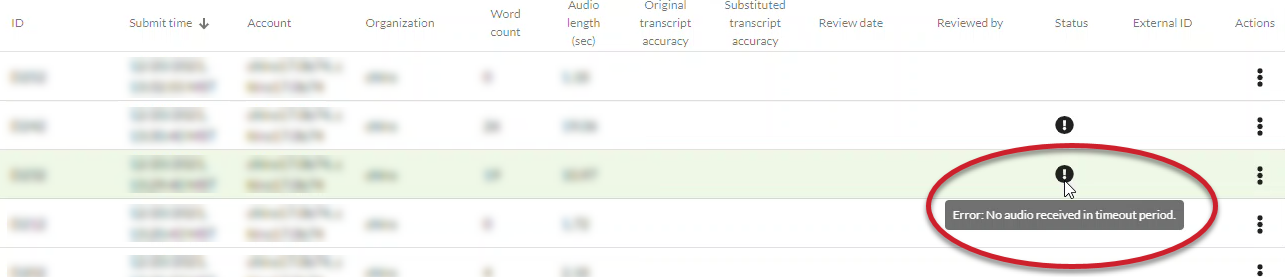
![]() - These are events that have the result of Error. To view error information:
- These are events that have the result of Error. To view error information:
Hover the mouse over the icon to see a brief description of the error.
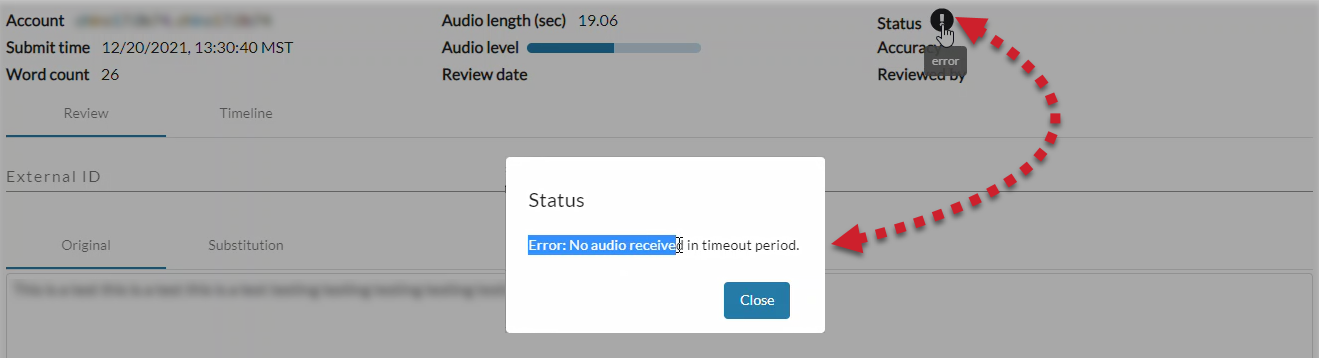
Double-click on the icon to open the Detail Review & Correct page where you can see error information that can be copied by clicking on the status icon at the top of the page.
Error Definitions
Some possible errors include:
- Audio arriving too slowly - The audio arrived at too slow a rate.
- Audio processing error - The audio file is corrupt. This could be a result of a frame that is poorly formed, or a WebM audio without a valid header. The dictation server canceled this dictation, so there is no audio or transcript.
- Audio too big - (WebSocket only) The audio upload exceeded the limit of 30 minutes for a regular dictation, or 3 hours for a Conversation dictation. When this error is sent, the dictation is ended and the session is closed with a close reason of
AUDIO_TOO_BIG. Breaking the audio into multiple, smaller dictations would be reasonable. (Note: The file server on the Tomcat handles this for HTTP.) - Error with Unrecognized Code -1 - There is no audio associated with the voice shortcut.
- Gateway encountered an error processing job - The dictation server gateway sent an HTTP dictation to a WebSocket server at the same time as the server was being shut down. When this occurs the client is sent a "Fatal server error" message.
- Grammar Compilation Failure (or Grammar Load Failure) - This error indicates that there is a shortcut containing forbidden characters in the user's account. A shortcut name with a space next to a hyphen (e.g. Oral- Pediatrics) will cause this error. The work-around is to edit the problem shortcut to remove the space next to the hyphen and save it. (Prior to the 18.1.0 release a shortcut name like this could be added via our API.)
- No audio available - The dictation server did not receive any audio data from the client. This can happen when there is a network connectivity issue, or if the client isn't sending audio for some reason.
The issue may also have to do with very short audio. For users of our API, a very short dictation might not get an audio buffer's worth of data, so might not send anything. Ogg data has a moderate sized header and we wait for that, but if your dictation client is using a smaller header and doesn't have much audio to go with it, it might not make our minimum size. If data is marked as "ogg" but isn't and the audio is short, it could be under our minimum size. - No audio received in timeout period - The dictation server did not receive audio before the timeout period (which is 30 seconds), after which the dictation was aborted. That could be caused by a network connectivity issue. A user dictating with Voice for Android or iOS would likely have received a message on their device stating, "Poor network connection. This may affect your dictation." before this issue occurred. For users of our API, this error would mean that there was no "Audio Done" message sent.
- No valid frames decoded before end of stream - The system received what it believed to be audio, but there was not enough information to process.
- Recognition Server Error – There is no audio associated with the voice shortcut.
- Session time exceeded - The server maintains a timer to avoid getting hung on a dictation that has run into a problem, or one that is excessively long. (For example, Ogg can compress periods of silence a lot more than 5 times.) The default is 120 minutes, but it is configurable (
sessionTimeoutMinutes). The dictation is canceled and marked as done (so it ends from the client's view) and is marked it with the error. - Socket closed unexpectedly - (WebSocket only) The session closed at a point the dictation server did not think it should. We allow the client to close when it likes as long as it specifies a reason of
NORMAL_CLOSURE (1000)orGOING_AWAY (1001). Any close after the dictation is complete is OK (we were closing anyway). If the close comes from the client or a network error, it is marked as an error. - Stopped dictation due to silence exceeding # seconds - After the number seconds of silence is detected in a dictation on the dictation server, the server stops processing the dictation and presents an error of
TOO_MUCH_SILENCE. The default is 180 seconds, but the actual error message lists the number configured for the server. At that point the client stops recording and pastes the transcript (if any). "Silence" in regards to this error means the absence of words, so could include noises and sounds that are not interpreted as words.- In Voice for Windows, the error displays as, "Low audio detected. Dictation stopped due to long period of silence."
- In the nVoq Wireless Microphone for Android, the error displays as, "Error encountered during dictation. Please try again."
- In the nVoq Wireless Microphone for iOS, the error displays as, "Long silence was detected. Please try again."
- In Voice for Android or iOS the error displays as, "Long silence detected. Please try again."
- Too Much Speech - There was too much audio for the matching server to process the voice shortcut.
- Unable to determine audio format - This could be an audio format that we don’t support, but could also be a request that failed to send audio data before the audio format could be determined. The server will wait 30 seconds for the Ogg header, and give up if it doesn't arrive within that timeframe.
- Unexpected termination - No audio data was received by the server because the client ended the transaction. Most likely this is because the request was canceled by the user.
External ID
The external identifier is an optional parameter that is usually supplied by an API voice client with each job request, and can be used to associate a dictation or shortcut with a particular patient encounter, customer record, etc.
- This field has a maximum of 63 characters and is displayed on the Review & Correct page table and in the Detail Review & Correct screen, where it can be edited.
- This information is displayed until it is deleted from the system. The length of time that it is saved is configurable on the Organizations page at the Group level on the Client Settings tab under Data Retention: Dictation Information.
Audio Observations
This column can be displayed in the list by selecting it in the Customize Columns window.
These are the observation tags added by a system level administrator on the Detail Review & Correct page. When this column is visible you can sort columns or use the Search field to view all transactions with a particular tag.
Client Product
This column can be displayed in the list by selecting it in the Customize Columns window.
This is the name of the client that was used to run the activity.
- If Voice for Windows was used, the field will say Voice-Windows
- If Voice for Android was used, the field will say nVoq Mobile Voice
- If Voice for iOS was used, the field will say Voice-iOS
- This field could also be populated for other client products using our APIs.
- If the Client Product name is more than 100 characters long it is truncated here to only 100 characters.
- This information is displayed until it is deleted from the system. The length of time that it is saved is configurable on the Organizations page at the Group level on the Client Settings tab under Data Retention: Dictation Information.
Client Vendor
This column can be displayed in the list by selecting it in the Customize Columns window.
This is the vendor of the client used to run the activity.
- If nVoq Voice was used, the field will say nVoq Incorporated
- This field could also be populated for other client vendors using our APIs.
- If the Client Vendor name is more than 100 characters long it is truncated here to only 100 characters.
- This information is displayed until it is deleted from the system. The length of time that it is saved is configurable on the Organizations page at the Group level on the Client Settings tab under Data Retention: Dictation Information.
Client Version
This column can be displayed in the list by selecting it in the Customize Columns window.
This is the version number of the client used to run the activity, for example, "16.1.0-9".
- This field could also be populated for other client products using our APIs.
- If the Client Version number is more than 100 characters long it is truncated here to only 100 characters.
- This information is displayed until it is deleted from the system. The length of time that it is saved is configurable on the Organizations page at the Group level on the Client Settings tab under Data Retention: Dictation Information.
Microphone
This column can be displayed in the list by selecting it in the Customize Columns window.
The microphone used to record a dictation or conversation. (Applies to single-speaker dictations or multi-speaker conversation only)
- If recorded with Voice and the Microphone setting in the client is configured as "Default," the words Default - Microphone (microphone name) will be displayed here. For example, if your computer's default microphone is a Plantronics Blackwire C210, this will display as, "Default - Microphone (Plantronics Blackwire C210)".
- If recorded on Voice for Windows and a preferred microphone (not "default") is configured on the Microphone setting in the client, the name of that microphone will be listed here, e.g. Microphone (Plantronics Blackwire C210).
- If recorded using the Wireless Microphone for Android, Android wMic Dictation will be displayed.
- If recorded using the Wireless Microphone for iOS, iOS wMic Dictation will be displayed.
- If recorded on Voice for Android, Android Keyboard will be displayed.
- If recorded on Voice for iOS, Voice-iOS will be displayed.
- If the name of the microphone is more than 100 characters long, such as Default - Microphone Array (Microphone Array (Intelligent® Sound Smarts Technology for Digital Microphones), it is truncated here to only 100 characters.
- Microphone information is displayed until it is deleted from the system. The length of time that it is saved is configurable on the Organizations page at the Group level on the Client Settings tab under Data Retention: Dictation Information.
Queue Depth
This column can be displayed in the list by selecting it in the Customize Columns window.
The number of items already in the queue and waiting to be picked up by the dictation server when the job was submitted. (Applies to HTTP dictations only.)
Topic
This column can be displayed in the list by selecting it in the Customize Columns window.
The dictation topic used for this dictation.
- Dictations recorded with Voice for Android Offline Mode are listed with the topic, "Offline."
- Dictations recorded using the Conversations feature are listed with the topic, "Conversations."
Total Time (ms)
This column can be displayed in the list by selecting it in the Customize Columns window.
The total time (in milliseconds) that elapsed between the time a dictation item was submitted to a dictation server and the time the item was completed by the dictation server.
Upload Delay
This column can be displayed in the list by selecting it in the Customize Columns window.
Upload Delay = the delta for Audio Set to Done - (Audio Length*1000)
This is the time between dictation start and audio done. Lower or negative numbers indicate faster audio upload time for dictations. Large positive values (like a 5-digit POSITIVE number, e.g. 20,000) indicate slow audio upload. A large number may indicate slowness on the customer’s internal system (like their WiFi), but it could be a problem on our end. If you see a large number, you should compare it to other users in that same group. (Is it happening for just one user? Or the whole group?) You should also pull the user’s dictation client log file and send that to nVoq Support.
Username
This column can be displayed in the list by selecting it in the Customize Columns window.
The user's username used to sign in to the account. Including this column is especially helpful if you have users with the same first and last name. Username will always be unique.
Actions
Click the Actions icon![]() to open the menu and select an action to take with an item.
to open the menu and select an action to take with an item.
- Open Item - Open the list item to listen to recordings and make corrections.You can also double-click on an item to open it.